NVR/Intelligent Motion Detection (IMD) Setup on NVR: Difference between revisions
From Luminys WIKI
Techsupport (talk | contribs) Created page with "<div class="lm-banner">File:LuminysMainPageBanner2.png</div> = <div class="center">Adding Devices to LumiViewer</div> = ===Description=== This tutorial will go over how to add devices to LumiViewer desktop app. ===Prerequisites=== * LumiViewer application installed on the computer. ===Video Instructions=== <youtube start="466">https://www.youtube.com/watch?v=t6_V0da8MXs</youtube> ===Step by Step Instructions=== 1. After logging into the NVR, access motion detec..." |
Techsupport (talk | contribs) |
||
| (5 intermediate revisions by the same user not shown) | |||
| Line 1: | Line 1: | ||
<div class="lm-banner">[[File:LuminysMainPageBanner2.png]]</div> | <div class="lm-banner">[[File:LuminysMainPageBanner2.png]]</div> | ||
= <div class="center"> | = <div class="center">Intelligent Motion Detection (IMD) Setup on NVR</div> = | ||
===Description=== | ===Description=== | ||
This tutorial will go over how to | This tutorial will go over how to setup motion detection and iMD on NVR. | ||
===Prerequisites=== | ===Prerequisites=== | ||
* | * The computer is able to access the NVR's web GUI. | ||
===Video Instructions=== | ===Video Instructions=== | ||
<youtube start="466">https://www.youtube.com/watch?v=t6_V0da8MXs</youtube> | <youtube start="466">https://www.youtube.com/watch?v=t6_V0da8MXs&t=2s&ab_channel=LuminysSystemsCorporation</youtube> | ||
===Step by Step Instructions=== | ===Step by Step Instructions=== | ||
| Line 18: | Line 18: | ||
[[File:Intelligent_Motion_Detection_(IMD)_Setup_on_NVR_1.png|1000px|link=https://wiki.luminyscorp.com/images/b/b7/Intelligent_Motion_Detection_%28IMD%29_Setup_on_NVR_1.png]] | [[File:Intelligent_Motion_Detection_(IMD)_Setup_on_NVR_1.png|1000px|link=https://wiki.luminyscorp.com/images/b/b7/Intelligent_Motion_Detection_%28IMD%29_Setup_on_NVR_1.png]] | ||
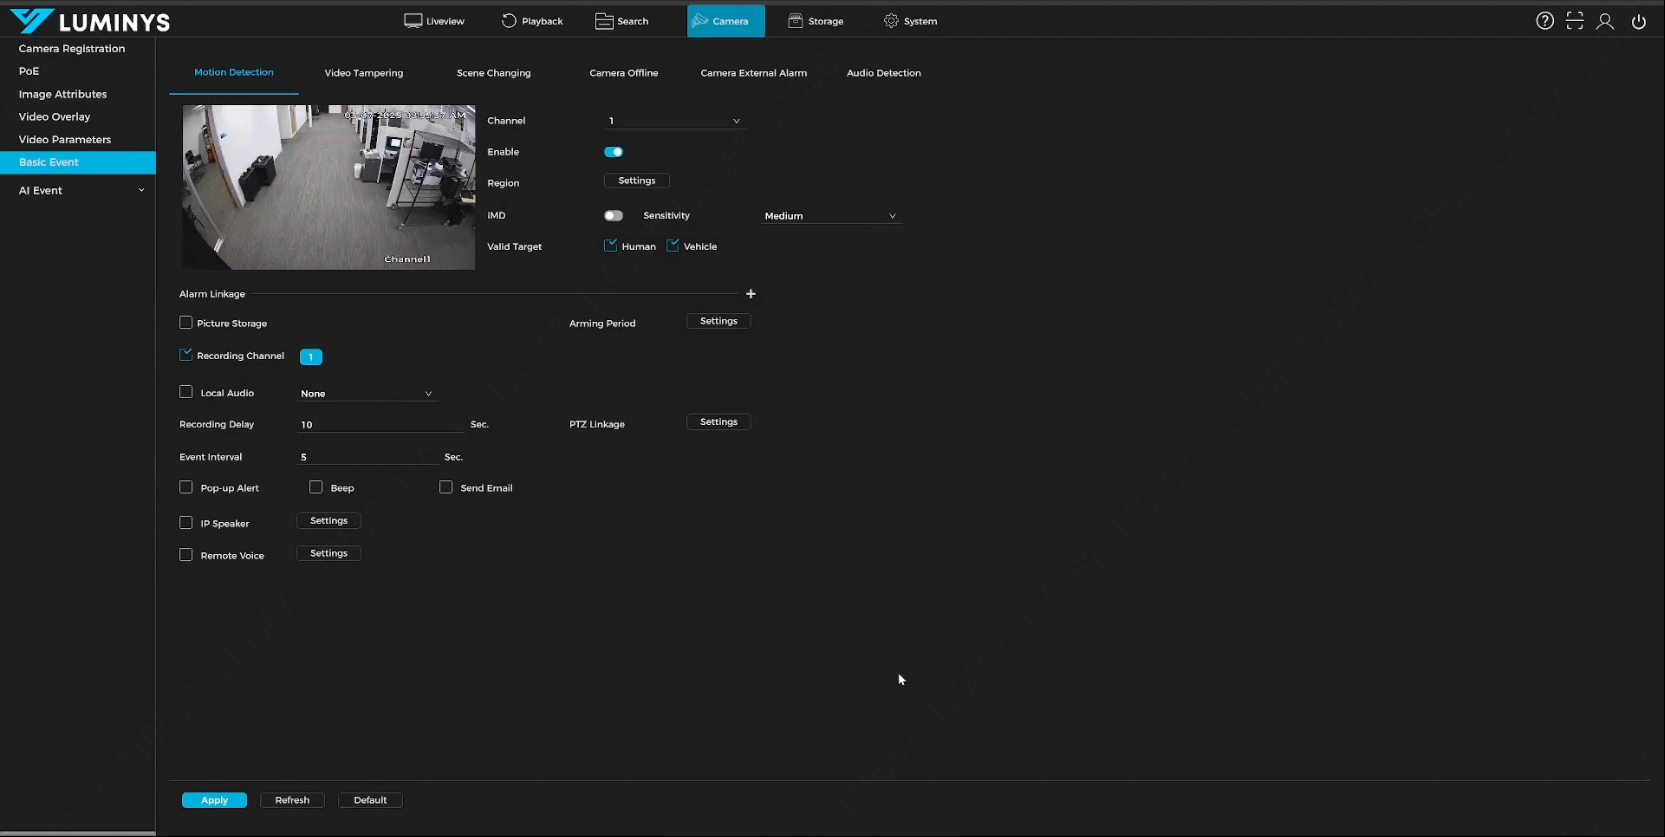
2. | 2. Each setting is explained below: | ||
{| class="wikitable" | {| class="wikitable" | ||
|- | |- | ||
| <span style=color:black;font-style:italic;font-weight:bold>Channel</span> || style="text-align:left;" | Displays a dropdown list when clicking the down arrow, showing the current camera channel. | | style="text-align:left;" | <span style=color:black;font-style:italic;font-weight:bold>Channel</span> || style="text-align:left;" | Displays a dropdown list when clicking the down arrow, showing the current camera channel. | ||
|- | |- | ||
| <span style=color:black;font-style:italic;font-weight:bold>Enable</span> || style="text-align:left;" | Turns motion detection on or off. | | style="text-align:left;" | <span style=color:black;font-style:italic;font-weight:bold>Enable</span> || style="text-align:left;" | Turns motion detection on or off. | ||
|- | |- | ||
| <span style=color:black;font-style:italic;font-weight:bold>Region</span> || style="text-align:left;" | Clicking “Settings” next to “Region” enlarges the image and allows grid editing, similar to the camera’s section. | | style="text-align:left;" | <span style=color:black;font-style:italic;font-weight:bold>Region</span> || style="text-align:left;" | Clicking “Settings” next to “Region” enlarges the image and allows grid editing, similar to the camera’s section. | ||
|- | |- | ||
| <span style=color:black;font-style:italic;font-weight:bold>iMD</span> || style="text-align:left;" | Enables target filtering for detecting only humans or motor vehicles. | | style="text-align:left;" | <span style=color:black;font-style:italic;font-weight:bold>iMD</span> || style="text-align:left;" | Enables target filtering for detecting only humans or motor vehicles. | ||
|- | |- | ||
| <span style=color:black;font-style:italic;font-weight:bold>Sensitivity</span> || style="text-align:left;" | Adjusts how frequently motion detection is triggered. | | style="text-align:left;" | <span style=color:black;font-style:italic;font-weight:bold>Sensitivity</span> || style="text-align:left;" | Adjusts how frequently motion detection is triggered. | ||
|- | |- | ||
| <span style=color:black;font-style:italic;font-weight:bold>Picture</span> || style="text-align:left;" | Saves images when motion detection occurs and can attach snapshots to emails when used with the “Send Email” feature. | | style="text-align:left;" | <span style=color:black;font-style:italic;font-weight:bold>Picture</span> || style="text-align:left;" | Saves images when motion detection occurs and can attach snapshots to emails when used with the “Send Email” feature. | ||
|- | |- | ||
| <span style=color:black;font-style:italic;font-weight:bold>Arming Period</span> || style="text-align:left;" | Defines schedules for motion detection activation based on specific dates and times. | | style="text-align:left;" | <span style=color:black;font-style:italic;font-weight:bold>Arming Period</span> || style="text-align:left;" | Defines schedules for motion detection activation based on specific dates and times. | ||
|- | |- | ||
| <span style=color:black;font-style:italic;font-weight:bold>Recording Channel</span> || style="text-align:left;" | Saves footage to the NVR. By default, each channel records to its designated channel. For example, if working on channel 1, the recording channel should also be set to channel 1. | | style="text-align:left;" | <span style=color:black;font-style:italic;font-weight:bold>Recording Channel</span> || style="text-align:left;" | Saves footage to the NVR. By default, each channel records to its designated channel. For example, if working on channel 1, the recording channel should also be set to channel 1. | ||
|- | |- | ||
| <span style=color:black;font-style:italic;font-weight:bold>Local Audio</span> || style="text-align:left;" | Uses an audio file stored on the NVR, if applicable, to play sound when motion detection is triggered. | | style="text-align:left;" | <span style=color:black;font-style:italic;font-weight:bold>Local Audio</span> || style="text-align:left;" | Uses an audio file stored on the NVR, if applicable, to play sound when motion detection is triggered. | ||
|- | |- | ||
| <span style=color:black;font-style:italic;font-weight:bold>Recording Delay</span> || style="text-align:left;" | Also known as post-recording, this setting determines how long recording continues after motion detection ends. | | style="text-align:left;" | <span style=color:black;font-style:italic;font-weight:bold>Recording Delay</span> || style="text-align:left;" | Also known as post-recording, this setting determines how long recording continues after motion detection ends. | ||
|- | |- | ||
| <span style=color:black;font-style:italic;font-weight:bold>Event Interval</span> || style="text-align:left;" | Defines the required time gap before motion detection can trigger again, also referred to as anti-dither. | | style="text-align:left;" | <span style=color:black;font-style:italic;font-weight:bold>Event Interval</span> || style="text-align:left;" | Defines the required time gap before motion detection can trigger again, also referred to as anti-dither. | ||
|- | |- | ||
| <span style=color:black;font-style:italic;font-weight:bold>Pop-up Alert</span> || style="text-align:left;" | Displays an alert on a monitor connected to the NVR via HDMI. | | style="text-align:left;" | <span style=color:black;font-style:italic;font-weight:bold>Pop-up Alert</span> || style="text-align:left;" | Displays an alert on a monitor connected to the NVR via HDMI. | ||
|- | |- | ||
| <span style=color:black;font-style:italic;font-weight:bold>Beep</span> || style="text-align:left;" | Produces an audible beep from the NVR when motion detection is triggered. | | style="text-align:left;" | <span style=color:black;font-style:italic;font-weight:bold>Beep</span> || style="text-align:left;" | Produces an audible beep from the NVR when motion detection is triggered. | ||
|- | |- | ||
| <span style=color:black;font-style:italic;font-weight:bold>Send Email</span> || style="text-align:left;" | Uses the NVR as an SMTP server to send email notifications upon motion detection. | | style="text-align:left;" | <span style=color:black;font-style:italic;font-weight:bold>Send Email</span> || style="text-align:left;" | Uses the NVR as an SMTP server to send email notifications upon motion detection. | ||
|- | |- | ||
| <span style=color:black;font-style:italic;font-weight:bold>IP Speaker</span> || style="text-align:left;" | If an IP speaker is connected to the NVR, it can be used to play messages when motion detection is triggered. | | style="text-align:left;" | <span style=color:black;font-style:italic;font-weight:bold>IP Speaker</span> || style="text-align:left;" | If an IP speaker is connected to the NVR, it can be used to play messages when motion detection is triggered. | ||
|- | |- | ||
| <span style=color:black;font-style:italic;font-weight:bold>Remote Voice</span> || style="text-align:left;" | Plays pre-recorded audio files upon motion detection, similar to the audio linkage feature in the camera’s web GUI. | | style="text-align:left;" | <span style=color:black;font-style:italic;font-weight:bold>Remote Voice</span> || style="text-align:left;" | Plays pre-recorded audio files upon motion detection, similar to the audio linkage feature in the camera’s web GUI. | ||
|} | |} | ||
[[File:Intelligent_Motion_Detection_(IMD)_Setup_on_NVR_2.png|1000px|link=https://wiki.luminyscorp.com/images/7/79/Intelligent_Motion_Detection_%28IMD%29_Setup_on_NVR_2.png]] | [[File:Intelligent_Motion_Detection_(IMD)_Setup_on_NVR_2.png|1000px|link=https://wiki.luminyscorp.com/images/7/79/Intelligent_Motion_Detection_%28IMD%29_Setup_on_NVR_2.png]] | ||
Latest revision as of 17:08, 12 March 2025

Intelligent Motion Detection (IMD) Setup on NVR
Description
This tutorial will go over how to setup motion detection and iMD on NVR.
Prerequisites
- The computer is able to access the NVR's web GUI.
Video Instructions
Step by Step Instructions
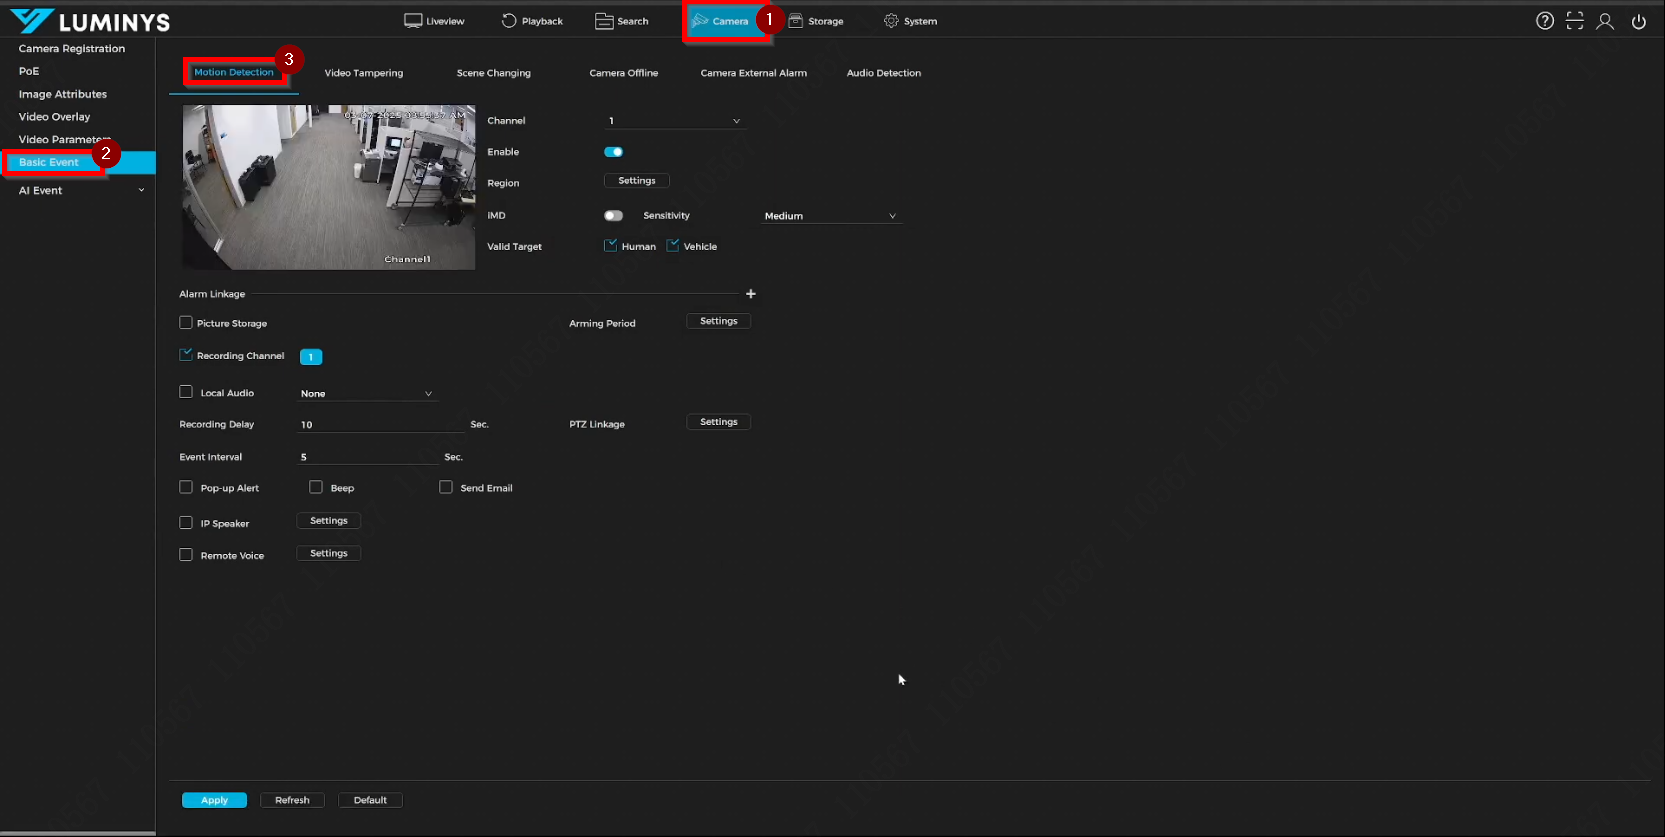
1. After logging into the NVR, access motion detection by selecting Camera > Basic Event > Motion Detection.
2. Each setting is explained below:
| Channel | Displays a dropdown list when clicking the down arrow, showing the current camera channel. |
| Enable | Turns motion detection on or off. |
| Region | Clicking “Settings” next to “Region” enlarges the image and allows grid editing, similar to the camera’s section. |
| iMD | Enables target filtering for detecting only humans or motor vehicles. |
| Sensitivity | Adjusts how frequently motion detection is triggered. |
| Picture | Saves images when motion detection occurs and can attach snapshots to emails when used with the “Send Email” feature. |
| Arming Period | Defines schedules for motion detection activation based on specific dates and times. |
| Recording Channel | Saves footage to the NVR. By default, each channel records to its designated channel. For example, if working on channel 1, the recording channel should also be set to channel 1. |
| Local Audio | Uses an audio file stored on the NVR, if applicable, to play sound when motion detection is triggered. |
| Recording Delay | Also known as post-recording, this setting determines how long recording continues after motion detection ends. |
| Event Interval | Defines the required time gap before motion detection can trigger again, also referred to as anti-dither. |
| Pop-up Alert | Displays an alert on a monitor connected to the NVR via HDMI. |
| Beep | Produces an audible beep from the NVR when motion detection is triggered. |
| Send Email | Uses the NVR as an SMTP server to send email notifications upon motion detection. |
| IP Speaker | If an IP speaker is connected to the NVR, it can be used to play messages when motion detection is triggered. |
| Remote Voice | Plays pre-recorded audio files upon motion detection, similar to the audio linkage feature in the camera’s web GUI. |