NVR/Doorbell event Setup on NVR: Difference between revisions
From Luminys WIKI
Techsupport (talk | contribs) No edit summary |
Techsupport (talk | contribs) No edit summary |
||
| (3 intermediate revisions by the same user not shown) | |||
| Line 1: | Line 1: | ||
<div class="lm-banner">[[File:LuminysMainPageBanner2.png]]</div> | <div class="lm-banner">[[File:LuminysMainPageBanner2.png]]</div> | ||
= <div class="center">Configure Doorbell event on NVR</div> = | = <div class="center">Configure Doorbell event on NVR (R3-A series only)</div> = | ||
===Description=== | ===Description=== | ||
This tutorial will go over how to configure Doorbell event on the NVR. | This tutorial will go over how to configure Doorbell event on the NVR (R3-A series only). | ||
===Prerequisites=== | ===Prerequisites=== | ||
| Line 24: | Line 24: | ||
[[File:NVR_db_alarm_3.png|1000px|link=https://wiki.luminyscorp.com/images/0/00/NVR_db_alarm_3.png]] | [[File:NVR_db_alarm_3.png|1000px|link=https://wiki.luminyscorp.com/images/0/00/NVR_db_alarm_3.png]] | ||
{| class="wikitable" | {| class="wikitable" style="text-align:left" | ||
! | ! Linkage !! Description | ||
|- | |- | ||
| Picture Storage || | | Picture Storage || Captures images when the doorbell is pressed and can include snapshots in emails when used with the “Send Email” feature. | ||
|- | |||
| Arming Period || Sets the time schedule that determines when linkage actions are active based on specified dates and times. | |||
|- | |||
| Recording Channel || Specifies which channel stores the video on the NVR. By default, each device records to its corresponding channel (e.g., channel 1 records to channel 1). | |||
|- | |||
| Local Audio || Plays a pre-recorded audio file stored on the NVR when the doorbell is pressed. | |||
|- | |||
| Alarm Output || Activates the NVR’s alarm output when the doorbell is pressed. | |||
|- | |||
| Recording Delay || Also called post-recording; defines how long recording continues after the doorbell is pressed. | |||
|- | |||
| PTZ Linkage || Triggers a linked PTZ camera to move to a preset position, such as focusing on the doorbell area when pressed. | |||
|- | |||
| Pop-up Alert || Shows a notification on a display connected to the NVR via HDMI. | |||
|- | |||
| Send Email || Sends email notifications through the NVR using configured SMTP settings. | |||
|- | |- | ||
|} | |} | ||
Latest revision as of 16:08, 22 June 2026

Configure Doorbell event on NVR (R3-A series only)
Description
This tutorial will go over how to configure Doorbell event on the NVR (R3-A series only).
Prerequisites
- Adding Video Doorbell to NVR
- Access the WebUI of the NVR
Step by Step Instructions
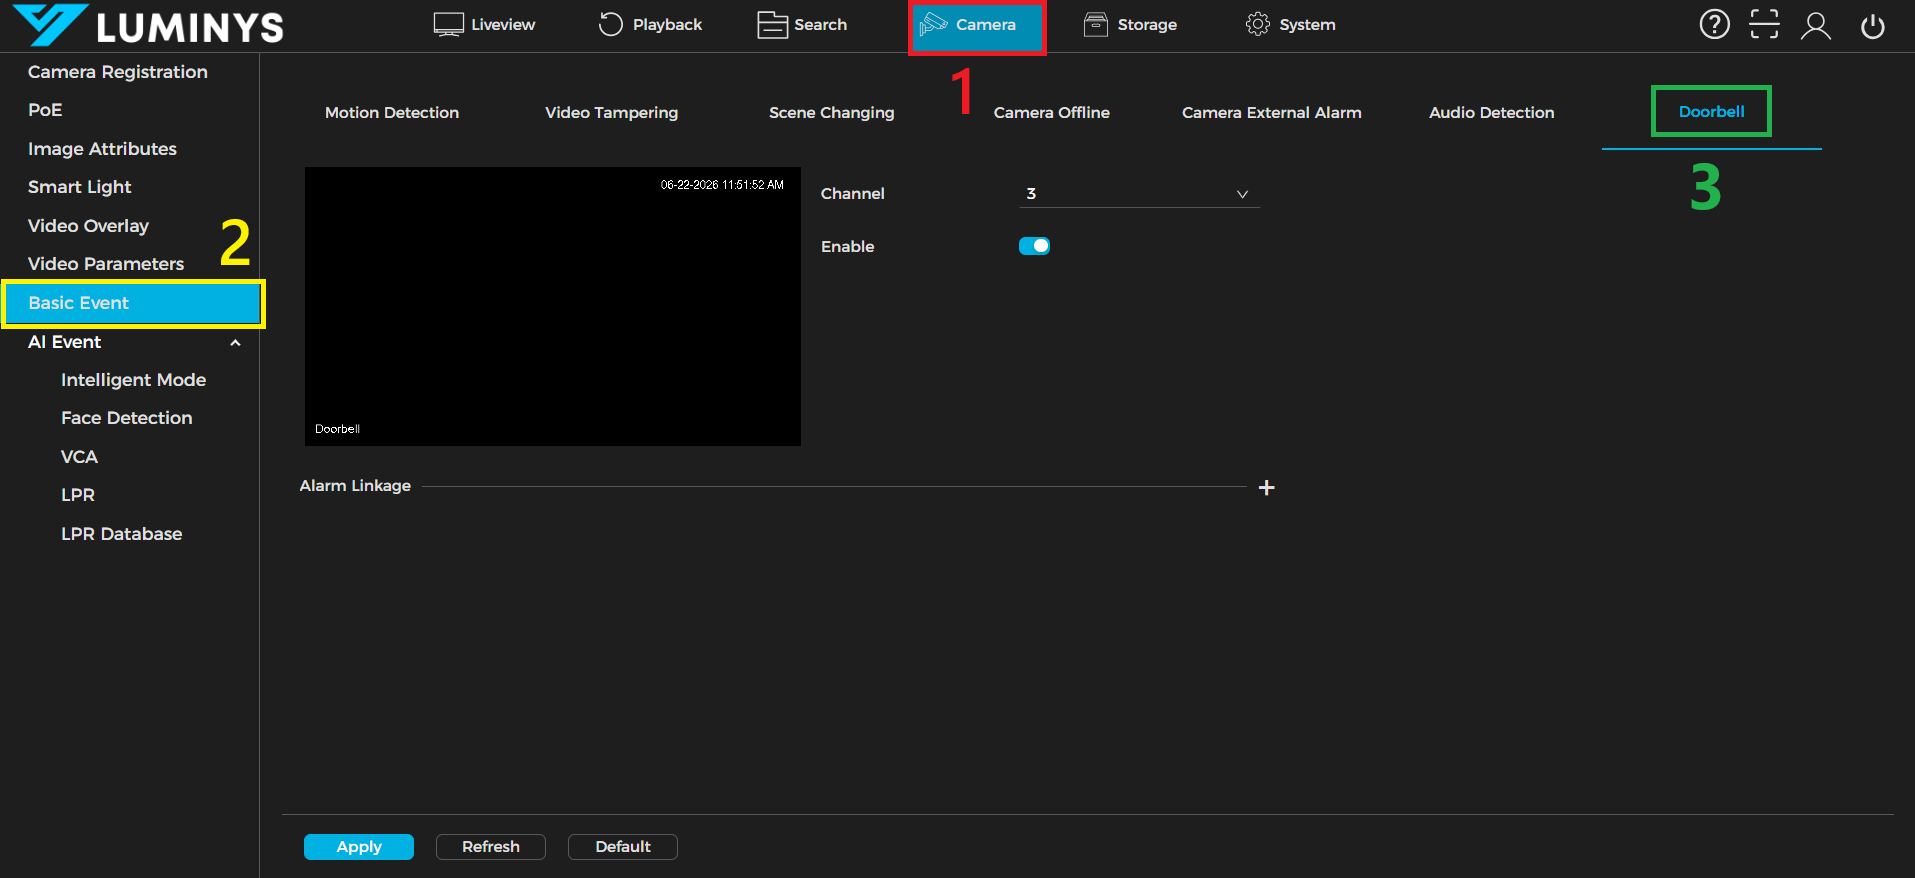
1. From the NVR WebUI, click the Camera (1) tab, then select Basic event (2) from the left panel. Locate the Doorbell subtab (3).
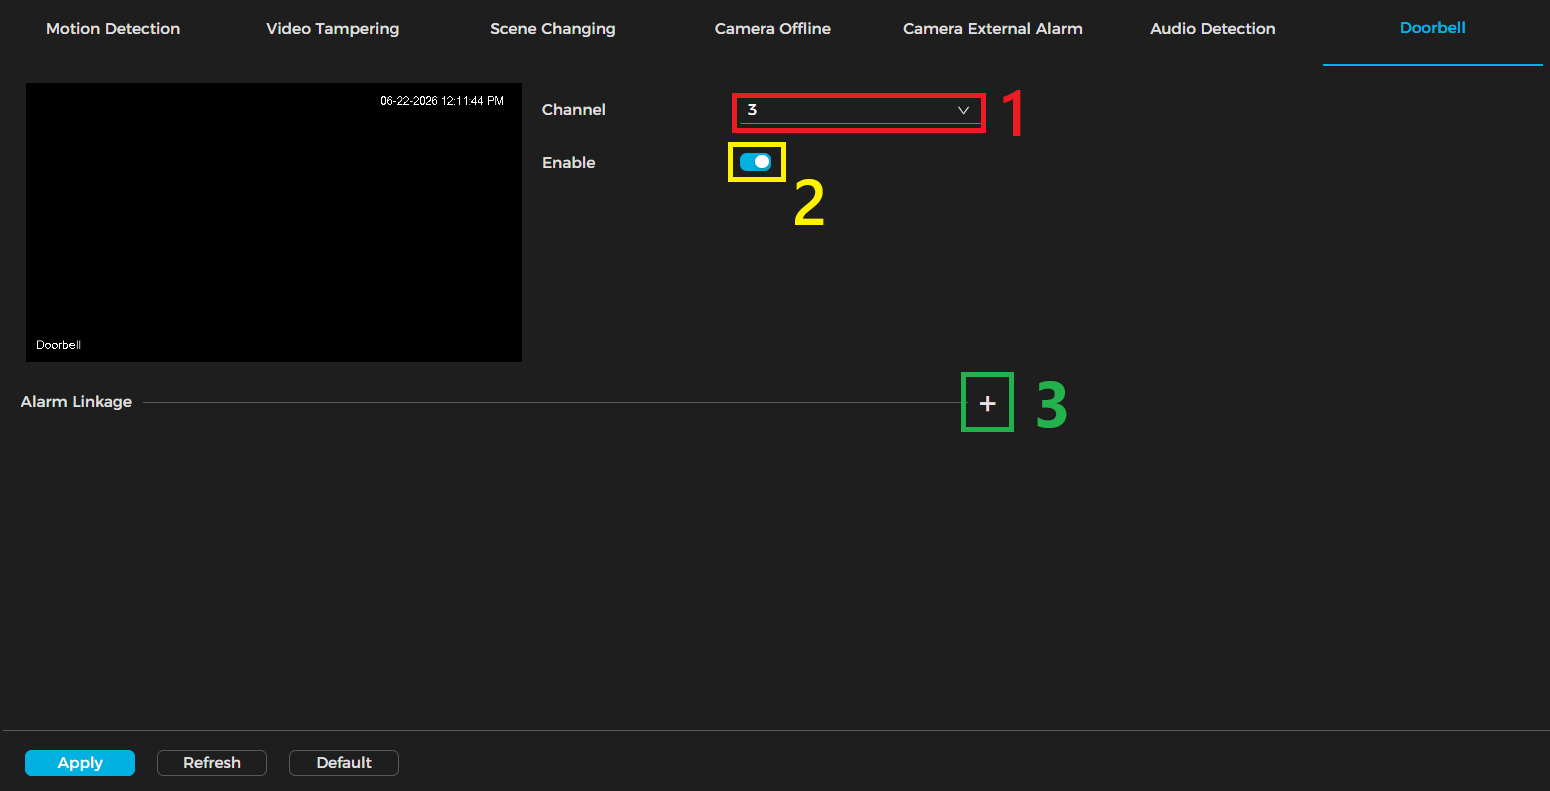
2. Click the Channel dropdown (1) and select the channel you connected the doorbell to. Then, enable the toggle switch (2) to activate the alarm function. After that, click the Alarm Linkage plus sign (3) to expand the linkage menu.
3. Configure all linkages, then click Apply.
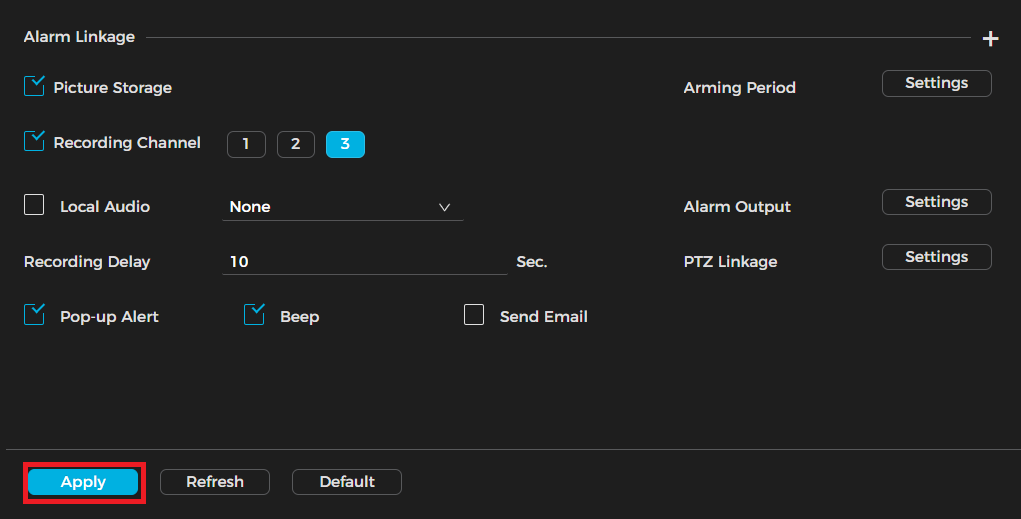
| Linkage | Description |
|---|---|
| Picture Storage | Captures images when the doorbell is pressed and can include snapshots in emails when used with the “Send Email” feature. |
| Arming Period | Sets the time schedule that determines when linkage actions are active based on specified dates and times. |
| Recording Channel | Specifies which channel stores the video on the NVR. By default, each device records to its corresponding channel (e.g., channel 1 records to channel 1). |
| Local Audio | Plays a pre-recorded audio file stored on the NVR when the doorbell is pressed. |
| Alarm Output | Activates the NVR’s alarm output when the doorbell is pressed. |
| Recording Delay | Also called post-recording; defines how long recording continues after the doorbell is pressed. |
| PTZ Linkage | Triggers a linked PTZ camera to move to a preset position, such as focusing on the doorbell area when pressed. |
| Pop-up Alert | Shows a notification on a display connected to the NVR via HDMI. |
| Send Email | Sends email notifications through the NVR using configured SMTP settings. |