Template:LumiGuardian Troubleshooting Added Luminys Cameras: Difference between revisions
Techsupport (talk | contribs) Created page with "===Step by Step Instructions=== If you have connected Luminys cameras to the LumiGuardian Solar Trailer and they are not showing up in LumiCloud, follow the below steps: <br><br> 1. Log into the user account that has the LumiGuardian Solar Trailer added to it. <br>Click on the Device Type option at the top left. <br>Select '''Solar Trailer''' 1200px 2. Select '''Solar Device''' on the left. <br>Click on '''Settings''' n..." |
Techsupport (talk | contribs) |
||
| (4 intermediate revisions by the same user not shown) | |||
| Line 19: | Line 19: | ||
4. You will be automatically logged into the Solar Trailer's web interface. | 4. You will be automatically logged into the Solar Trailer's web interface. | ||
<br>Click on ''' | <br>Click on '''Camera''' | ||
[[File: | [[File:LumiGuardianTroubleshootAddedCameras_260717_1.png|1200px|link=]] | ||
5. Click on '''Camera | 5. Click on '''Camera Registration''' on the left panel. | ||
[[File: | [[File:LumiGuardianTroubleshootAddedCameras_260717_2.png|1200px|link=]] | ||
6. Check the list of added cameras | 6. Check the list of added cameras. If any of them are not connected properly to the Solar Trailer, they will show a red dot under '''Status'''<span style = "color:red">(1)</span>. | ||
<br>Click on the Pencil Icon under '''Edit''' for one of the Luminys cameras having connection issues. | <br>Click on the Pencil Icon <span style = "color:green">(2)</span>under '''Edit''' for one of the Luminys cameras having connection issues. | ||
[[File: | [[File:LumiGuardianTroubleshootAddedCameras_260717_3.png|1200px|link=]] | ||
7. Click on the drop-down next to ''' | 7. Click on the drop-down next to '''Protocol''' | ||
[[File: | [[File:LumiGuardianTroubleshootAddedCameras_260717_4.png|400px|link=]] | ||
8. Select ''' | 8. Select '''Private''' for the protocol under '''Protocol'''. | ||
<br>Enter the username for the camera in the field next to '''Username'''. | <br>Enter the username for the camera in the field next to '''Username'''. | ||
<br>Enter the password for the camera in the field next to '''Password'''. | <br>Enter the password for the camera in the field next to '''Password'''. | ||
<br>Click on '''OK''' at the bottom | <br>Click on '''OK''' at the bottom | ||
[[File: | [[File:LumiGuardianTroubleshootAddedCameras_260717_5.png|400px|link=]] | ||
9. If the camera is connected correctly, the red dot should change to a green dot under '''Status''' for the camera. | 9. If the camera is connected correctly, the red dot should change to a green dot under '''Status''' for the camera. | ||
<br>Verify that it says ''' | <br>Verify that it says '''Private''' under '''Protocol''' for the camera. | ||
<br>Repeat steps 6-9 for any other Luminys cameras that are having connection issues and the Manufacturer is not set to '''Smart''' | <br>Repeat steps 6-9 for any other Luminys cameras that are having connection issues and the Manufacturer is not set to '''Smart''' | ||
[[File: | [[File:LumiGuardianTroubleshootAddedCameras_260717_6.png|1200px|link=]] | ||
10. | 10. From the current screen, navigate to System <span style = "color:red">(1)</span> > General <span style = "color:green">(2)</span> > Date Settings <span style = "color:yellow; background:black">(3)</span>. | ||
<br>Click on '''Advanced Settings''' | <br>Click on '''Advanced Settings''' | ||
[[File: | [[File:LumiGuardianTroubleshootAddedCameras_260717_7.png|1200px|link=]] | ||
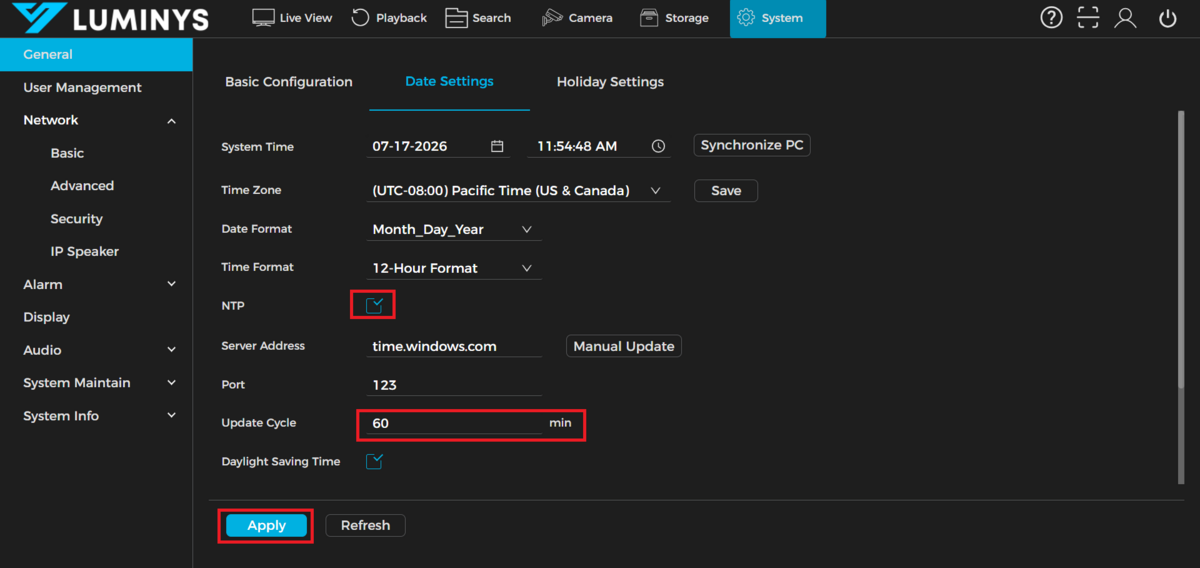
11. Check the box next to '''NTP'''. | |||
<br>Enter '''60''' in the field next to ''' | <br>Enter '''60''' in the field next to '''Update Cycle'''. | ||
<br>Click on '''Apply''' at the bottom | <br>Click on '''Apply''' at the bottom | ||
[[File: | [[File:LumiGuardianTroubleshootAddedCameras_260717_8.png|1200px|link=]] | ||
12. Once the changes have been saved, you will see '''Operation succeeded''' at the top | |||
[[File: | [[File:LumiGuardianTroubleshootAddedCameras_260717_9.png|1200px|link=]] | ||
Latest revision as of 15:12, 17 July 2026
Step by Step Instructions
If you have connected Luminys cameras to the LumiGuardian Solar Trailer and they are not showing up in LumiCloud, follow the below steps:
1. Log into the user account that has the LumiGuardian Solar Trailer added to it.
Click on the Device Type option at the top left.
Select Solar Trailer

2. Select Solar Device on the left.
Click on Settings next to the Solar Trailer

3. Click on Device Management at the top

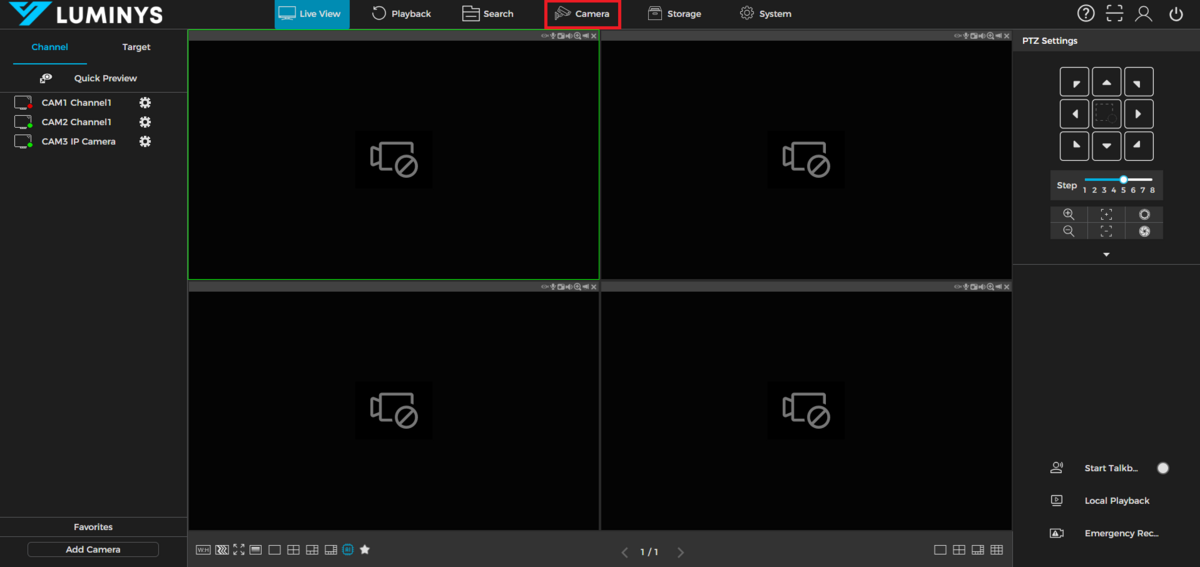
4. You will be automatically logged into the Solar Trailer's web interface.
Click on Camera
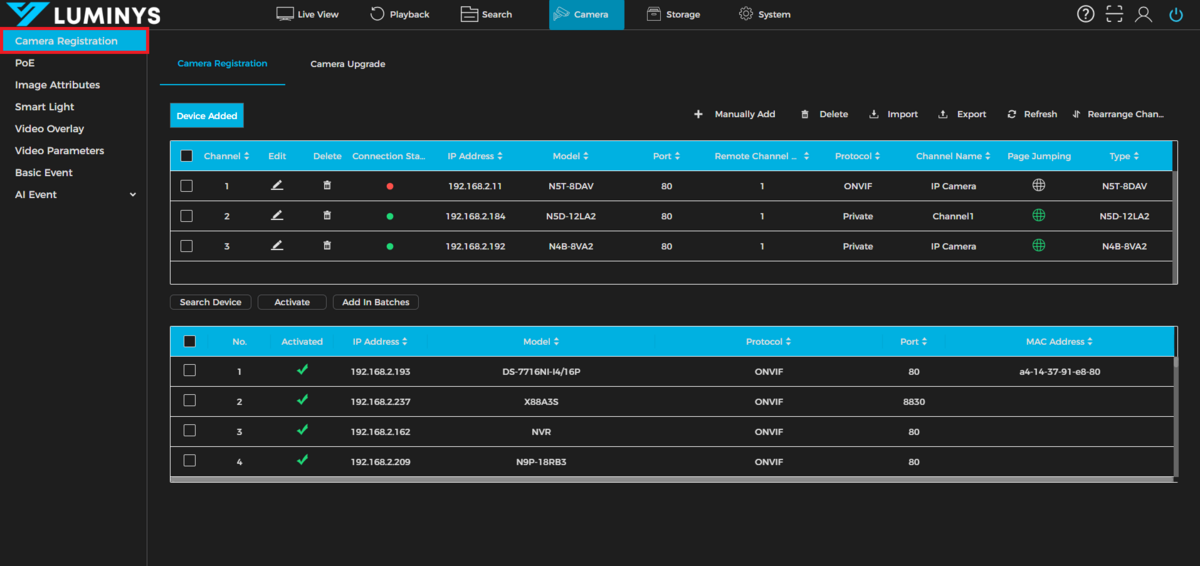
5. Click on Camera Registration on the left panel.
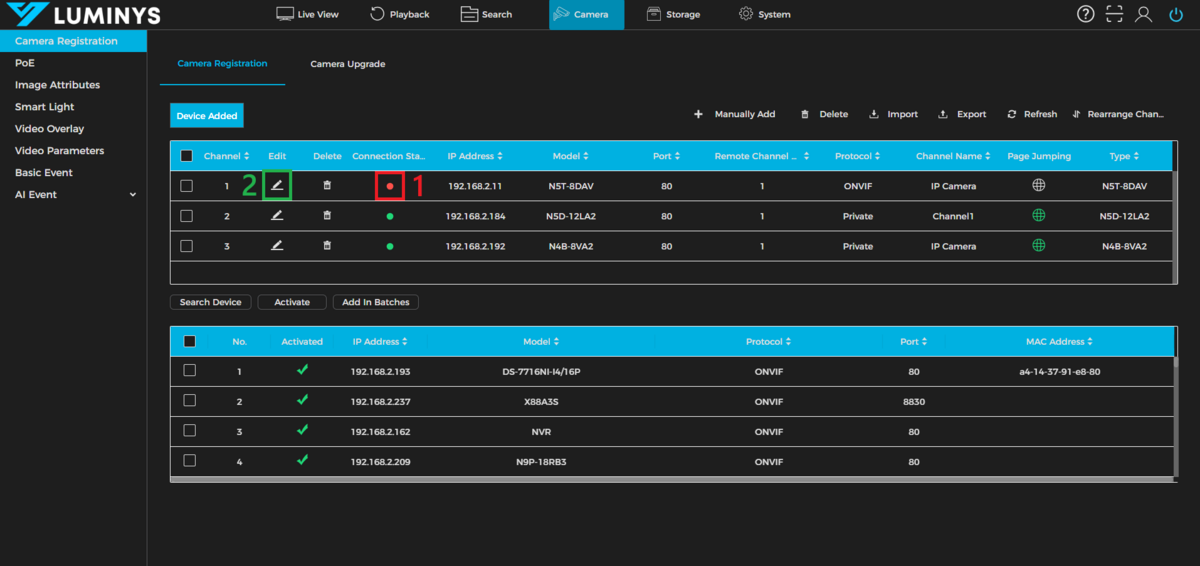
6. Check the list of added cameras. If any of them are not connected properly to the Solar Trailer, they will show a red dot under Status(1).
Click on the Pencil Icon (2)under Edit for one of the Luminys cameras having connection issues.
7. Click on the drop-down next to Protocol
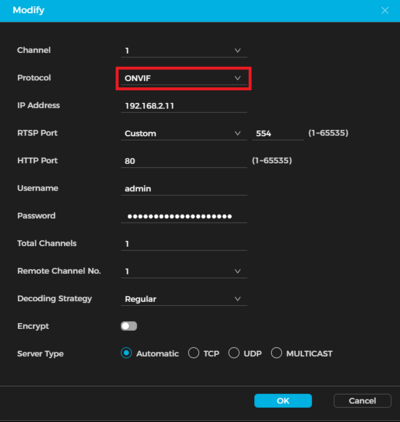
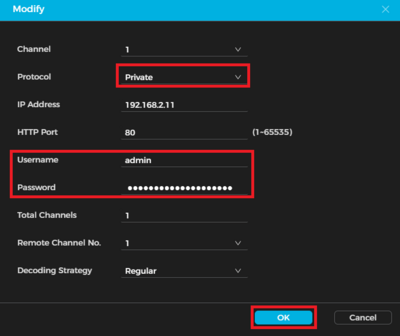
8. Select Private for the protocol under Protocol.
Enter the username for the camera in the field next to Username.
Enter the password for the camera in the field next to Password.
Click on OK at the bottom
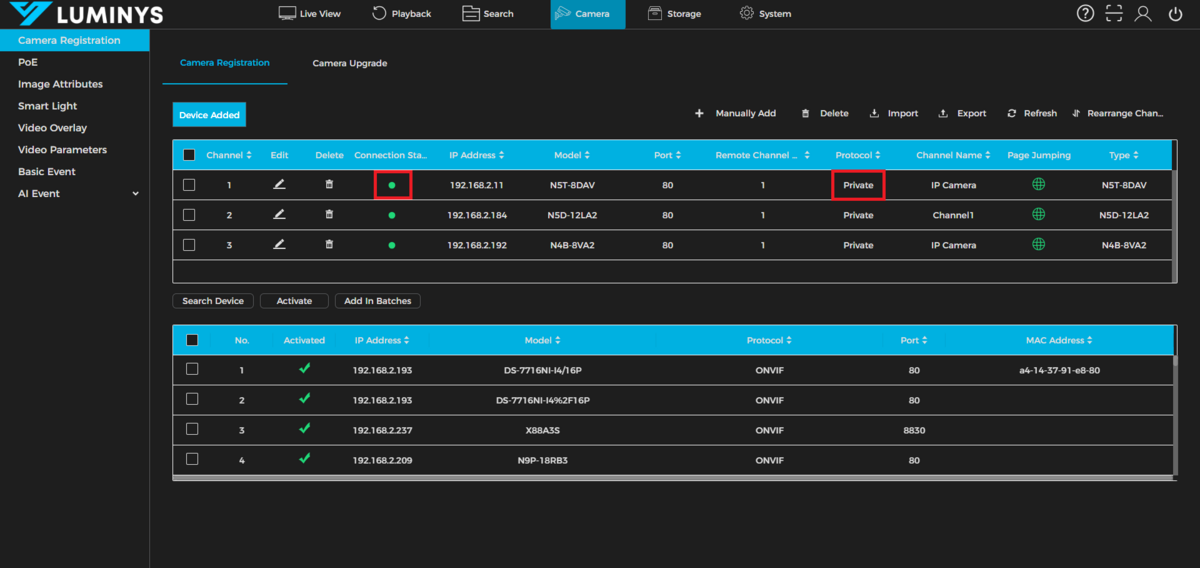
9. If the camera is connected correctly, the red dot should change to a green dot under Status for the camera.
Verify that it says Private under Protocol for the camera.
Repeat steps 6-9 for any other Luminys cameras that are having connection issues and the Manufacturer is not set to Smart
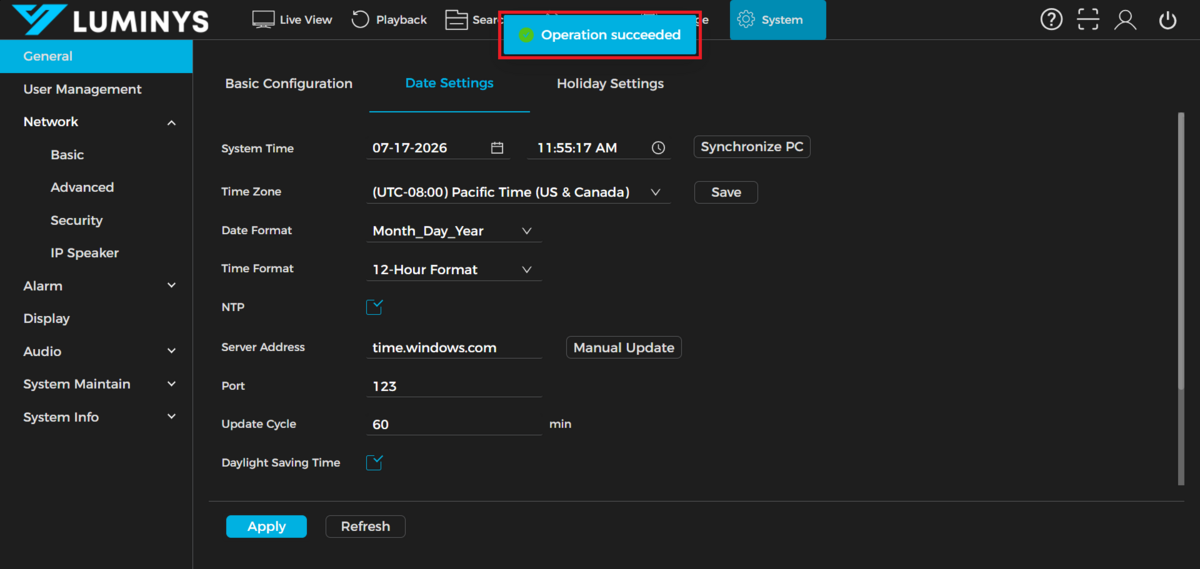
10. From the current screen, navigate to System (1) > General (2) > Date Settings (3).
Click on Advanced Settings
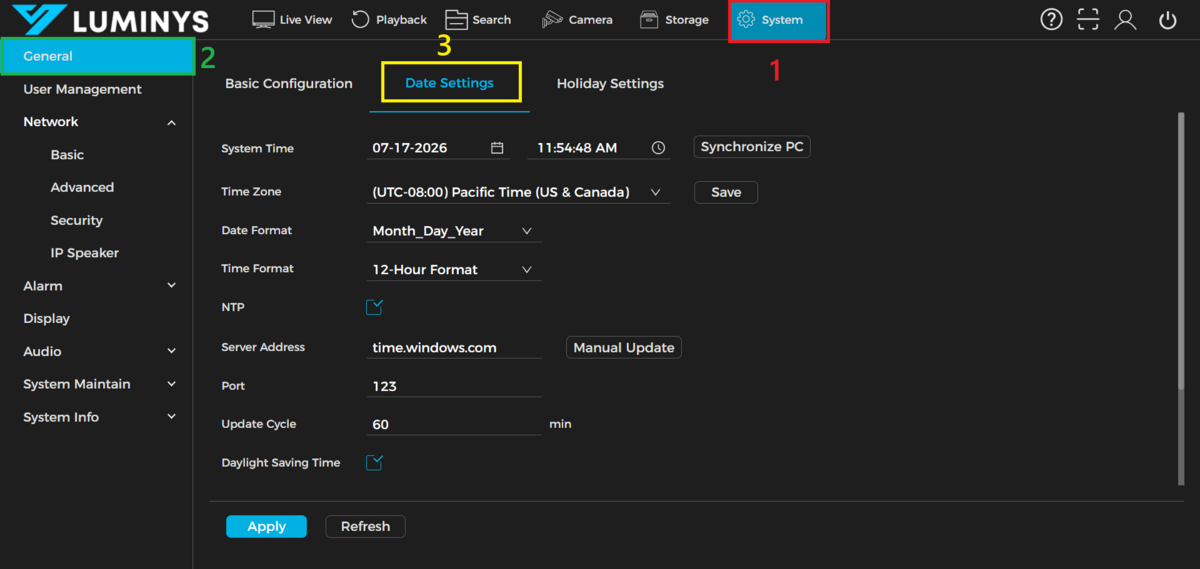
11. Check the box next to NTP.
Enter 60 in the field next to Update Cycle.
Click on Apply at the bottom
12. Once the changes have been saved, you will see Operation succeeded at the top