LumiCenter/Installation and Launching the Client: Difference between revisions
Techsupport (talk | contribs) No edit summary |
Techsupport (talk | contribs) No edit summary |
||
| (6 intermediate revisions by the same user not shown) | |||
| Line 1: | Line 1: | ||
== | <div class="lm-banner">[[File:LuminysMainPageBanner2.png]]</div> | ||
= <div class="center">Installation and Launching the Client</div> = | |||
==Prerequisites== | ==Prerequisites== | ||
* LumiCenter software on the computer being used as a server. | * LumiCenter software on the computer being used as a server. | ||
===Video Instructions=== | |||
<youtube>https://www.youtube.com/watch?v=auOwmh3vIf8</youtube> | |||
==Step by Step Instructions== | ==Step by Step Instructions== | ||
| Line 9: | Line 13: | ||
1. Download and unzip LumiCenter. | 1. Download and unzip LumiCenter. | ||
[[File:1._Unzip_LumiCenter.png | | [[File:1._Unzip_LumiCenter.png|1000px|link=https://wiki.luminyscorp.com/images/c/ce/1._Unzip_LumiCenter.png]] | ||
2. Double-click on the "setup.exe" file inside the unzipped LumiCenter folder to start the installation process. | 2. Double-click on the "setup.exe" file inside the unzipped LumiCenter folder to start the installation process. | ||
[[File:2._Click_Setup.png | | [[File:2._Click_Setup.png|1000px|link=https://wiki.luminyscorp.com/images/1/1c/2._Click_Setup.png]] | ||
3. If a pop-up appears stating that the Publisher is unknown, this is normal. Click "Yes" to proceed with the installation. | 3. If a pop-up appears stating that the Publisher is unknown, this is normal. Click "Yes" to proceed with the installation. | ||
[[File:3._Click_Yes_on_Unknown_Publisher.png | | [[File:3._Click_Yes_on_Unknown_Publisher.png|500px|link=https://wiki.luminyscorp.com/images/2/23/3._Click_Yes_on_Unknown_Publisher.png]] | ||
4. Select the desired language for the installation. | 4. Select the desired language for the installation. | ||
[[File:4._Choose_Language_For_Installation.png | | [[File:4._Choose_Language_For_Installation.png|1000px|link=https://wiki.luminyscorp.com/images/a/ae/4._Choose_Language_For_Installation.png]] | ||
5. Three installation options are available. The "Enable full installation log" option can be turned on or off, depending on whether viewing the installation logs is preferred. | 5. Three installation options are available. The "Enable full installation log" option can be turned on or off, depending on whether viewing the installation logs is preferred. | ||
| Line 41: | Line 45: | ||
## Access and permissions are determined by the administrator. | ## Access and permissions are determined by the administrator. | ||
[https://wiki.luminyscorp.com/images/d/d7/5._Choose_One_of_the_Three_Option_to_Install.png | [[File:5._Choose_One_of_the_Three_Option_to_Install.png|1000px|link=https://wiki.luminyscorp.com/images/d/d7/5._Choose_One_of_the_Three_Option_to_Install.png]] | ||
6. To log all installation-related events, select the "Enable full installation log" checkbox (note that this may increase the installation time). | 6. To log all installation-related events, select the "Enable full installation log" checkbox (note that this may increase the installation time). | ||
| Line 47: | Line 51: | ||
<span style=color:black;font-style:italic;font-weight:bold>Note: </span>The installation process may take some time to complete, depending on the hardware of the computer being used. | <span style=color:black;font-style:italic;font-weight:bold>Note: </span>The installation process may take some time to complete, depending on the hardware of the computer being used. | ||
[[File: | [[File:6._Checkbox_For_Installation_Log.png|1000px|link=https://wiki.luminyscorp.com/images/4/42/6._Checkbox_For_Installation_Log.png]] | ||
7. By default, the installation will automatically select the necessary components for LumiCenter to function properly (most checkboxes should already be selected). Guardant drivers are typically used for electronic dongle-based licensing and are not required for regular usage. | 7. By default, the installation will automatically select the necessary components for LumiCenter to function properly (most checkboxes should already be selected). Guardant drivers are typically used for electronic dongle-based licensing and are not required for regular usage. | ||
[[File:7.1._Select_Components_to_Install.png|1000px|link=https://wiki.luminyscorp.com/images/8/89/7.1._Select_Components_to_Install.png]] | |||
<span style=color:black;font-style:italic;font-weight:bold>Note: </span>After clicking "Install," a series of components will be installed, and this process may take some time to complete. | <span style=color:black;font-style:italic;font-weight:bold>Note: </span>After clicking "Install," a series of components will be installed, and this process may take some time to complete. | ||
[[File: | [[File:7.2._Installing_PostgreSQL.png|1000px|link=https://wiki.luminyscorp.com/images/a/a1/7.2._Installing_PostgreSQL.png]] | ||
[[File: | |||
[[File: | [[File:7.3._Installing_LumiCenter_Detector_Pack.png|1000px|link=https://wiki.luminyscorp.com/images/8/81/7.3._Installing_LumiCenter_Detector_Pack.png]] | ||
[[File:7.4._Installing_VMS_Drivers_Pack.png|1000px|link=https://wiki.luminyscorp.com/images/6/68/7.4._Installing_VMS_Drivers_Pack.png]] | |||
8. After all components have been installed, a pop-up window will appear to proceed with installing the LumiCenter software. | 8. After all components have been installed, a pop-up window will appear to proceed with installing the LumiCenter software. | ||
[[File: | [[File:8._Installing_LumiCenter_Software.png|1000px|link=https://wiki.luminyscorp.com/images/d/dc/8._Installing_LumiCenter_Software.png]] | ||
9. Click “I accept the terms of the License Agreement” to continue. | 9. Click “I accept the terms of the License Agreement” to continue. | ||
[[File: | [[File:9._Agree_to_Terms_and_License_Agreement.png|1000px|link=https://wiki.luminyscorp.com/images/3/32/9._Agree_to_Terms_and_License_Agreement.png]] | ||
10. By default, the syslog database and metadata database will be installed in the C:\LumiCenterData\ folder. Alternatively, another location can be selected for the installation folder. | 10. By default, the syslog database and metadata database will be installed in the C:\LumiCenterData\ folder. Alternatively, another location can be selected for the installation folder. | ||
| Line 69: | Line 77: | ||
<span style=color:black;font-style:italic;font-weight:bold>Note: </span>Due to the large amount of data involved, it is recommended to select a different disk for data storage. | <span style=color:black;font-style:italic;font-weight:bold>Note: </span>Due to the large amount of data involved, it is recommended to select a different disk for data storage. | ||
[[File: | [[File:10._Installation_Path_For_Syslog_Database_and_Metadata_Database.png|1000px|link=https://wiki.luminyscorp.com/images/5/54/10._Installation_Path_For_Syslog_Database_and_Metadata_Database.png]] | ||
11. Choose “Standard” installation as the recommended option. | 11. Choose “Standard” installation as the recommended option. | ||
[[File: | [[File:11._Standard_Installation_as_Recommended_Option.png|1000px|link=https://wiki.luminyscorp.com/images/6/67/11._Standard_Installation_as_Recommended_Option.png]] | ||
12. If this is the first time installing LumiCenter at this location, select "Create new domain and add server to it." If an existing domain has already been created by another LumiCenter server, choose "Add server to domain later." | 12. If this is the first time installing LumiCenter at this location, select "Create new domain and add server to it." If an existing domain has already been created by another LumiCenter server, choose "Add server to domain later." | ||
[[File: | [[File:12._Create_New_Domain_And_Add_Server_to_It.png|1000px|link=https://wiki.luminyscorp.com/images/3/3f/12._Create_New_Domain_And_Add_Server_to_It.png]] | ||
13. Verify that the following setup options are correct before proceeding. | 13. Verify that the following setup options are correct before proceeding. | ||
[[File: | [[File:13._Confirmation_Setup_Before_Proceeding_Further.png|1000px|link=https://wiki.luminyscorp.com/images/e/ee/13._Confirmation_Setup_Before_Proceeding_Further.png]] | ||
14. Wait for the installation to complete. | 14. Wait for the installation to complete. | ||
[[File: | [[File:14._Wait_for_Installation_Process_to_Complete.png|1000px|link=https://wiki.luminyscorp.com/images/0/09/14._Wait_for_Installation_Process_to_Complete.png]] | ||
15. A pop-up window will appear once the installation is complete. The initial login for LumiCenter will be as follows:<br> | 15. A pop-up window will appear once the installation is complete. The initial login for LumiCenter will be as follows:<br> | ||
| Line 91: | Line 99: | ||
Password: root | Password: root | ||
[[File: | [[File:15._Installation_Complete.png|1000px|link=https://wiki.luminyscorp.com/images/0/0f/15._Installation_Complete.png]] | ||
16. After clicking "Finish" on the previous pop-up window, another window will appear, showing which components were selected and installed based on the previous choices. | 16. After clicking "Finish" on the previous pop-up window, another window will appear, showing which components were selected and installed based on the previous choices. | ||
[[File: | [[File:16._Completion_of_Component_State_From_Previous_Selection.png|1000px|link=https://wiki.luminyscorp.com/images/1/14/16._Completion_of_Component_State_From_Previous_Selection.png]] | ||
17. The LumiCenter icon will appear on the computer’s desktop once the installation is complete. | 17. The LumiCenter icon will appear on the computer’s desktop once the installation is complete. | ||
[[File: | [[File:17._LumiCenter_Icon_on_Desktop.png|1000px|link=https://wiki.luminyscorp.com/images/6/60/17._LumiCenter_Icon_on_Desktop.png]] | ||
18. After LumiCenter is installed, double-click the icon on the desktop to launch the client software. A pop-up window will prompt for login. The initial username and password for LumiCenter are both "root." After entering these credentials and clicking "Connect," another window will appear, asking to create a new password. | 18. After LumiCenter is installed, double-click the icon on the desktop to launch the client software. A pop-up window will prompt for login. The initial username and password for LumiCenter are both "root." After entering these credentials and clicking "Connect," another window will appear, asking to create a new password. | ||
| Line 105: | Line 113: | ||
<span style=color:black;font-style:italic;font-weight:bold>Note: </span>If there are issues creating the new password, hover over the red exclamation mark to view the password requirements. | <span style=color:black;font-style:italic;font-weight:bold>Note: </span>If there are issues creating the new password, hover over the red exclamation mark to view the password requirements. | ||
[[File: | [[File:18._Launching_LumiCenter_and_Create_New_Password.png|1000px|link=https://wiki.luminyscorp.com/images/6/6c/18._Launching_LumiCenter_and_Create_New_Password.png]] | ||
Latest revision as of 12:11, 3 December 2024
Installation and Launching the Client
Prerequisites
- LumiCenter software on the computer being used as a server.
Video Instructions
Step by Step Instructions
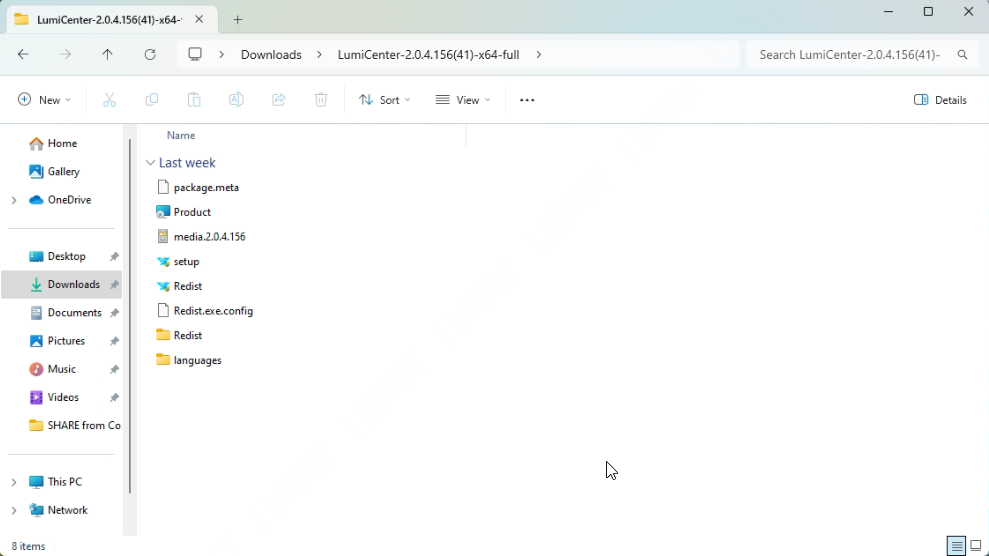
1. Download and unzip LumiCenter.
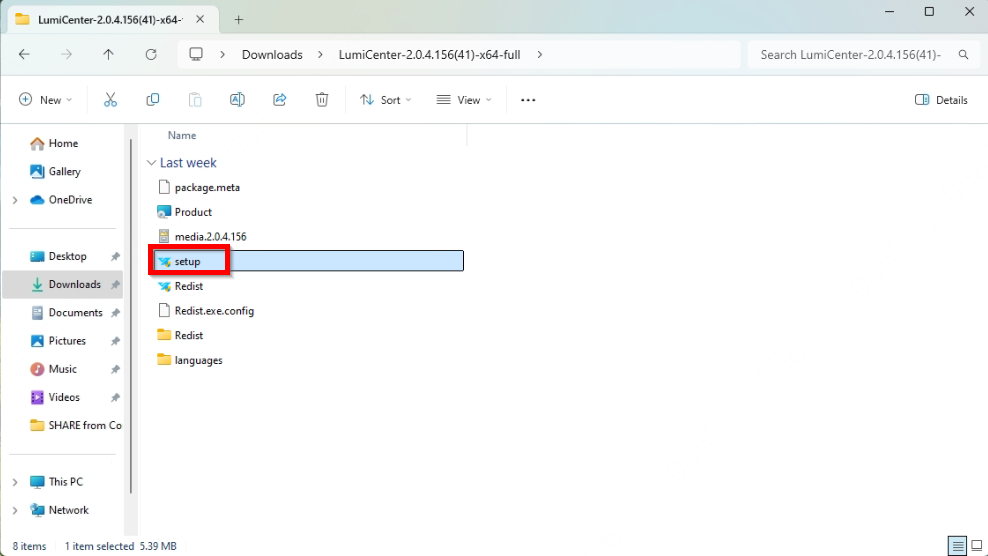
2. Double-click on the "setup.exe" file inside the unzipped LumiCenter folder to start the installation process.
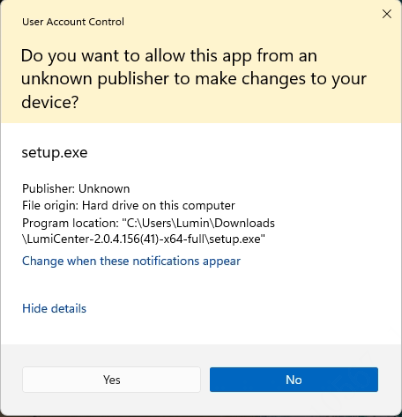
3. If a pop-up appears stating that the Publisher is unknown, this is normal. Click "Yes" to proceed with the installation.
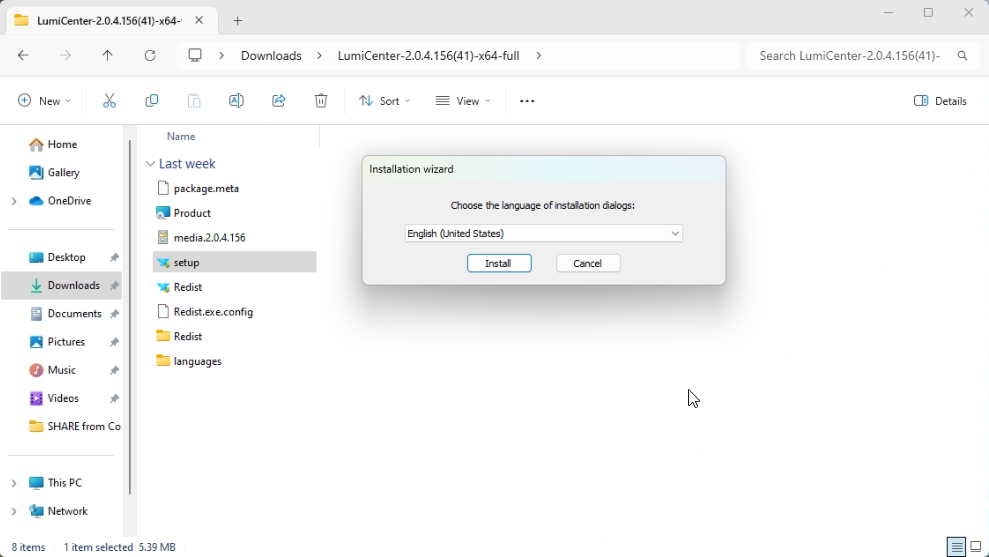
4. Select the desired language for the installation.
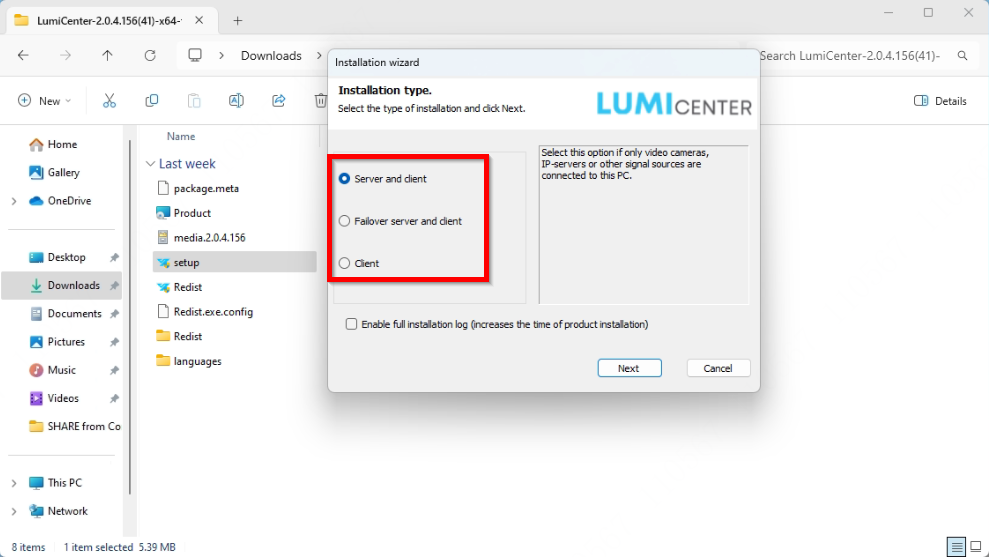
5. Three installation options are available. The "Enable full installation log" option can be turned on or off, depending on whether viewing the installation logs is preferred.
- A. Server and Client
- Installs both client and server services. This option is recommended for setups with no more than five servers that need to operate within the same domain.
- Interacts with devices (cameras, microphones, inputs, outputs, and so on) that constitute a security system.
- Stores storage data on its own disk space.
- Stores databases of events and databases of object motion metadata.
- Analyzes the incoming video using detection tools.
- Keeps configurations of the security system, user settings, custom layouts, macros, and so on.
- B. Failover Server and Client
- Installs both client and server services with Failover capability. In case of emergencies like power outages or network issues, the Failover technology restores the server configuration on another server.
- Recommended for setups with 5 to 30 (at least 3) servers that need to operate within the same domain.
- C. Client
- Installs only the client application, which enables connection to any server for administration, management, or monitoring tasks.
- Access and permissions are determined by the administrator.
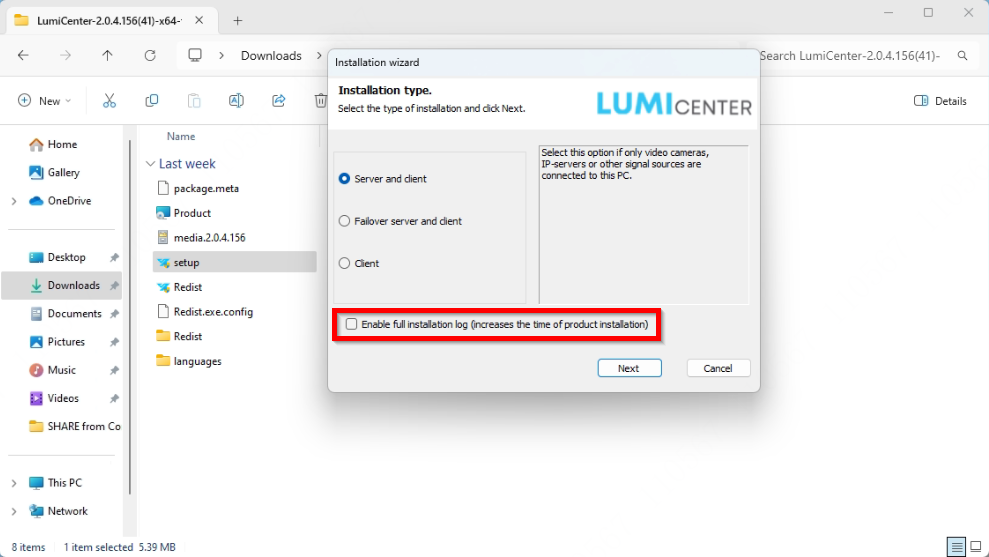
6. To log all installation-related events, select the "Enable full installation log" checkbox (note that this may increase the installation time).
Note: The installation process may take some time to complete, depending on the hardware of the computer being used.
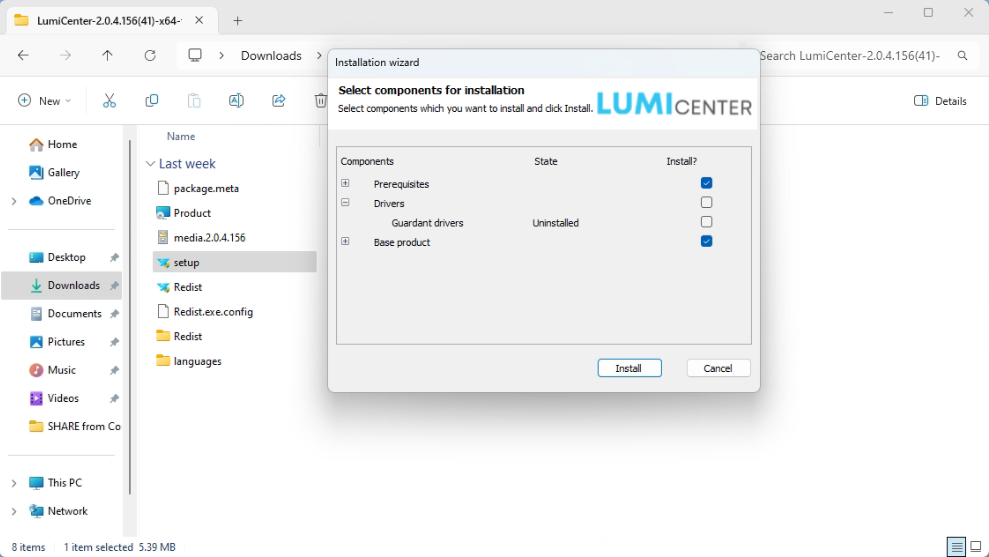
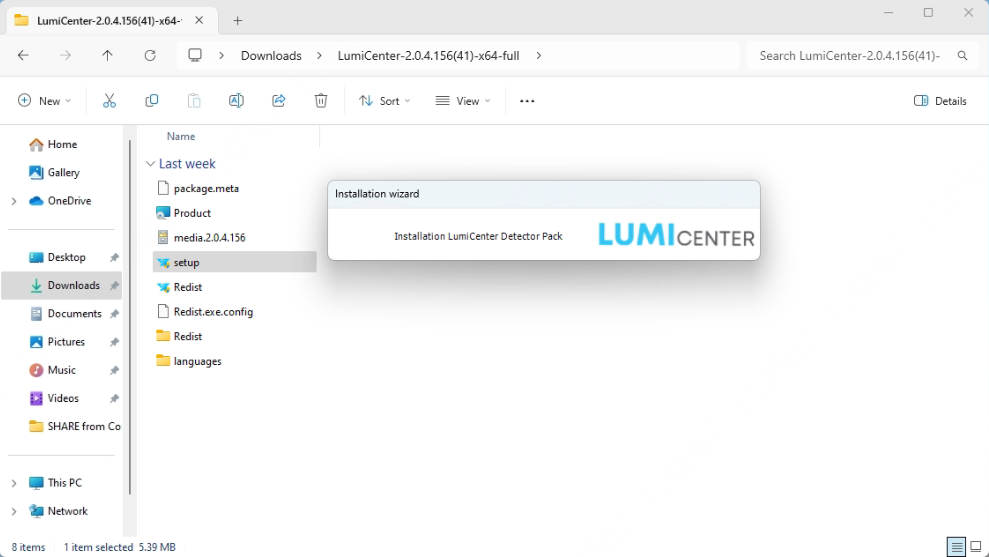
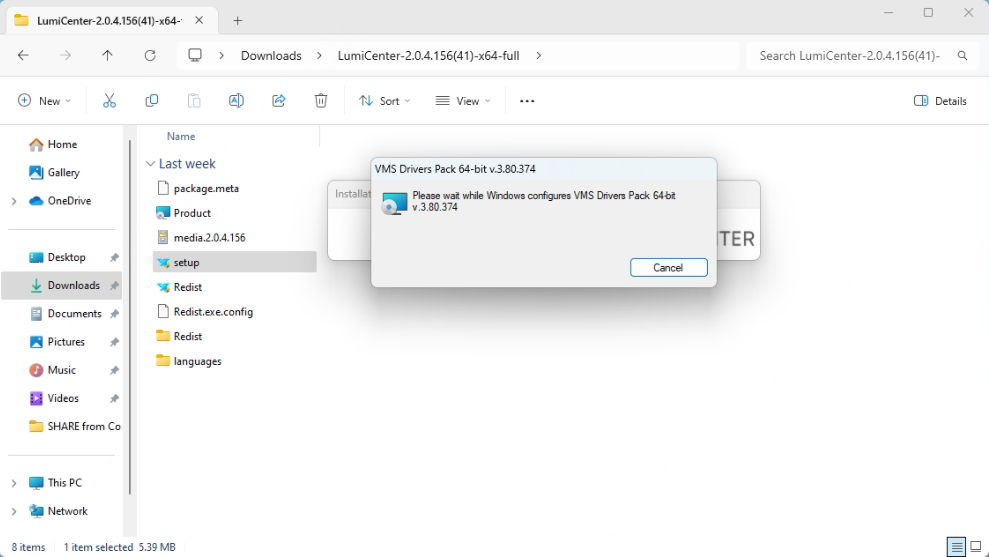
7. By default, the installation will automatically select the necessary components for LumiCenter to function properly (most checkboxes should already be selected). Guardant drivers are typically used for electronic dongle-based licensing and are not required for regular usage.
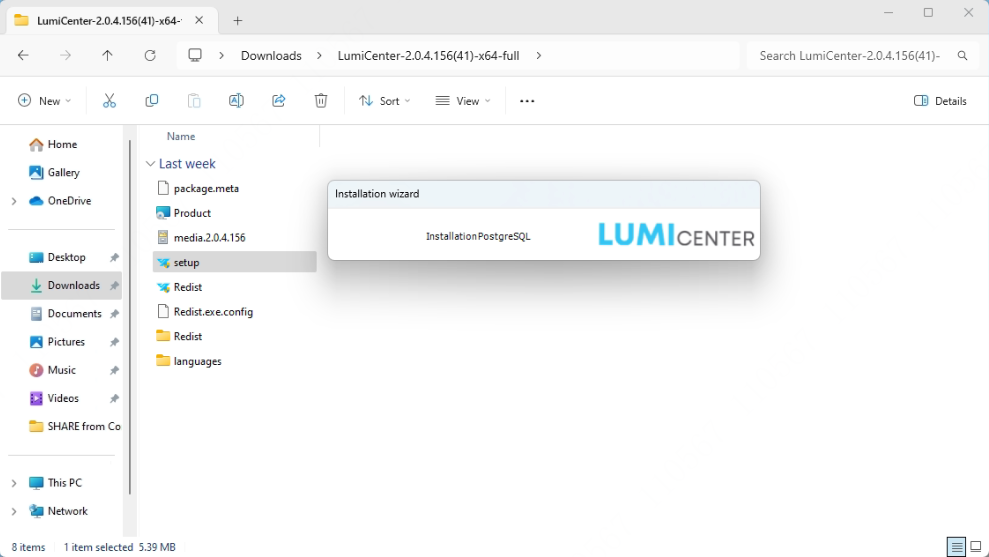
Note: After clicking "Install," a series of components will be installed, and this process may take some time to complete.
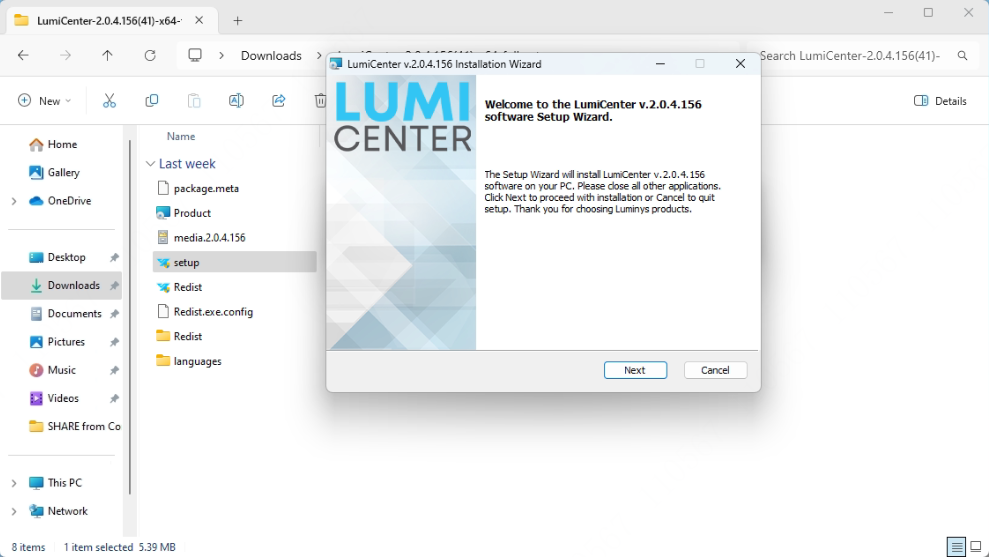
8. After all components have been installed, a pop-up window will appear to proceed with installing the LumiCenter software.
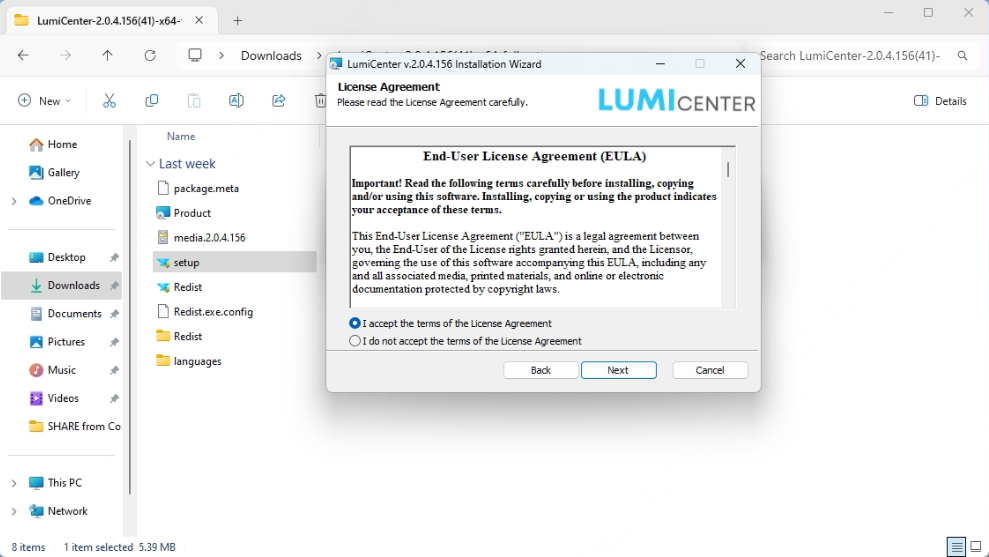
9. Click “I accept the terms of the License Agreement” to continue.
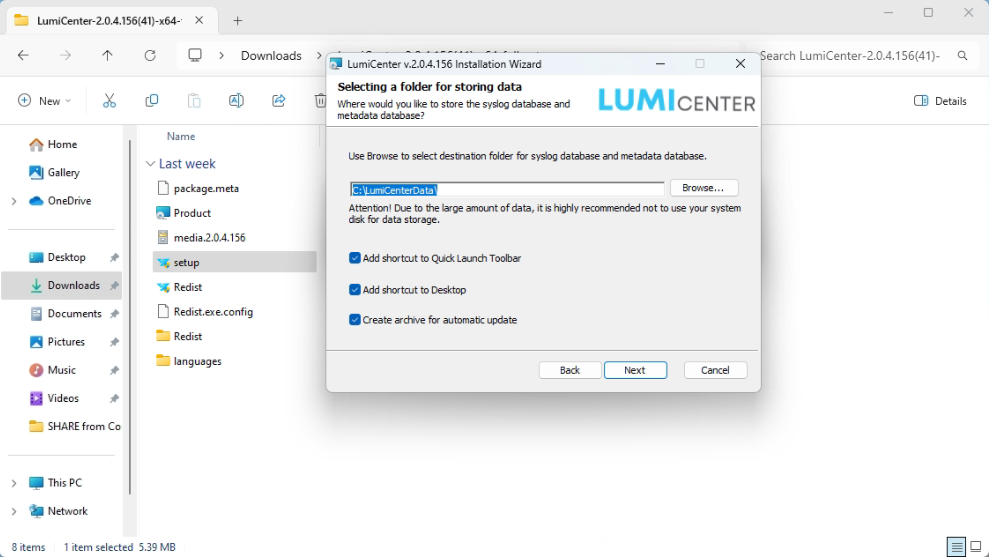
10. By default, the syslog database and metadata database will be installed in the C:\LumiCenterData\ folder. Alternatively, another location can be selected for the installation folder.
Note: Due to the large amount of data involved, it is recommended to select a different disk for data storage.
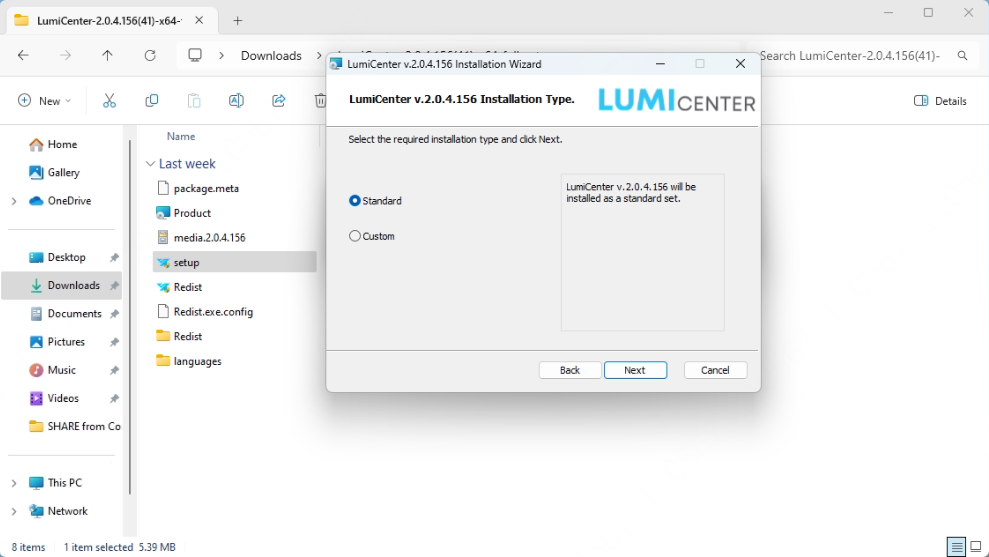
11. Choose “Standard” installation as the recommended option.
12. If this is the first time installing LumiCenter at this location, select "Create new domain and add server to it." If an existing domain has already been created by another LumiCenter server, choose "Add server to domain later."
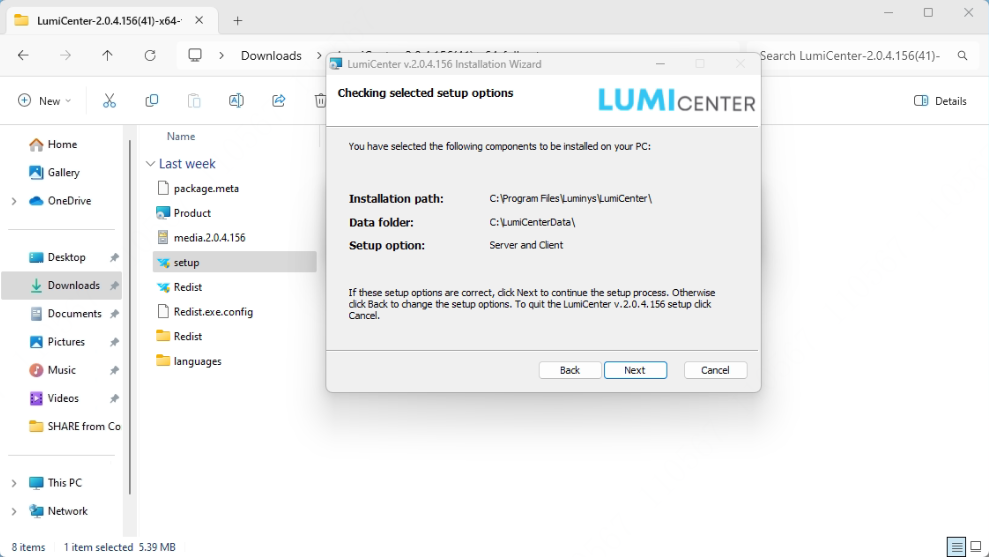
13. Verify that the following setup options are correct before proceeding.
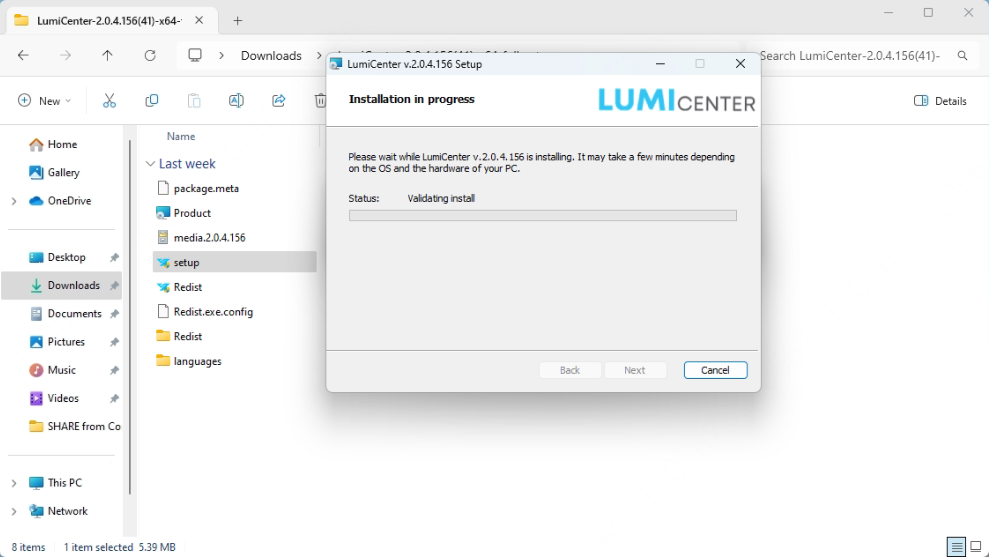
14. Wait for the installation to complete.
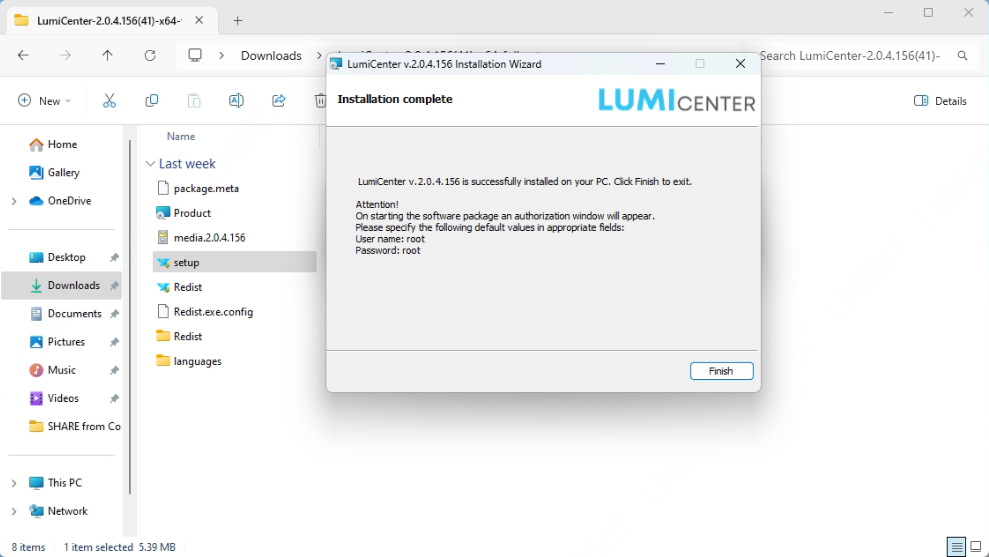
15. A pop-up window will appear once the installation is complete. The initial login for LumiCenter will be as follows:
Username: root
Password: root
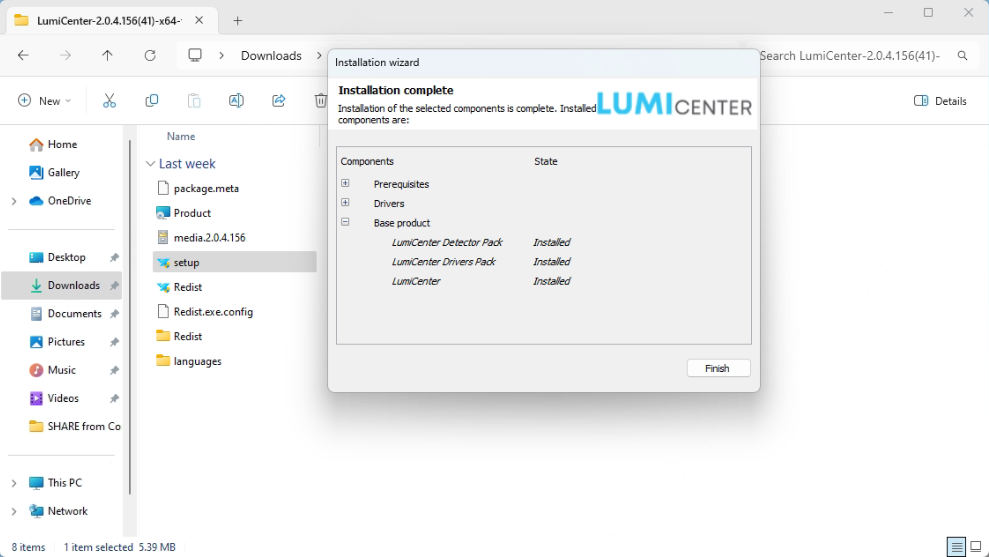
16. After clicking "Finish" on the previous pop-up window, another window will appear, showing which components were selected and installed based on the previous choices.
17. The LumiCenter icon will appear on the computer’s desktop once the installation is complete.
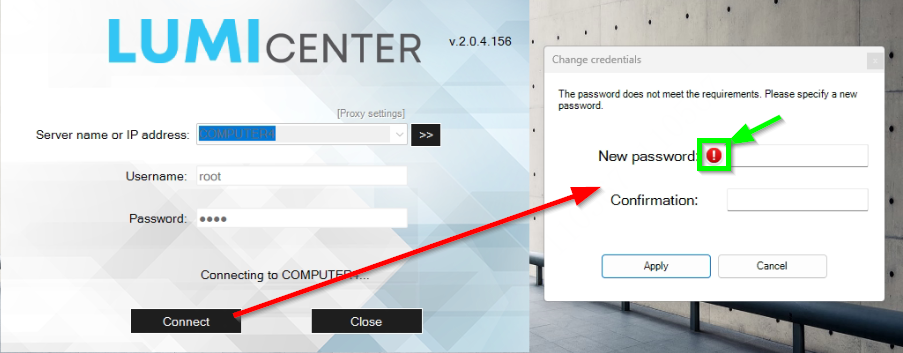
18. After LumiCenter is installed, double-click the icon on the desktop to launch the client software. A pop-up window will prompt for login. The initial username and password for LumiCenter are both "root." After entering these credentials and clicking "Connect," another window will appear, asking to create a new password.
Note: If there are issues creating the new password, hover over the red exclamation mark to view the password requirements.

