LumiGuardian/LumiCloud for Dealer Accounts: Difference between revisions
Techsupport (talk | contribs) No edit summary |
Techsupport (talk | contribs) No edit summary |
||
| Line 17: | Line 17: | ||
1. Access the dealer web portal, then enter the email address and temporary password to log in. | 1. Access the dealer web portal, then enter the email address and temporary password to log in. | ||
[[File:1._Dealer_Web_Portal.png | | [[File:1._Dealer_Web_Portal.png|1000px|link=https://wiki.luminyscorp.com/images/b/b1/1._Dealer_Web_Portal.png]] | ||
2. After logging in, the password can be changed by entering the temporary password as the old password and entering the desired password in the new password field twice. | 2. After logging in, the password can be changed by entering the temporary password as the old password and entering the desired password in the new password field twice. | ||
[[File:2a._Password_Changing_For_Dealers_Part_1.png | | [[File:2a._Password_Changing_For_Dealers_Part_1.png|1000px|link=https://wiki.luminyscorp.com/images/3/3a/2a._Password_Changing_For_Dealers_Part_1.png]] | ||
[[File:2b._Password_Changing_For_Dealers_Part_2.png | | [[File:2b._Password_Changing_For_Dealers_Part_2.png|1000px|link=https://wiki.luminyscorp.com/images/b/b2/2b._Password_Changing_For_Dealers_Part_2.png]] | ||
3. Expand the "Client" section and click on "Client Management" to create user accounts for users. | 3. Expand the "Client" section and click on "Client Management" to create user accounts for users. | ||
[[File:3._Creating_User_Account.png | | [[File:3._Creating_User_Account.png|1000px|link=https://wiki.luminyscorp.com/images/d/d5/3._Creating_User_Account.png]] | ||
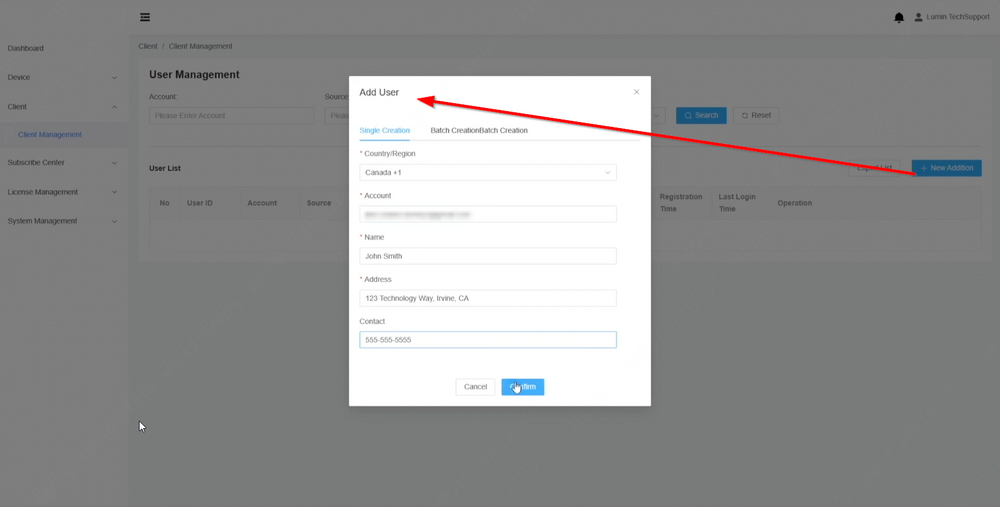
4. Click on "New Addition" to add a user account. Fill in the required information to continue, then click confirm to proceed. | 4. Click on "New Addition" to add a user account. Fill in the required information to continue, then click confirm to proceed. | ||
[[File:4._Add_User.png | | [[File:4._Add_User.png|1000px|link=https://wiki.luminyscorp.com/images/5/56/4._Add_User.png]] | ||
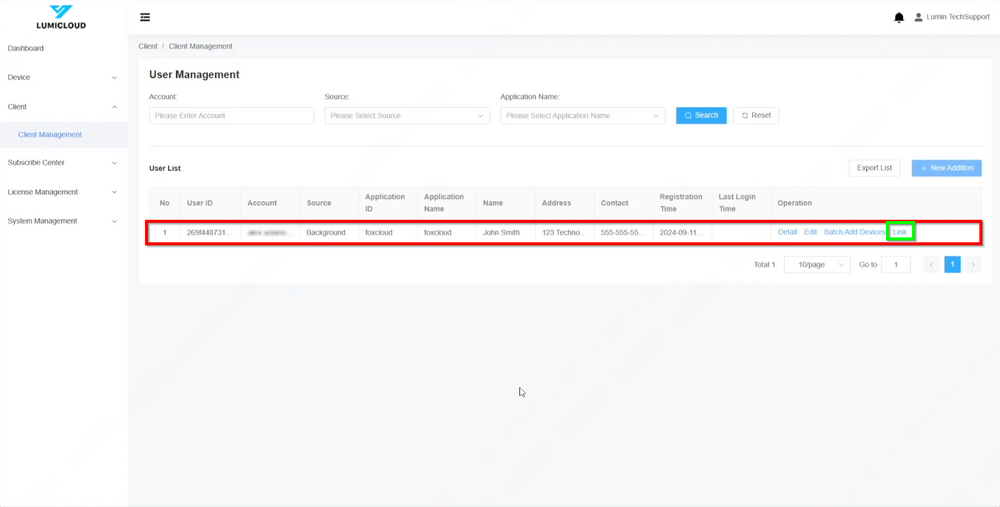
5. Once the account is created, it will appear under the User List section. After that, click on "Link," and the web portal will redirect to the user portal designated for user access. | 5. Once the account is created, it will appear under the User List section. After that, click on "Link," and the web portal will redirect to the user portal designated for user access. | ||
[[File:5._Link_Option.png | | [[File:5._Link_Option.png|1000px|link=https://wiki.luminyscorp.com/images/6/68/5._Link_Option.png]] | ||
6. This is the user account web portal. | 6. This is the user account web portal. | ||
[[File:6._User_Portal_Dashboard.png | | [[File:6._User_Portal_Dashboard.png|1000px|link=https://wiki.luminyscorp.com/images/c/cd/6._User_Portal_Dashboard.png]] | ||
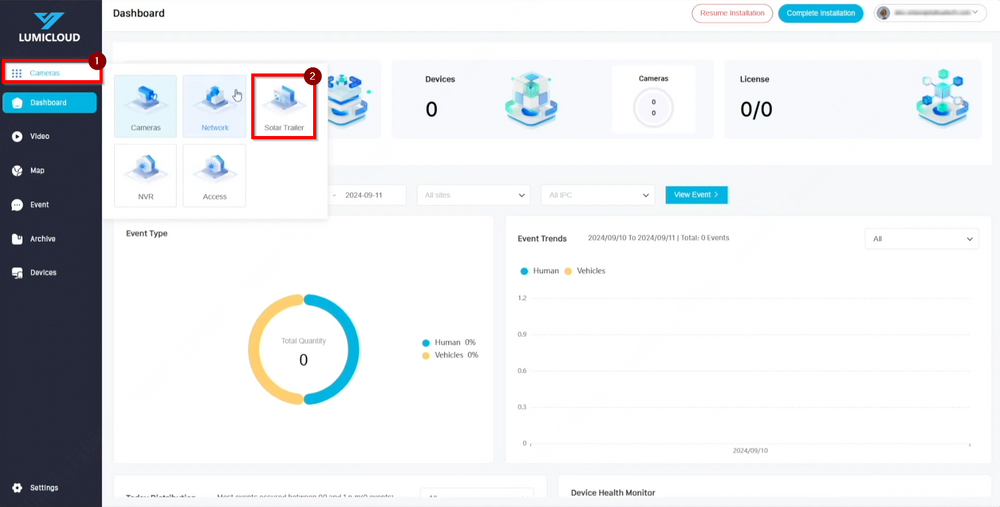
7. Click the grid icon (9 dots) in the top left corner and select "Solar Trailer." | 7. Click the grid icon (9 dots) in the top left corner and select "Solar Trailer." | ||
[[File:7._Selecting_Solar_Trailer.png | | [[File:7._Selecting_Solar_Trailer.png|1000px|link=https://wiki.luminyscorp.com/images/e/ef/7._Selecting_Solar_Trailer.png]] | ||
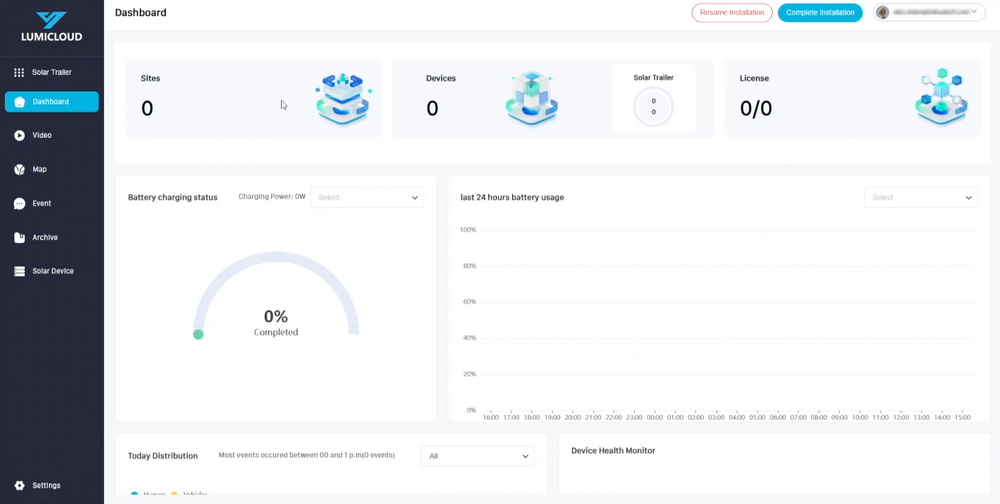
8. The "Dashboard" and all the options beneath it will now update to display information related to "Solar Trailer" exclusively. | 8. The "Dashboard" and all the options beneath it will now update to display information related to "Solar Trailer" exclusively. | ||
[[File:8.Solar_Trailer_Dashboard.png | | [[File:8.Solar_Trailer_Dashboard.png|1000px|link=https://wiki.luminyscorp.com/images/e/e9/8.Solar_Trailer_Dashboard.png]] | ||
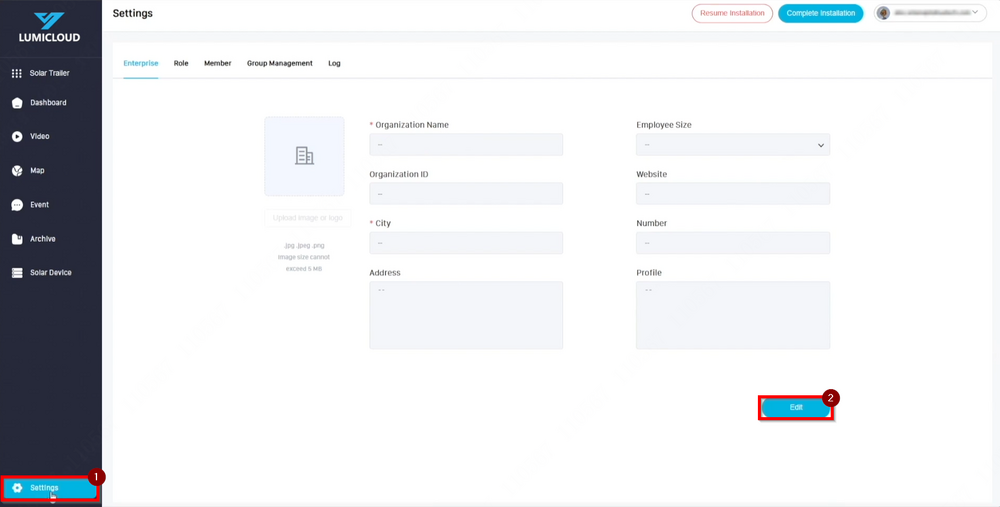
9. Click on "Settings" in the bottom left corner to create enterprise information for the user account. Select "Edit" to enable modifications. | 9. Click on "Settings" in the bottom left corner to create enterprise information for the user account. Select "Edit" to enable modifications. | ||
[[File:9._Editing_Enterprise_Information_for_User_Account.png | | [[File:9._Editing_Enterprise_Information_for_User_Account.png|1000px|link=https://wiki.luminyscorp.com/images/8/84/9._Editing_Enterprise_Information_for_User_Account.png]] | ||
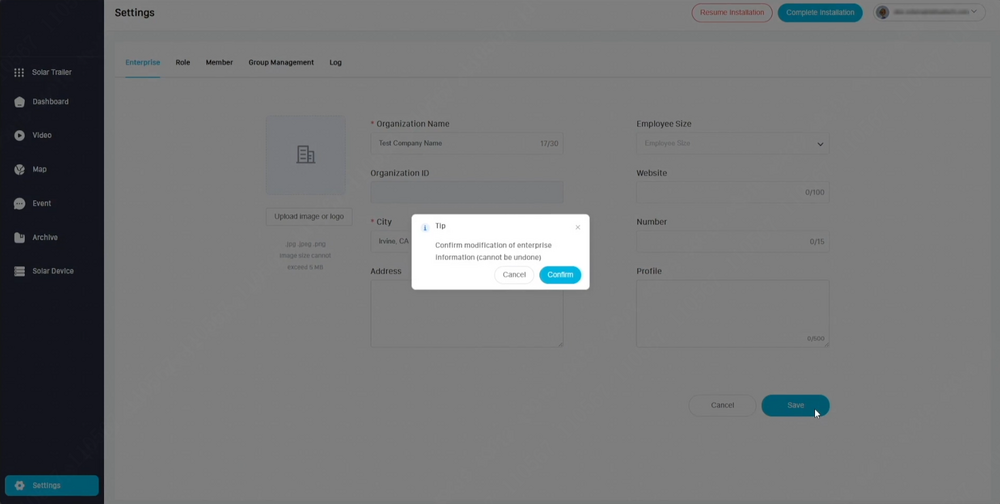
10. Fill in the required information (Organization Name and City), or optionally provide all available details. Click "Save" and confirm the changes. | 10. Fill in the required information (Organization Name and City), or optionally provide all available details. Click "Save" and confirm the changes. | ||
[[File:10._Saving_Enterprise_Information.png | | [[File:10._Saving_Enterprise_Information.png|1000px|link=https://wiki.luminyscorp.com/images/4/42/10._Saving_Enterprise_Information.png]] | ||
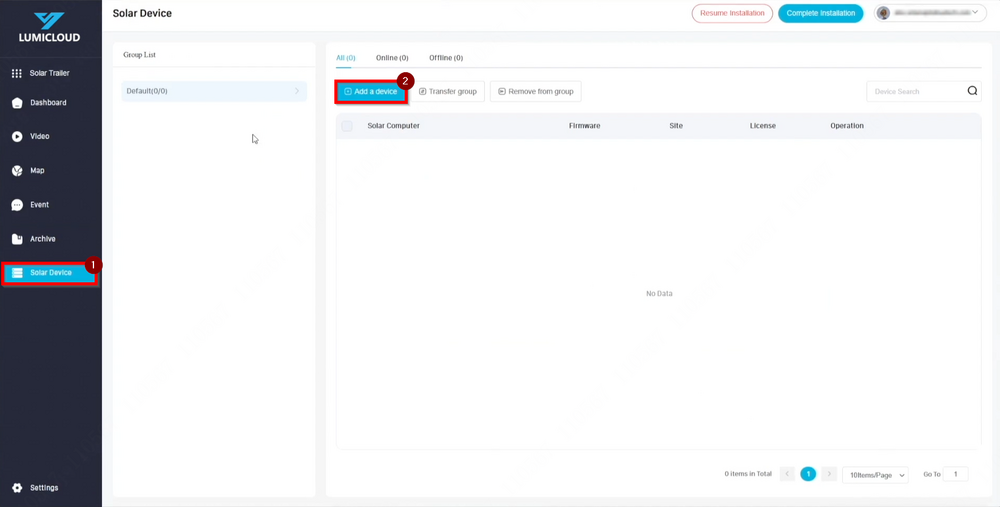
11. Navigate to “Solar Device” and click on “Add a device”. | 11. Navigate to “Solar Device” and click on “Add a device”. | ||
[[File:11._Adding_Solar_Device.png | | [[File:11._Adding_Solar_Device.png|1000px|link=https://wiki.luminyscorp.com/images/8/87/11._Adding_Solar_Device.png]] | ||
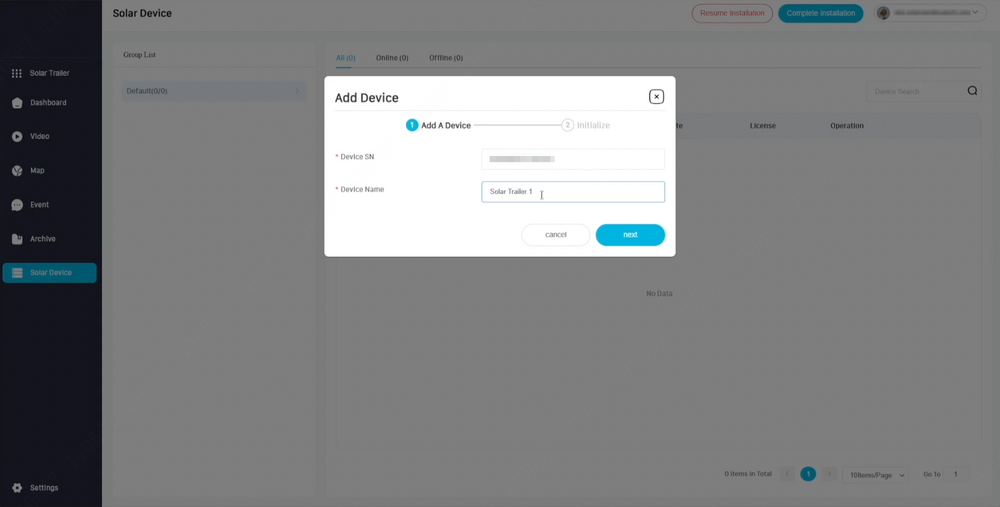
12. Enter the "Device SN," which is the serial number of the solar trailer, along with a user-defined name to associate with the serial number. | 12. Enter the "Device SN," which is the serial number of the solar trailer, along with a user-defined name to associate with the serial number. | ||
[[File:12._Device_SN_and_Name.png | | [[File:12._Device_SN_and_Name.png|1000px|link=https://wiki.luminyscorp.com/images/6/64/12._Device_SN_and_Name.png]] | ||
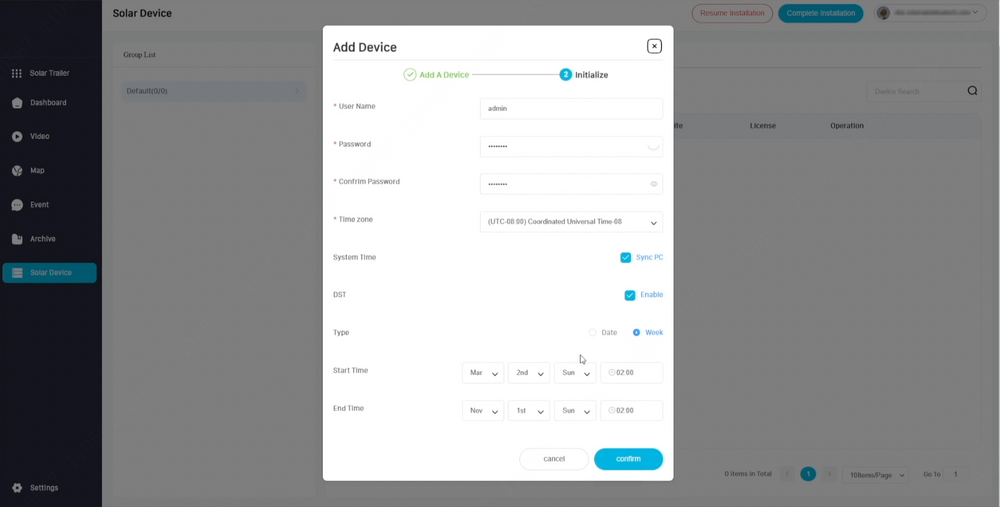
13. Enter the necessary information to proceed. While System Time and DST are optional, enabling them is advisable to ensure the time is accurate. | 13. Enter the necessary information to proceed. While System Time and DST are optional, enabling them is advisable to ensure the time is accurate. | ||
[[File:13._Initializing_and_Adding_the_Device.png | | [[File:13._Initializing_and_Adding_the_Device.png|1000px|link=https://wiki.luminyscorp.com/images/3/3c/13._Initializing_and_Adding_the_Device.png]] | ||
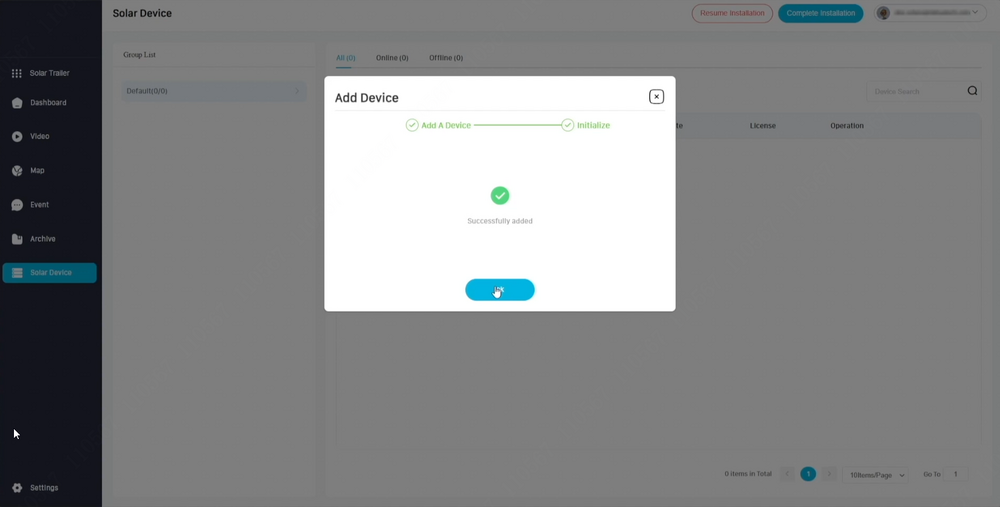
14. Once the process is complete, a pop-up message will appear indicating that the device has been successfully added. | 14. Once the process is complete, a pop-up message will appear indicating that the device has been successfully added. | ||
[[File:14._Added_Successfully.png | | [[File:14._Added_Successfully.png|1000px|link=https://wiki.luminyscorp.com/images/0/05/14._Added_Successfully.png]] | ||
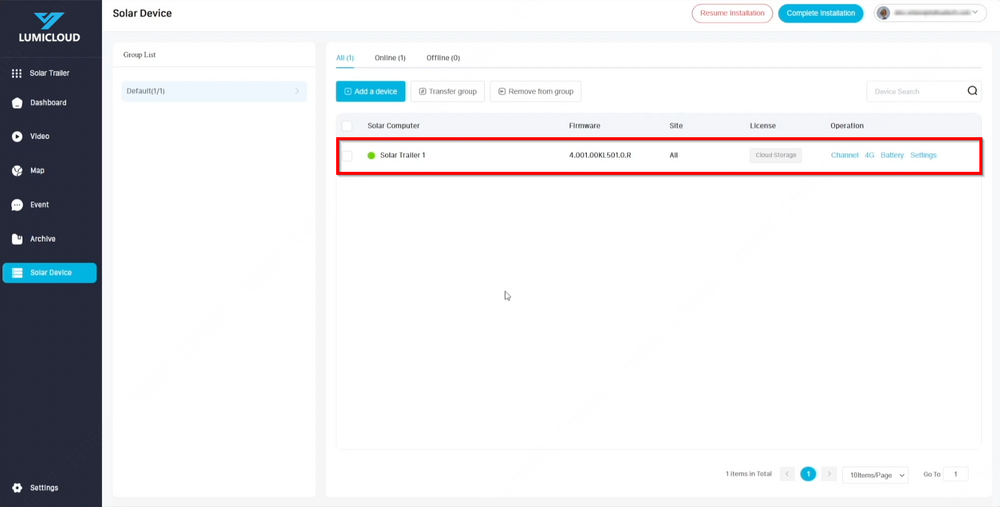
15. The solar trailer will be displayed here once it has been added. To add more solar trailers to this user account, follow the same process. | 15. The solar trailer will be displayed here once it has been added. To add more solar trailers to this user account, follow the same process. | ||
[[File:15._Solar_Device_Appears.png | | [[File:15._Solar_Device_Appears.png|1000px|link=https://wiki.luminyscorp.com/images/2/27/15._Solar_Device_Appears.png]] | ||
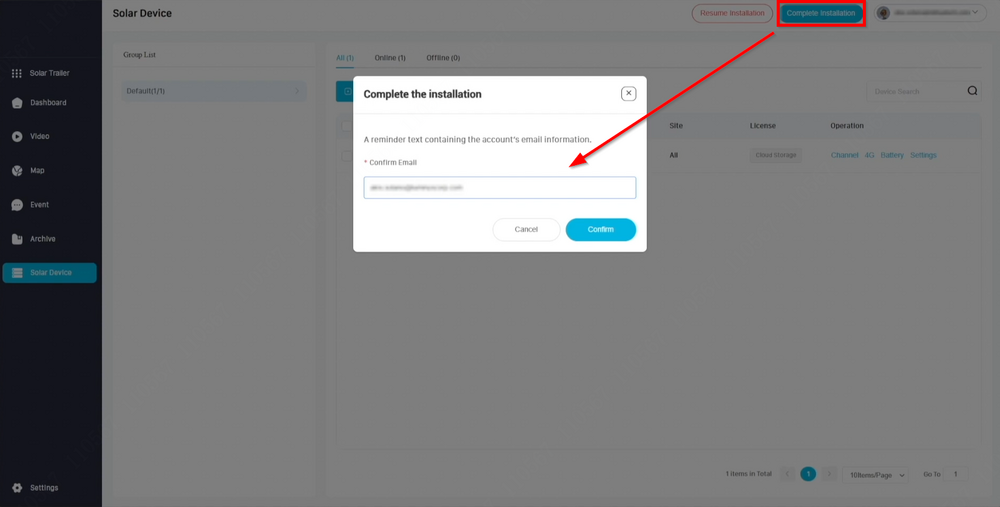
16. Click "Complete Installation" in the top right corner to finalize the user account setup. Re-enter the same user account email address and click confirm. | 16. Click "Complete Installation" in the top right corner to finalize the user account setup. Re-enter the same user account email address and click confirm. | ||
[[File:16._Complete_Installation.png | | [[File:16._Complete_Installation.png|1000px|link=https://wiki.luminyscorp.com/images/f/f5/16._Complete_Installation.png]] | ||
17. After the confirmation process, the web portal will log out, and an email will be sent to the user's email server, allowing them to activate their account and change the password. The dealer can log back into the dealer web portal, and under the same user created earlier, the option will change from "Link" to "Obtain Authorization." This indicates that the user account has been set up with the correct email address and password. | 17. After the confirmation process, the web portal will log out, and an email will be sent to the user's email server, allowing them to activate their account and change the password. The dealer can log back into the dealer web portal, and under the same user created earlier, the option will change from "Link" to "Obtain Authorization." This indicates that the user account has been set up with the correct email address and password. | ||
[[File:17._Obtain_Authorization.png | | [[File:17._Obtain_Authorization.png|1000px|link=https://wiki.luminyscorp.com/images/e/ee/17._Obtain_Authorization.png]] | ||
18. Under "Subscribe Center," dealers have the option to view the licenses they have already purchased by selecting "My Orders" in the Order List. | 18. Under "Subscribe Center," dealers have the option to view the licenses they have already purchased by selecting "My Orders" in the Order List. | ||
[[File:18._Orders_Appear_or_Redeem_Codes.png | | [[File:18._Orders_Appear_or_Redeem_Codes.png|1000px|link=https://wiki.luminyscorp.com/images/d/d9/18._Orders_Appear_or_Redeem_Codes.png]] | ||
19. Alternatively, dealers are provided with redeem codes via the local Sales Reps that can be activated using the "Redeem" button. | 19. Alternatively, dealers are provided with redeem codes via the local Sales Reps that can be activated using the "Redeem" button. | ||
[[File:19._Using_Redeem_Codes.png | | [[File:19._Using_Redeem_Codes.png|1000px|link=https://wiki.luminyscorp.com/images/1/13/19._Using_Redeem_Codes.png]] | ||
20. Once the license has been applied, it will display as “Confirmed”. | 20. Once the license has been applied, it will display as “Confirmed”. | ||
[[File:20._License_Listed_as_Confirmed.png | | [[File:20._License_Listed_as_Confirmed.png|1000px|link=https://wiki.luminyscorp.com/images/4/45/20._License_Listed_as_Confirmed.png]] | ||
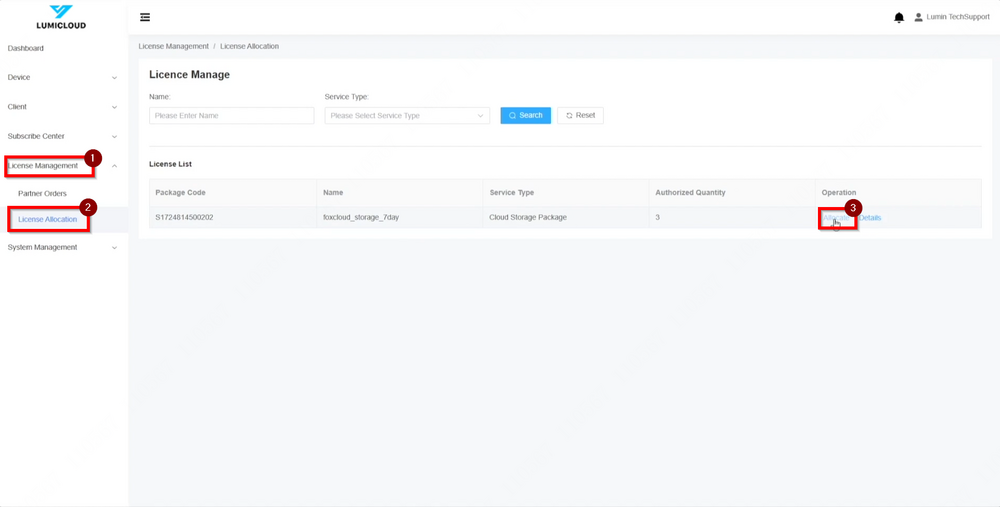
21. Next, navigate to "License Allocation" under License Management. Here, the confirmed licenses will be displayed, and allocation can begin. | 21. Next, navigate to "License Allocation" under License Management. Here, the confirmed licenses will be displayed, and allocation can begin. | ||
[[File:21._License_Allocation.png | | [[File:21._License_Allocation.png|1000px|link=https://wiki.luminyscorp.com/images/6/66/21._License_Allocation.png]] | ||
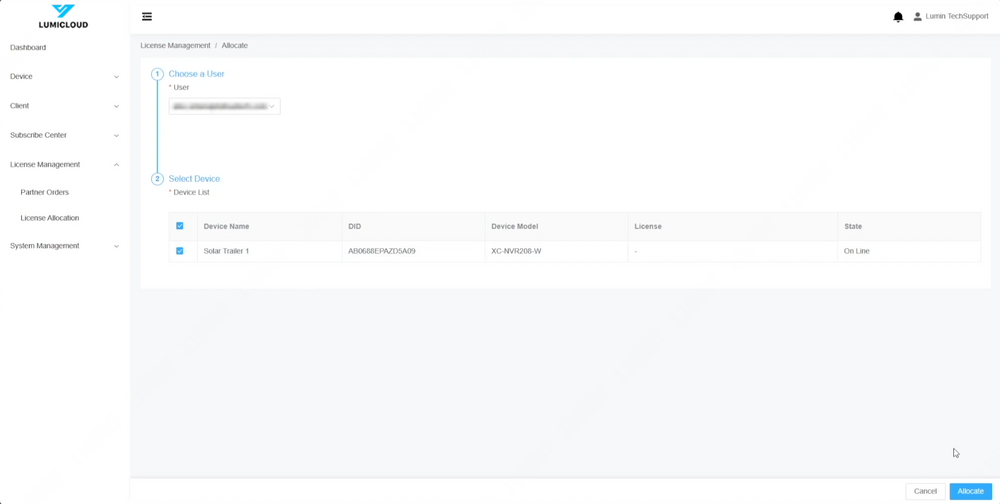
22. Select the user account to allocate the license to and choose the corresponding Solar Trailer to associate with the license. | 22. Select the user account to allocate the license to and choose the corresponding Solar Trailer to associate with the license. | ||
[[File:22._Selecting_User_Account_and_Device.png | | [[File:22._Selecting_User_Account_and_Device.png|1000px|link=https://wiki.luminyscorp.com/images/3/3b/22._Selecting_User_Account_and_Device.png]] | ||
Latest revision as of 11:30, 8 November 2024
LumiGuardian - LumiCloud for Dealer Accounts
Description
This tutorial will go over how to setup dealer accounts via LumiCloud for LumiGuardian.
Prerequisites
- Consult with Sale Reps for more information on how to register dealer account before the setup.
Video Instructions
N/A
Step by Step Instructions
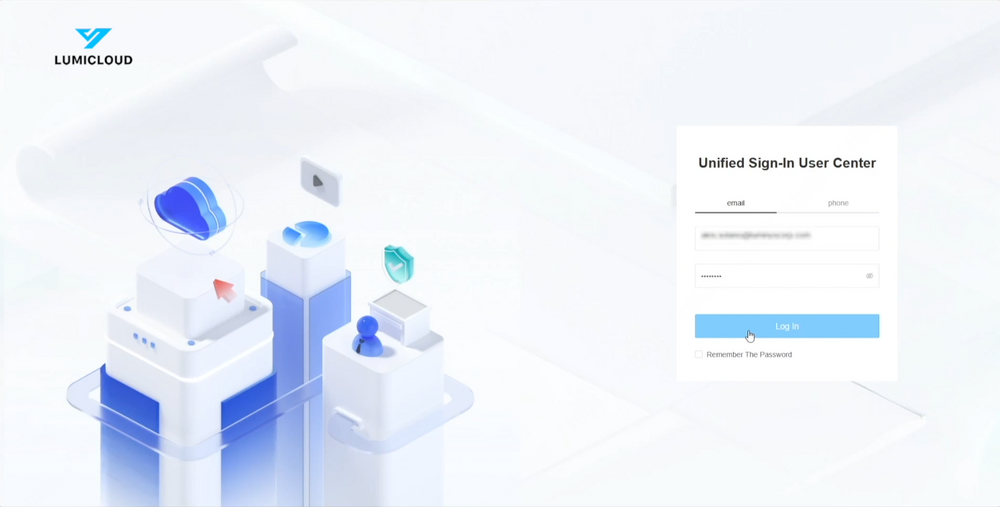
1. Access the dealer web portal, then enter the email address and temporary password to log in.
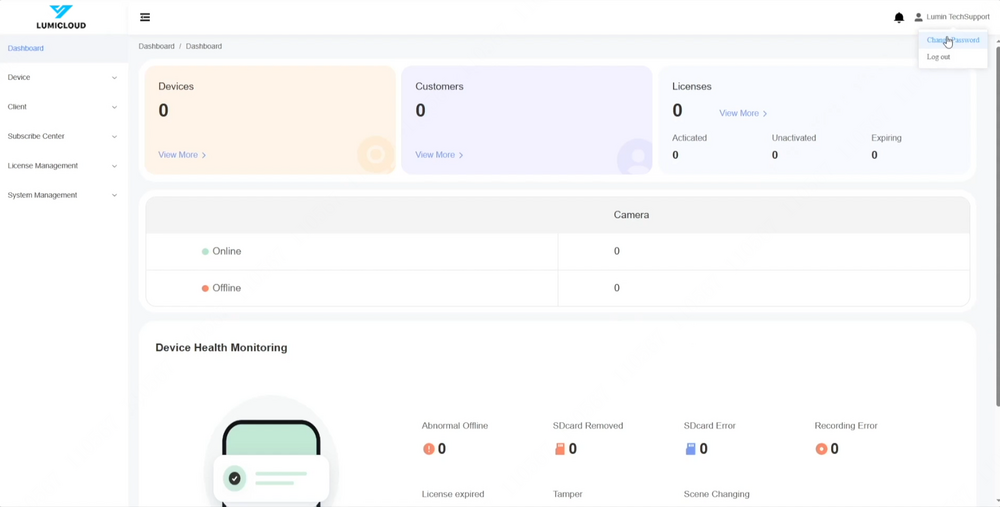
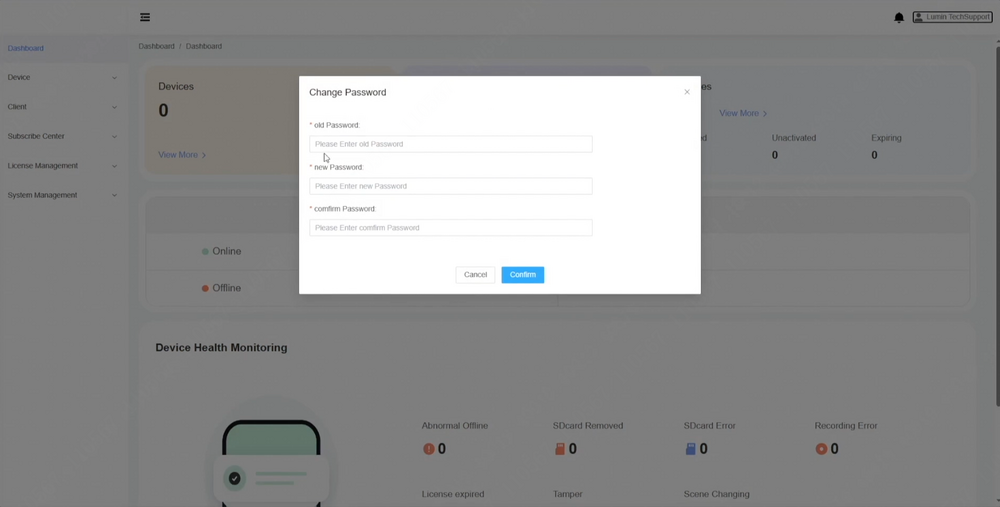
2. After logging in, the password can be changed by entering the temporary password as the old password and entering the desired password in the new password field twice.
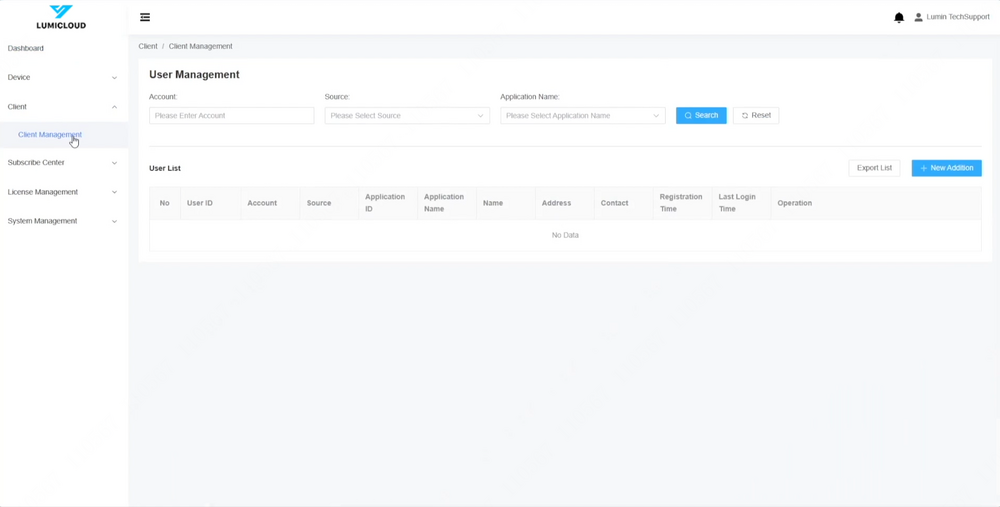
3. Expand the "Client" section and click on "Client Management" to create user accounts for users.
4. Click on "New Addition" to add a user account. Fill in the required information to continue, then click confirm to proceed.
5. Once the account is created, it will appear under the User List section. After that, click on "Link," and the web portal will redirect to the user portal designated for user access.
6. This is the user account web portal.
7. Click the grid icon (9 dots) in the top left corner and select "Solar Trailer."
8. The "Dashboard" and all the options beneath it will now update to display information related to "Solar Trailer" exclusively.
9. Click on "Settings" in the bottom left corner to create enterprise information for the user account. Select "Edit" to enable modifications.
10. Fill in the required information (Organization Name and City), or optionally provide all available details. Click "Save" and confirm the changes.
11. Navigate to “Solar Device” and click on “Add a device”.
12. Enter the "Device SN," which is the serial number of the solar trailer, along with a user-defined name to associate with the serial number.
13. Enter the necessary information to proceed. While System Time and DST are optional, enabling them is advisable to ensure the time is accurate.
14. Once the process is complete, a pop-up message will appear indicating that the device has been successfully added.
15. The solar trailer will be displayed here once it has been added. To add more solar trailers to this user account, follow the same process.
16. Click "Complete Installation" in the top right corner to finalize the user account setup. Re-enter the same user account email address and click confirm.
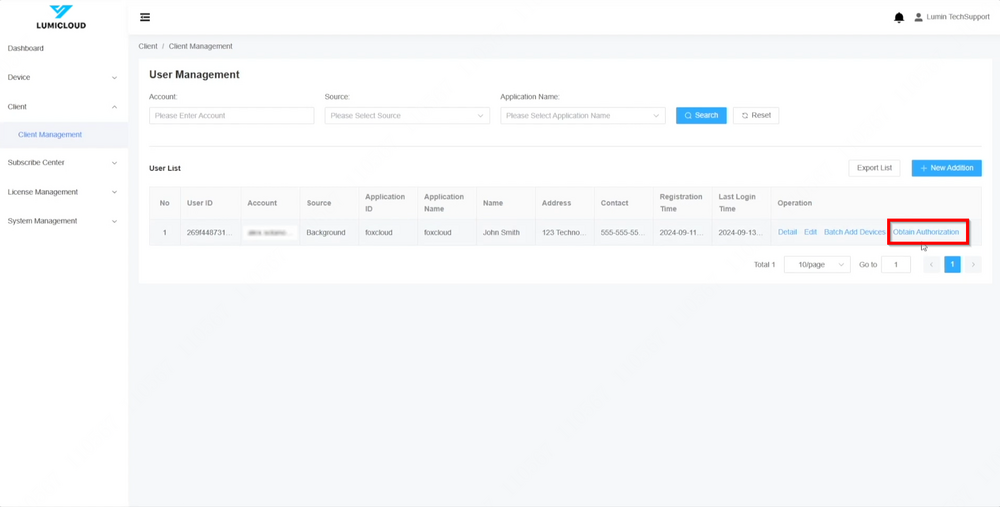
17. After the confirmation process, the web portal will log out, and an email will be sent to the user's email server, allowing them to activate their account and change the password. The dealer can log back into the dealer web portal, and under the same user created earlier, the option will change from "Link" to "Obtain Authorization." This indicates that the user account has been set up with the correct email address and password.
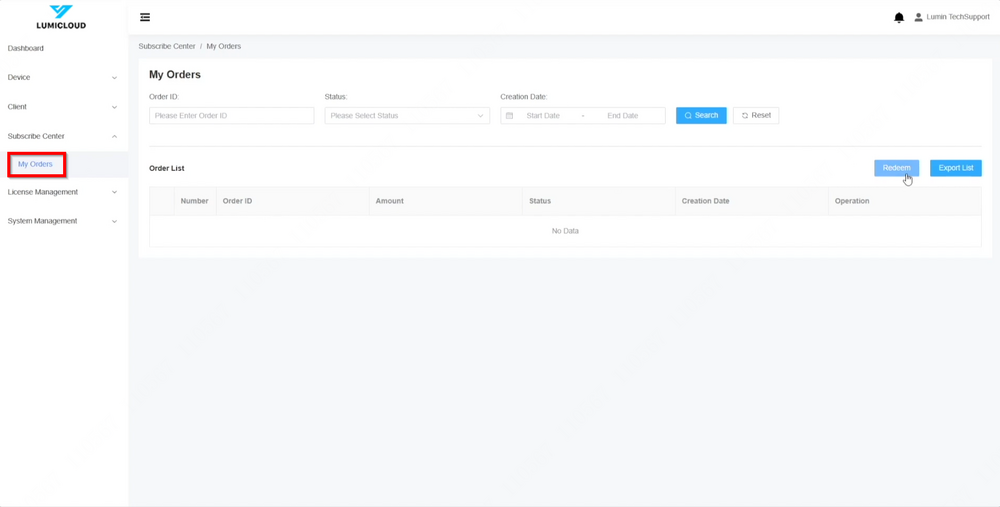
18. Under "Subscribe Center," dealers have the option to view the licenses they have already purchased by selecting "My Orders" in the Order List.
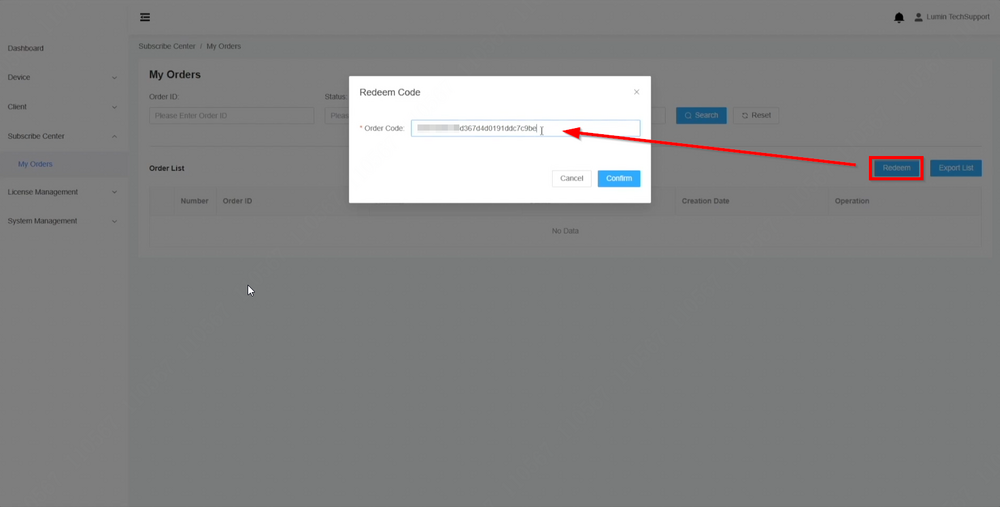
19. Alternatively, dealers are provided with redeem codes via the local Sales Reps that can be activated using the "Redeem" button.
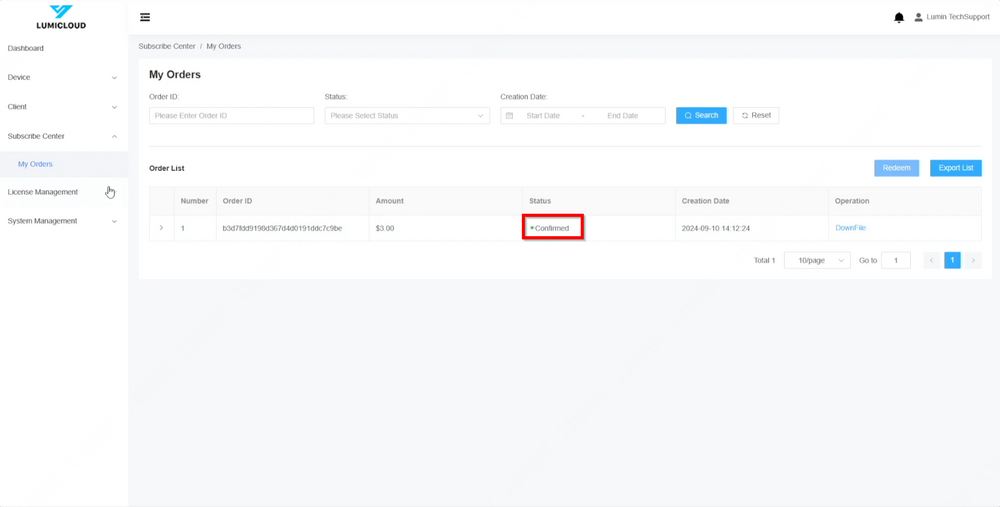
20. Once the license has been applied, it will display as “Confirmed”.
21. Next, navigate to "License Allocation" under License Management. Here, the confirmed licenses will be displayed, and allocation can begin.
22. Select the user account to allocate the license to and choose the corresponding Solar Trailer to associate with the license.

