LumiGuardian/LumiCloud for User Accounts: Difference between revisions
Techsupport (talk | contribs) No edit summary |
Techsupport (talk | contribs) No edit summary |
||
| (2 intermediate revisions by the same user not shown) | |||
| Line 1: | Line 1: | ||
= <div class="center">LumiGuardian - LumiCloud User Accounts Setup</div> = | |||
= <div class="center">LumiCloud User Accounts Setup</div> = | |||
===Description=== | ===Description=== | ||
| Line 10: | Line 8: | ||
===Video Instructions=== | ===Video Instructions=== | ||
< | <youtube>https://www.youtube.com/watch?v=-tiBVW75abU&ab_channel=LuminysSystemsCorporation</youtube> | ||
===Step by Step Instructions=== | ===Step by Step Instructions=== | ||
| Line 17: | Line 14: | ||
1. The dealer is responsible for creating user accounts and providing them to users. | 1. The dealer is responsible for creating user accounts and providing them to users. | ||
[[File:LumiCloud_User_Account_Setup_1.png | | [[File:LumiCloud_User_Account_Setup_1.png|1000px|link=https://wiki.luminyscorp.com/images/4/40/LumiCloud_User_Account_Setup_1.png]] | ||
2. Enter the new desired password twice to proceed. | 2. Enter the new desired password twice to proceed. | ||
[[File:LumiCloud_User_Account_Setup_2.png | | [[File:LumiCloud_User_Account_Setup_2.png|1000px|link=https://wiki.luminyscorp.com/images/e/ef/LumiCloud_User_Account_Setup_2.png]] | ||
3. Once the new password is created, a success message will appear at the top. The account can now be accessed using the email address and the newly created password. | 3. Once the new password is created, a success message will appear at the top. The account can now be accessed using the email address and the newly created password. | ||
[[File:LumiCloud_User_Account_Setup_3.png | | [[File:LumiCloud_User_Account_Setup_3.png|1000px|link=https://wiki.luminyscorp.com/images/7/7d/LumiCloud_User_Account_Setup_3.png]] | ||
4. Read the Service Agreement and Privacy Policy, then click "Next" to continue. Click "Accept" on the last page to proceed further. | 4. Read the Service Agreement and Privacy Policy, then click "Next" to continue. Click "Accept" on the last page to proceed further. | ||
[[File:LumiCloud_User_Account_Setup_4.png | | [[File:LumiCloud_User_Account_Setup_4.png|1000px|link=https://wiki.luminyscorp.com/images/a/ad/LumiCloud_User_Account_Setup_4.png]] | ||
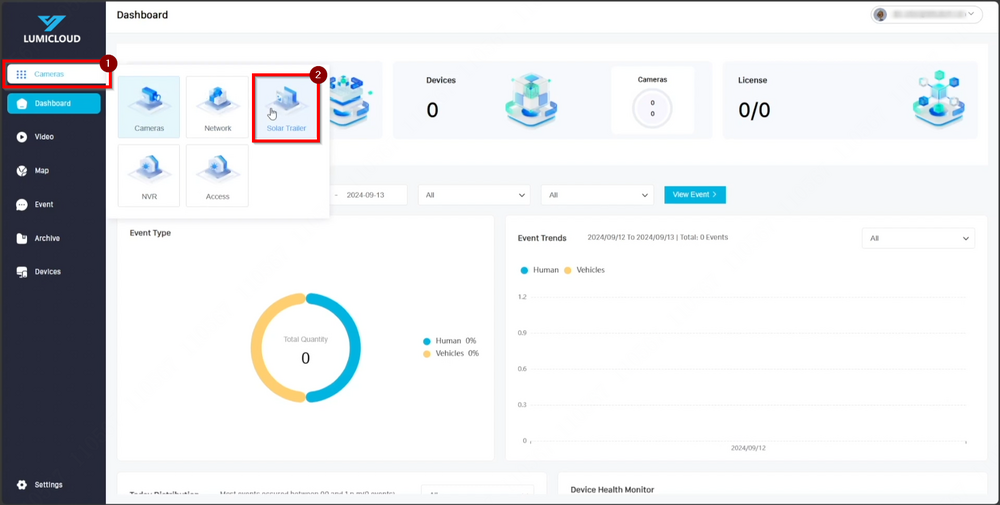
5. On the Dashboard, click on "Camera" located in the top left corner of the grid menu to expand for more options. Then click on "Solar Trailer" to proceed. | 5. On the Dashboard, click on "Camera" located in the top left corner of the grid menu to expand for more options. Then click on "Solar Trailer" to proceed. | ||
[[File:LumiCloud_User_Account_Setup_5.png | | [[File:LumiCloud_User_Account_Setup_5.png|1000px|link=https://wiki.luminyscorp.com/images/0/09/LumiCloud_User_Account_Setup_5.png]] | ||
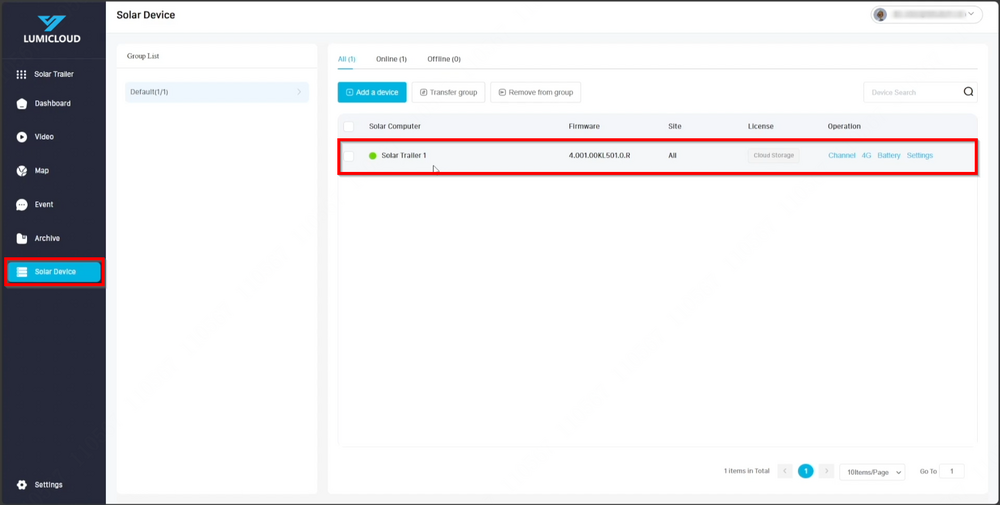
6. Once inside "Solar Trailer," click on "Solar Device" to view the solar trailer that the dealer added previously. | 6. Once inside "Solar Trailer," click on "Solar Device" to view the solar trailer that the dealer added previously. | ||
[[File:LumiCloud_User_Account_Setup_6.png | | [[File:LumiCloud_User_Account_Setup_6.png|1000px|link=https://wiki.luminyscorp.com/images/6/62/LumiCloud_User_Account_Setup_6.png]] | ||
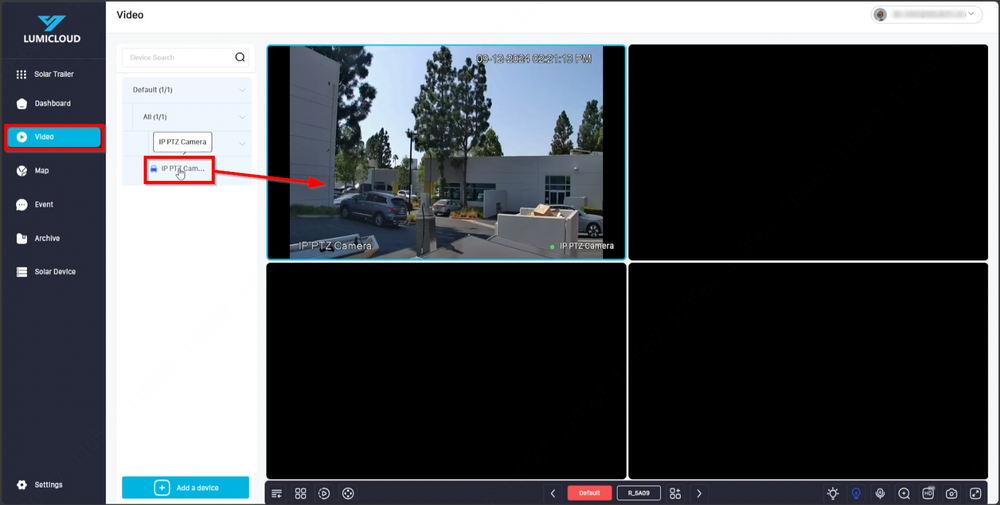
7. Click on "Video," then expand the solar device in the left side menu until the cameras are visible. Clicking on a camera will bring up the live view on the right side. | 7. Click on "Video," then expand the solar device in the left side menu until the cameras are visible. Clicking on a camera will bring up the live view on the right side. | ||
[[File:LumiCloud_User_Account_Setup_7.png | | [[File:LumiCloud_User_Account_Setup_7.png|1000px|link=https://wiki.luminyscorp.com/images/d/de/LumiCloud_User_Account_Setup_7.png]] | ||
Latest revision as of 09:05, 27 May 2025
LumiGuardian - LumiCloud User Accounts Setup
Description
This tutorial will go over how to setup user accounts via LumiCloud.
Prerequisites
- Dealer needs to create the user accounts and pass it over to users.
Video Instructions
Step by Step Instructions
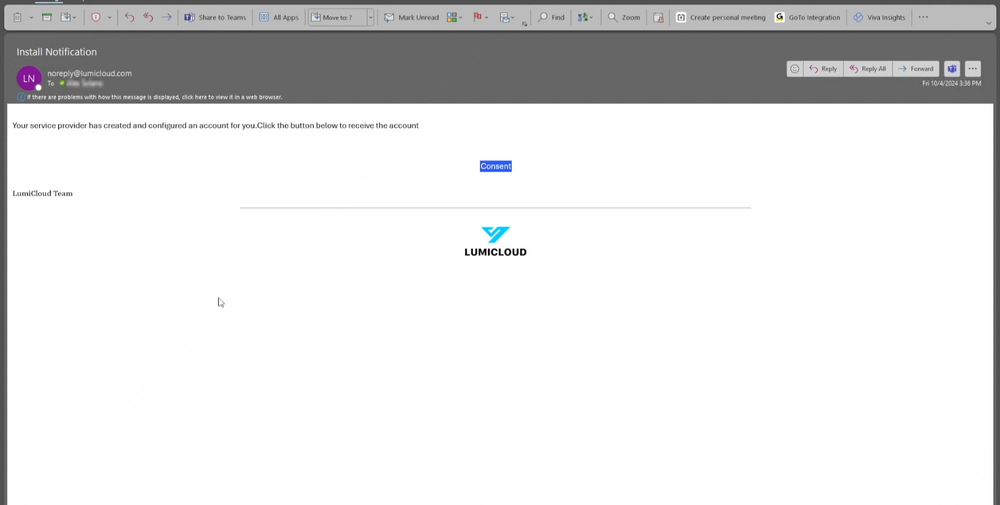
1. The dealer is responsible for creating user accounts and providing them to users.
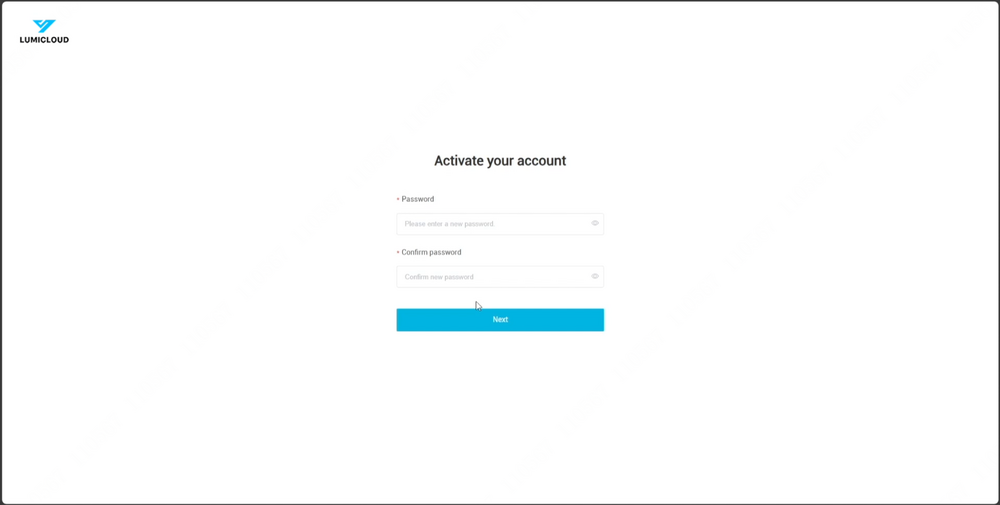
2. Enter the new desired password twice to proceed.
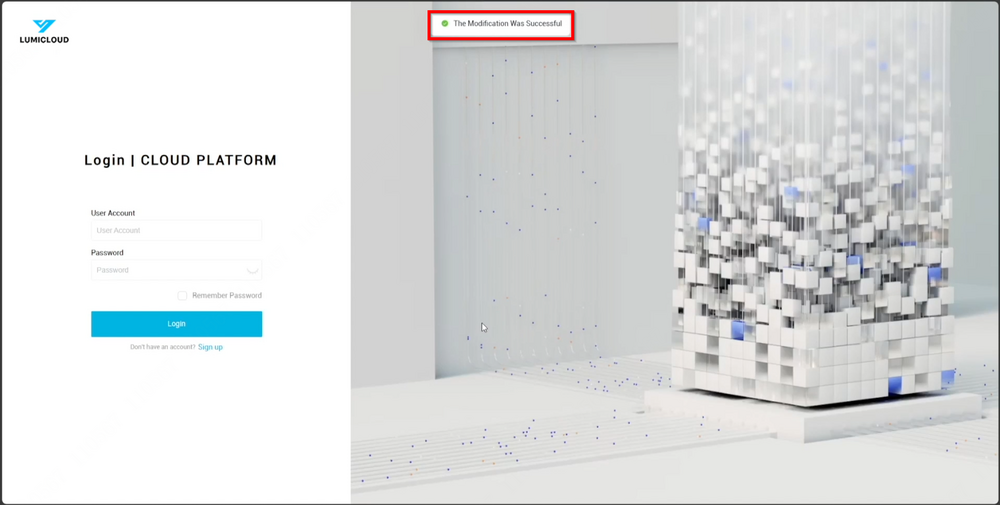
3. Once the new password is created, a success message will appear at the top. The account can now be accessed using the email address and the newly created password.
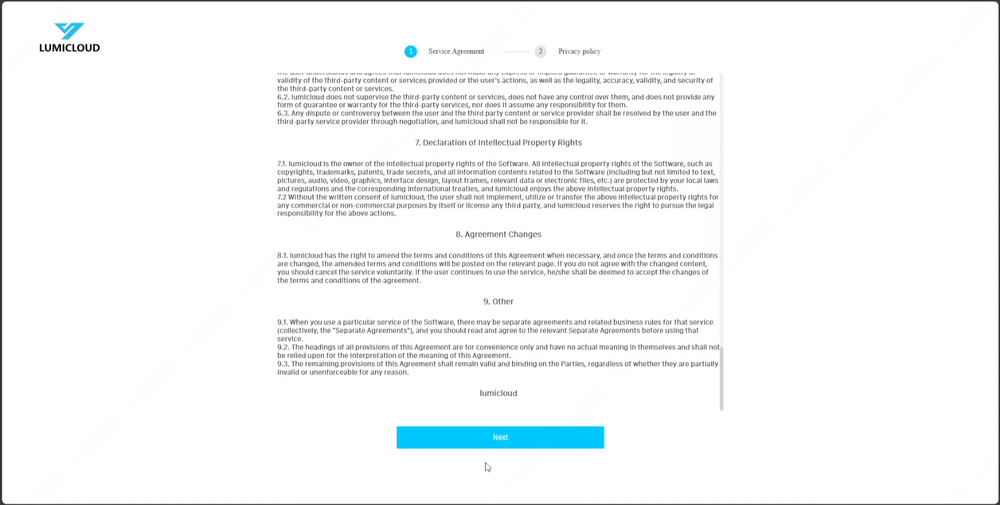
4. Read the Service Agreement and Privacy Policy, then click "Next" to continue. Click "Accept" on the last page to proceed further.
5. On the Dashboard, click on "Camera" located in the top left corner of the grid menu to expand for more options. Then click on "Solar Trailer" to proceed.
6. Once inside "Solar Trailer," click on "Solar Device" to view the solar trailer that the dealer added previously.
7. Click on "Video," then expand the solar device in the left side menu until the cameras are visible. Clicking on a camera will bring up the live view on the right side.
