Network Switches/LumiCloud Setup: Difference between revisions
Techsupport (talk | contribs) No edit summary |
Techsupport (talk | contribs) No edit summary |
||
| (5 intermediate revisions by the same user not shown) | |||
| Line 1: | Line 1: | ||
<div class="lm-banner">[[File:LuminysMainPageBanner2.png]]</div> | <div class="lm-banner">[[File:LuminysMainPageBanner2.png]]</div> | ||
= <div class=center>Network Switches LumiCloud Setup </div> = | |||
===Description=== | ===Description=== | ||
| Line 9: | Line 11: | ||
===Video Instructions=== | ===Video Instructions=== | ||
< | <youtube>https://www.youtube.com/watch?v=BVe_dsqsfVg</youtube> | ||
===Step by Step Instructions=== | ===Step by Step Instructions=== | ||
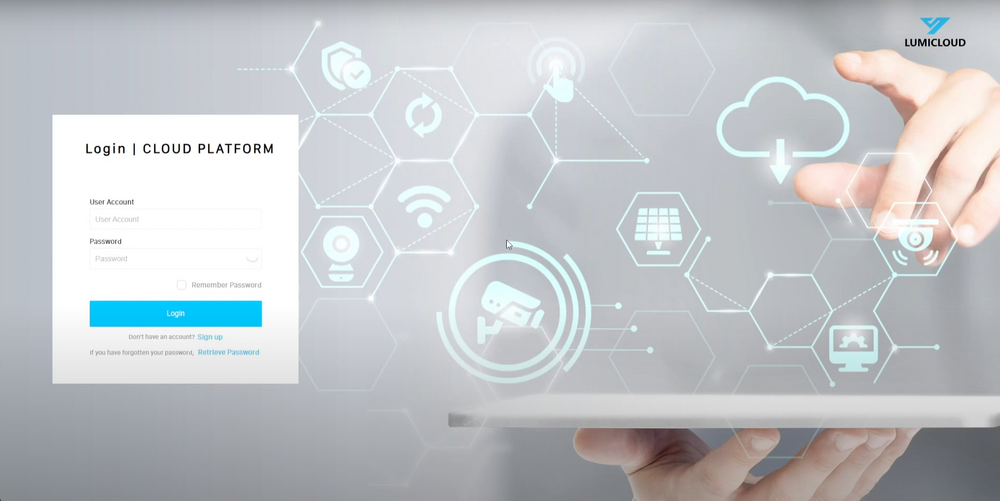
1. | 1. Open the browser and log in to the LumiCloud account for the network switch. | ||
[[File:Network_Switch_LumiCloud_Setup_1.png|1000px|link=https://wiki.luminyscorp.com/images/c/c3/Network_Switch_LumiCloud_Setup_1.png]] | |||
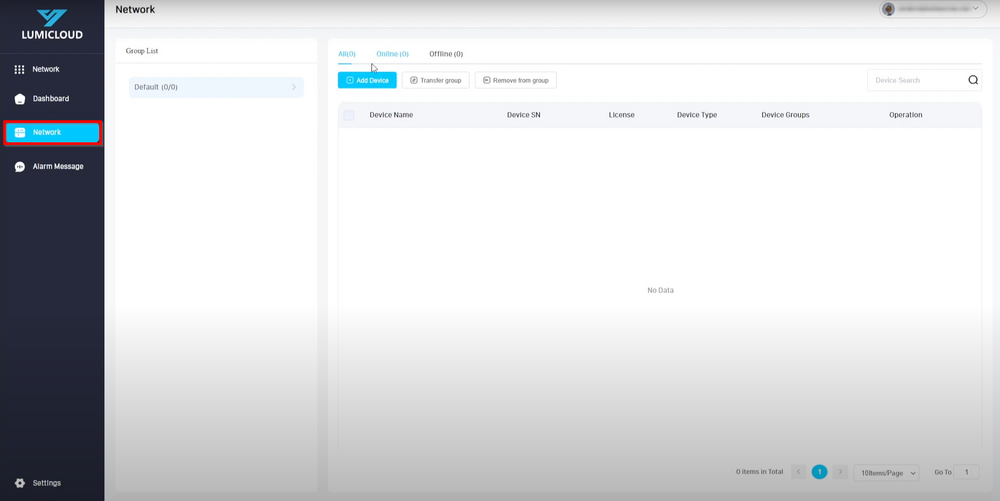
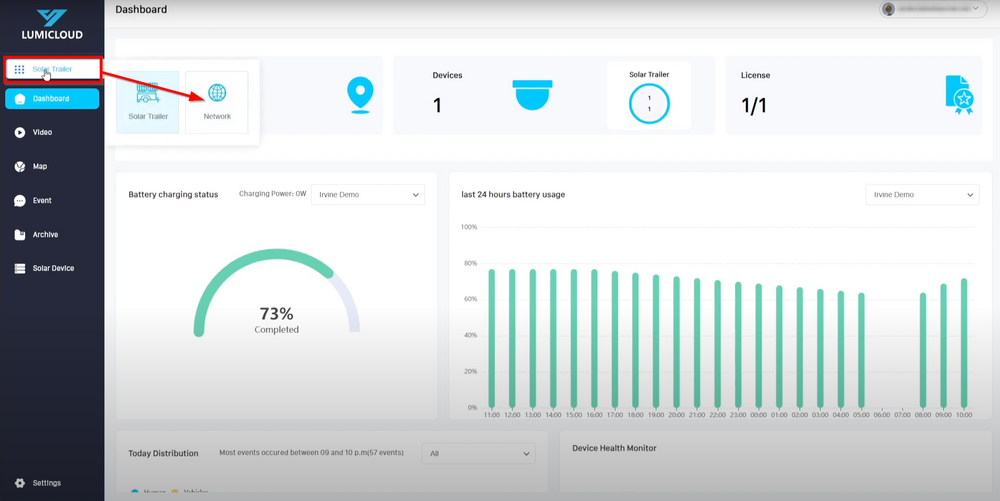
2. Click on "Solar Trailer," then select "Network." | |||
[[File:Network_Switch_LumiCloud_Setup_2.png|1000px|link=https://wiki.luminyscorp.com/images/7/76/Network_Switch_LumiCloud_Setup_2.png]] | |||
3. Click on “Network”. | |||
[[File:Network_Switch_LumiCloud_Setup_3.png|1000px|link=https://wiki.luminyscorp.com/images/8/87/Network_Switch_LumiCloud_Setup_3.png]] | |||
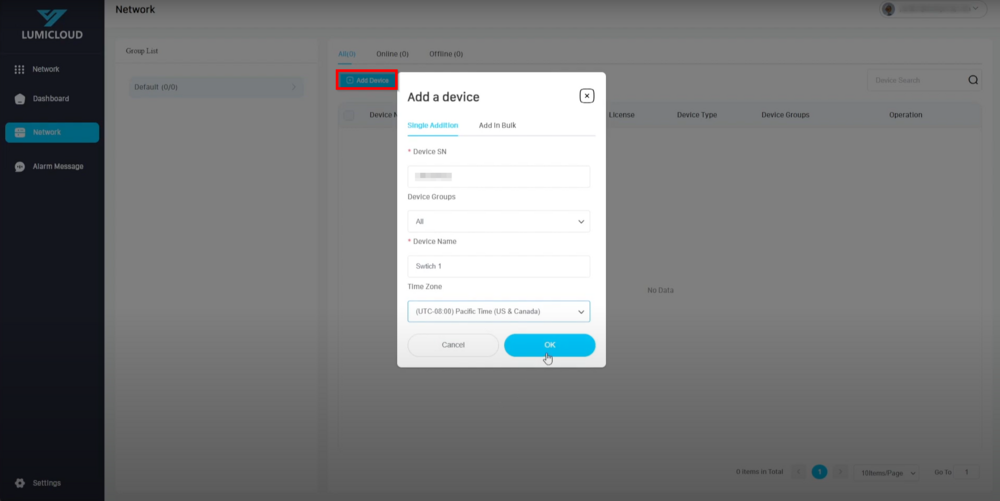
4. Click on "Add Device" to begin the process, and enter the required information. For a smoother experience, consider entering all information before proceeding. | |||
[[File:Network_Switch_LumiCloud_Setup_4.png|1000px|link=https://wiki.luminyscorp.com/images/7/72/Network_Switch_LumiCloud_Setup_4.png]] | |||
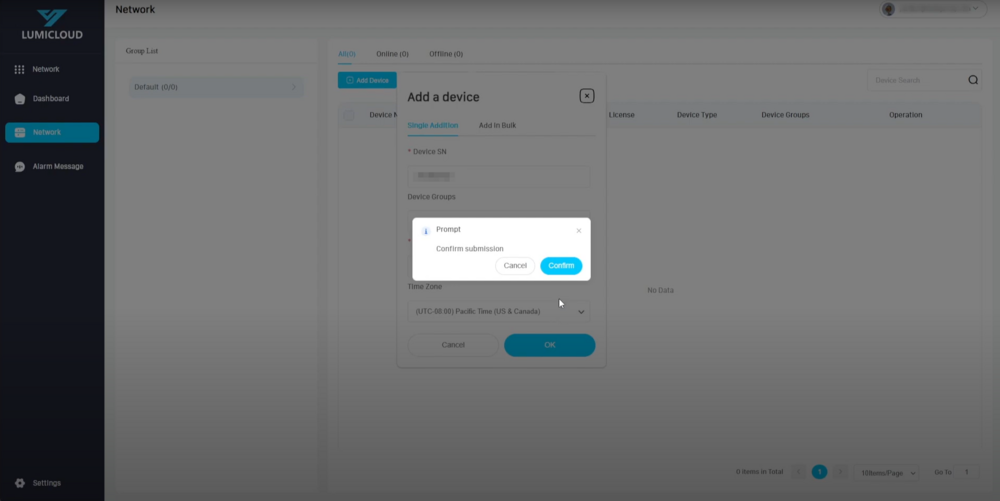
5. Click "Confirm" to complete adding the network switch to the LumiCloud account. | |||
[[File:Network_Switch_LumiCloud_Setup_5.png|1000px|link=https://wiki.luminyscorp.com/images/0/07/Network_Switch_LumiCloud_Setup_5.png]] | |||
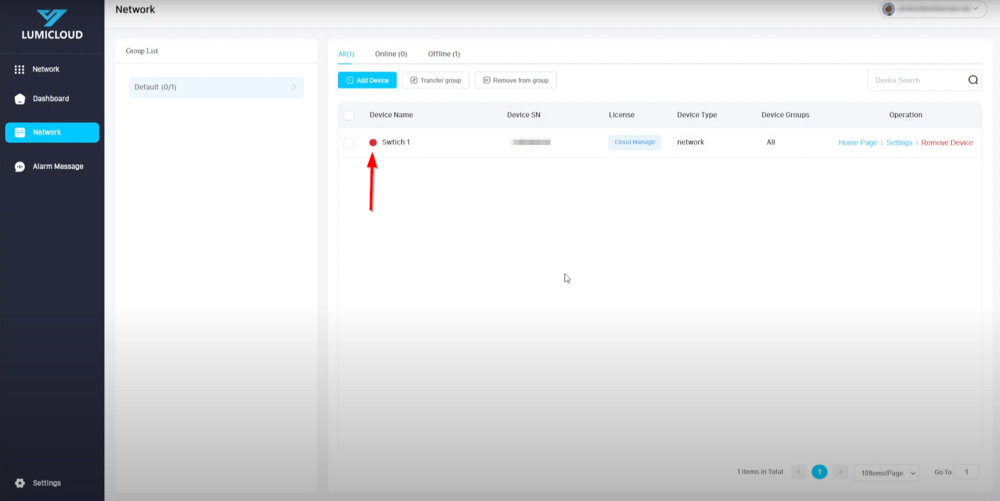
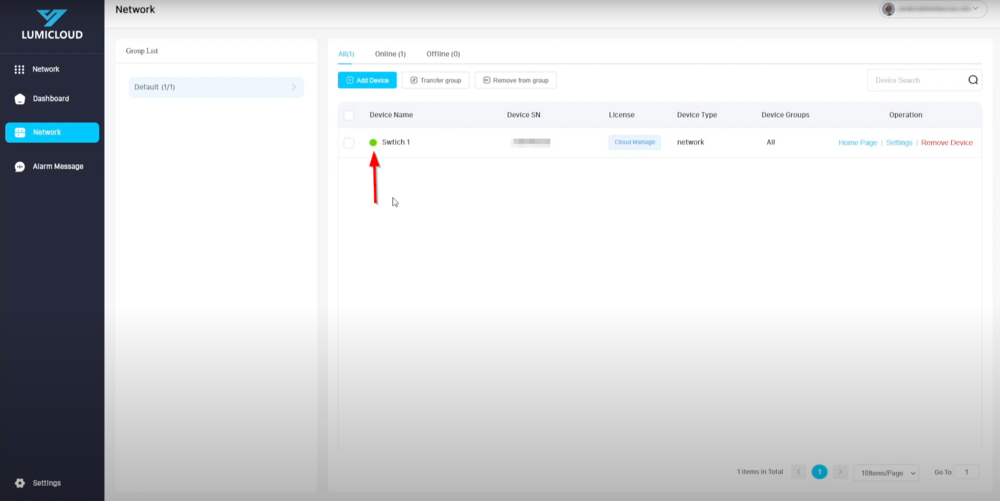
6. After the switch is added, if the license hasn’t been applied, the status light will appear red. Contact the dealer to apply the license. Once the license is applied, the status light will turn green. | |||
[[File:Network_Switch_LumiCloud_Setup_6.png|1000px|link=https://wiki.luminyscorp.com/images/c/ca/Network_Switch_LumiCloud_Setup_6.png]] | |||
[[File:Network_Switch_LumiCloud_Setup_7.png|1000px|link=https://wiki.luminyscorp.com/images/3/39/Network_Switch_LumiCloud_Setup_7.png]] | |||
7. Click on "Cloud Manage" to view the applied license details, including the effective and expiration dates. | |||
[[File:Network_Switch_LumiCloud_Setup_8.png|1000px|link=https://wiki.luminyscorp.com/images/2/2c/Network_Switch_LumiCloud_Setup_8.png]] | |||
[[File:Network_Switch_LumiCloud_Setup_9.png|1000px|link=https://wiki.luminyscorp.com/images/e/ee/Network_Switch_LumiCloud_Setup_9.png]] | |||
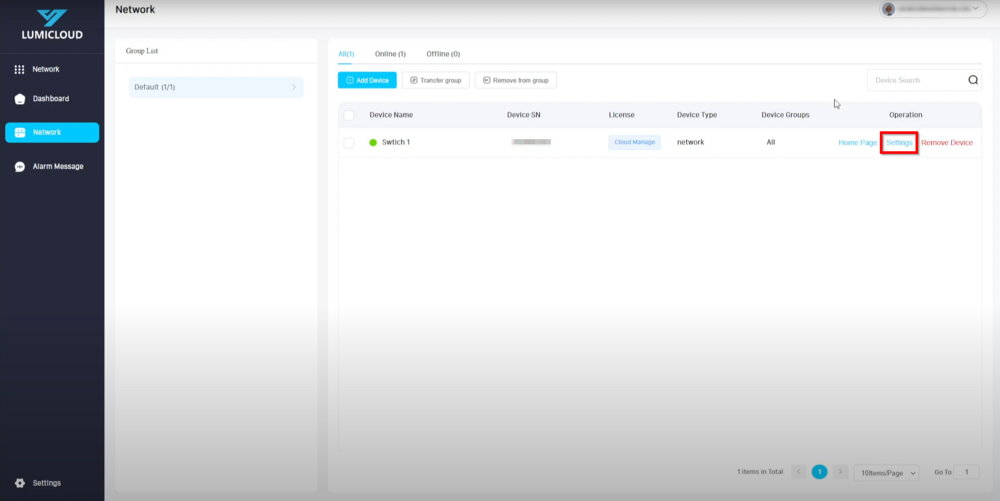
8. Click on "Settings" to view or configure additional settings for the network switch: | |||
*Device Version: Displays the current firmware version. | |||
*Device Model: Shows the model number of the network switch. | |||
*Cloud Update: Click "Update Now" to check for any available firmware updates. If none are available, a message will indicate that the current version is up-to-date. | |||
*Restart Device: Click "Restart" to reboot the network switch. | |||
*Loopback Alarm: Notifies if connected devices are creating a loopback. | |||
*Network Connection: Alerts if the network switch goes offline. | |||
*Port Congested: Notifies if any ports are congested, based on a customizable threshold percentage. | |||
*Remove Device: Removes the network switch when clicked. | |||
[[File:Network_Switch_LumiCloud_Setup_10.png|1000px|link=https://wiki.luminyscorp.com/images/d/d4/Network_Switch_LumiCloud_Setup_10.png]] | |||
[[File:Network_Switch_LumiCloud_Setup_11.png|1000px|link=https://wiki.luminyscorp.com/images/2/2f/Network_Switch_LumiCloud_Setup_11.png]] | |||
9. After completing the settings, click on "Home Page" to return to the network switch's home screen.<br> | |||
Clicking on the “Information” button (an exclamation mark inside a circle) displays a legend table explaining port indicators: | |||
*Copper/Optical Port: Available on all network switches; note that not all have optical ports. | |||
*Blue: Indicates smooth operation. | |||
*Orange: Indicates an error. | |||
*Red: Indicates congestion. | |||
*Black: Indicates the port is not connected. | |||
*Lightning icon with green circle: Shows the port is supplying PoE power. | |||
*Circle with a minus sign: Indicates the port is blocked. | |||
*Three connected dots: Indicates a loopback on the port. | |||
*X sign with a circle: Shows the port is closed. | |||
[[File:Network_Switch_LumiCloud_Setup_12.png|1000px|link=https://wiki.luminyscorp.com/images/4/48/Network_Switch_LumiCloud_Setup_12.png]] | |||
[[File: | [[File:Network_Switch_LumiCloud_Setup_13.png|1000px|link=https://wiki.luminyscorp.com/images/9/90/Network_Switch_LumiCloud_Setup_13.png]] | ||
10. Clicking on “View More Info” expands a list on the right-hand side, displaying details such as:<br> | |||
*Device Name: The user-defined name, which can be changed if needed. | |||
*Running Duration: The amount of time the network switch has been powered on. | |||
*Device Model: The model name of the network switch. | |||
*Device SN: The serial number of the network switch. | |||
*Firmware Version: The current firmware version running on the network switch. | |||
*IP Address: The current IP address being used by the network switch. | |||
*MAC Address: The MAC address associated with the network switch. | |||
[[File:Network_Switch_LumiCloud_Setup_14.png|1000px|link=https://wiki.luminyscorp.com/images/f/f9/Network_Switch_LumiCloud_Setup_14.png]] | |||
11. Click on "Settings" for each individual port to configure additional settings:<br> | |||
*Tag Name: A user-defined name for the port. | |||
*Port On/Off: Disabling the port prevents data transmission but still supplies power to the connected device. | |||
*Restart Port: Disabling and re-enabling the port only affects data transmission. | |||
*Port On/Off Config: Enabling or disabling PoE does not affect data transmission on the port. | |||
*Long Distance PoE: Extends the transmission distance up to 250 meters, automatically adjusting the port speed to 10Mbps. | |||
*PoE Watchdog: Automatically detects and restarts a powered device if it crashes. | |||
*Speed/Duplex Config: With flow control enabled, sub-devices are notified to pause packet transmission when the switch port is congested, reducing port congestion. | |||
*Energy Efficient Ethernet Config: When enabled, the switch automatically shuts down idle circuits to reduce power consumption. | |||
Once all settings are configured, click anywhere outside the list to save the changes. | |||
[[File:Network_Switch_LumiCloud_Setup_15.png|1000px|link=https://wiki.luminyscorp.com/images/4/41/Network_Switch_LumiCloud_Setup_15.png]] | |||
[[File: | [[File:Network_Switch_LumiCloud_Setup_16.png|1000px|link=https://wiki.luminyscorp.com/images/9/91/Network_Switch_LumiCloud_Setup_16.png]] | ||
[[File:Network_Switch_LumiCloud_Setup_17.png|1000px|link=https://wiki.luminyscorp.com/images/a/a8/Network_Switch_LumiCloud_Setup_17.png]] | |||
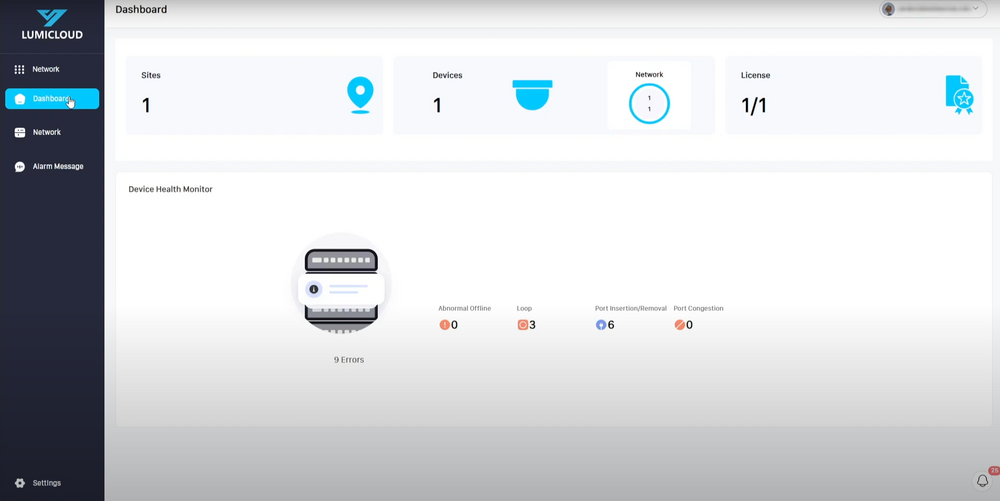
12. Click on "Dashboard" to view information including sites, devices, licenses, and the device health monitor. | |||
[[File:Network_Switch_LumiCloud_Setup_18.png|1000px|link=https://wiki.luminyscorp.com/images/0/05/Network_Switch_LumiCloud_Setup_18.png]] | |||
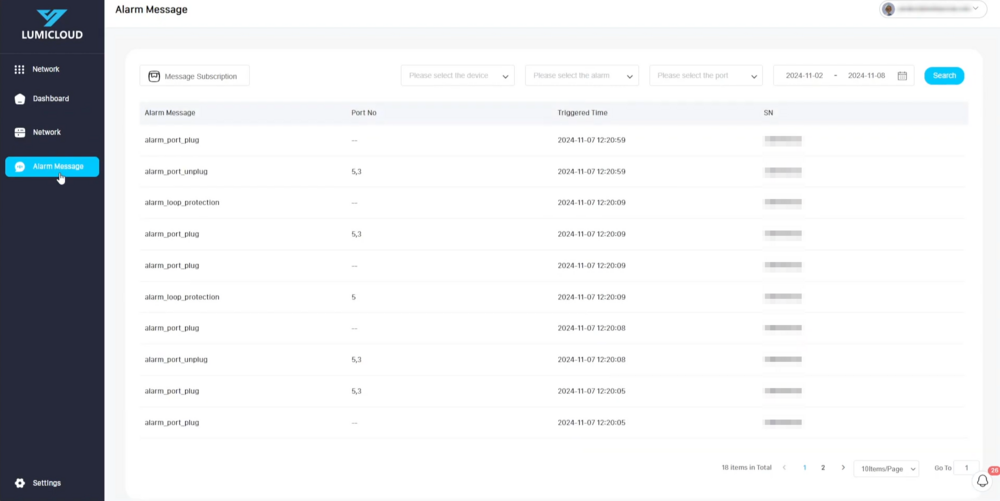
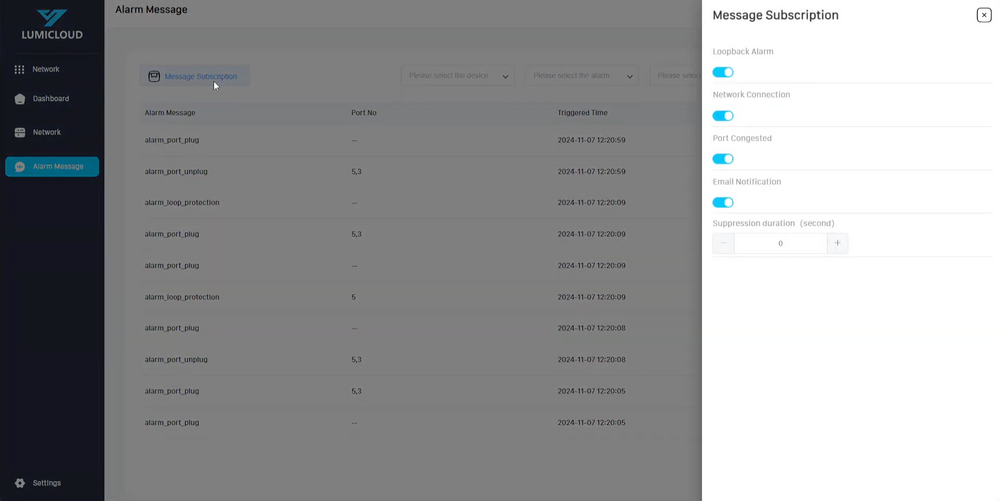
13. Click on "Alarm Message" to view information such as loopback alarms, network connection issues, port congestion, and email notifications. The "Suppression Duration" in seconds determines the interval between each notification. | |||
[[File:Network_Switch_LumiCloud_Setup_19.png|1000px|link=https://wiki.luminyscorp.com/images/c/c7/Network_Switch_LumiCloud_Setup_19.png]] | |||
[[File: | [[File:Network_Switch_LumiCloud_Setup_20.png|1000px|link=https://wiki.luminyscorp.com/images/3/3b/Network_Switch_LumiCloud_Setup_20.png]] | ||
Latest revision as of 17:44, 13 December 2024
Network Switches LumiCloud Setup
Description
This tutorial will go over on how to setup network switches on LumiCloud.
Prerequisites
- Physical switch powered on.
- A computer connected to the same network as the switch and access the website.
Video Instructions
Step by Step Instructions
1. Open the browser and log in to the LumiCloud account for the network switch.
2. Click on "Solar Trailer," then select "Network."
3. Click on “Network”.
4. Click on "Add Device" to begin the process, and enter the required information. For a smoother experience, consider entering all information before proceeding.
5. Click "Confirm" to complete adding the network switch to the LumiCloud account.
6. After the switch is added, if the license hasn’t been applied, the status light will appear red. Contact the dealer to apply the license. Once the license is applied, the status light will turn green.
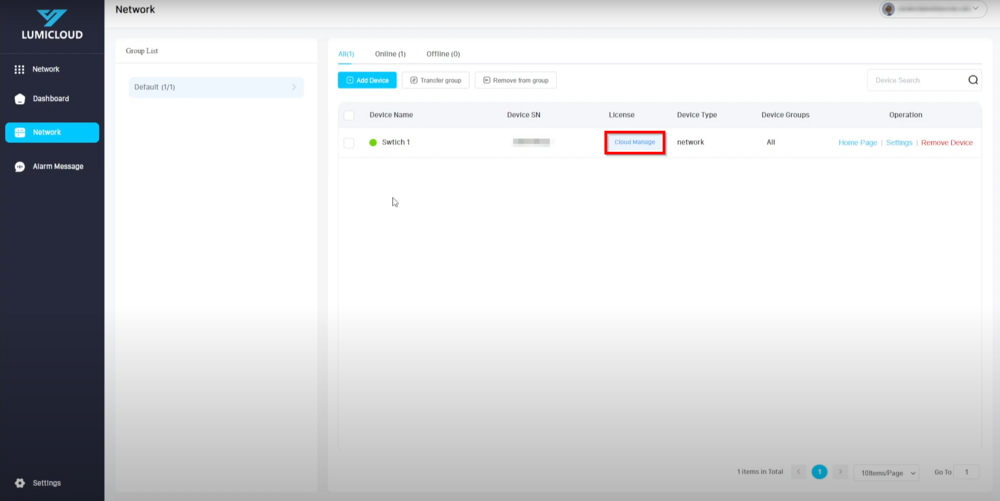
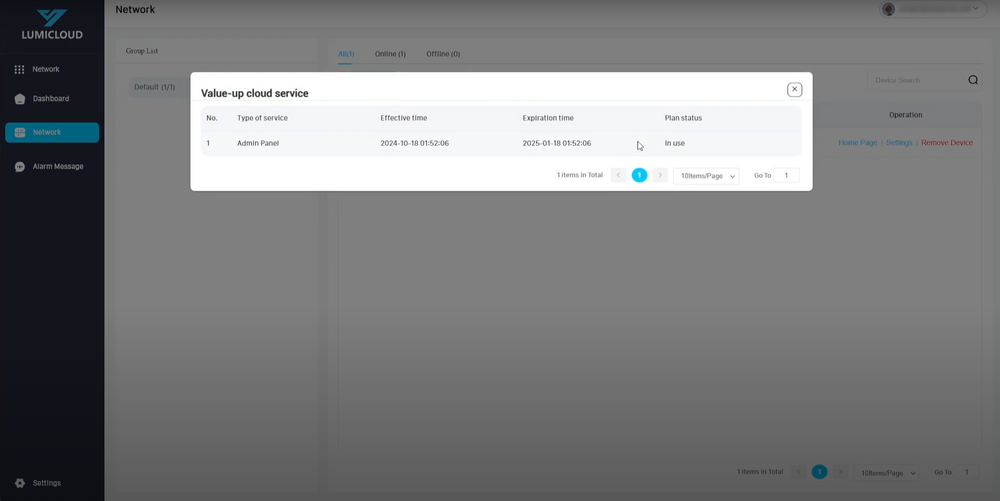
7. Click on "Cloud Manage" to view the applied license details, including the effective and expiration dates.
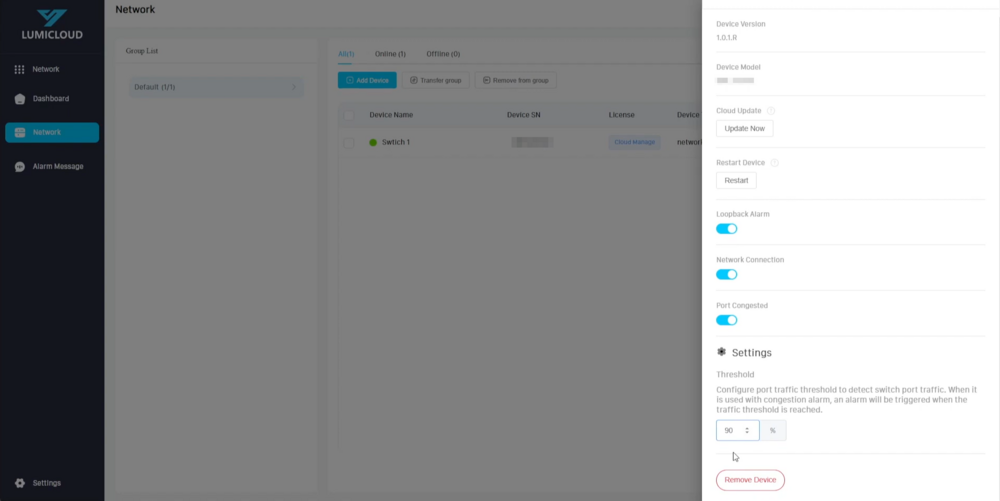
8. Click on "Settings" to view or configure additional settings for the network switch:
- Device Version: Displays the current firmware version.
- Device Model: Shows the model number of the network switch.
- Cloud Update: Click "Update Now" to check for any available firmware updates. If none are available, a message will indicate that the current version is up-to-date.
- Restart Device: Click "Restart" to reboot the network switch.
- Loopback Alarm: Notifies if connected devices are creating a loopback.
- Network Connection: Alerts if the network switch goes offline.
- Port Congested: Notifies if any ports are congested, based on a customizable threshold percentage.
- Remove Device: Removes the network switch when clicked.
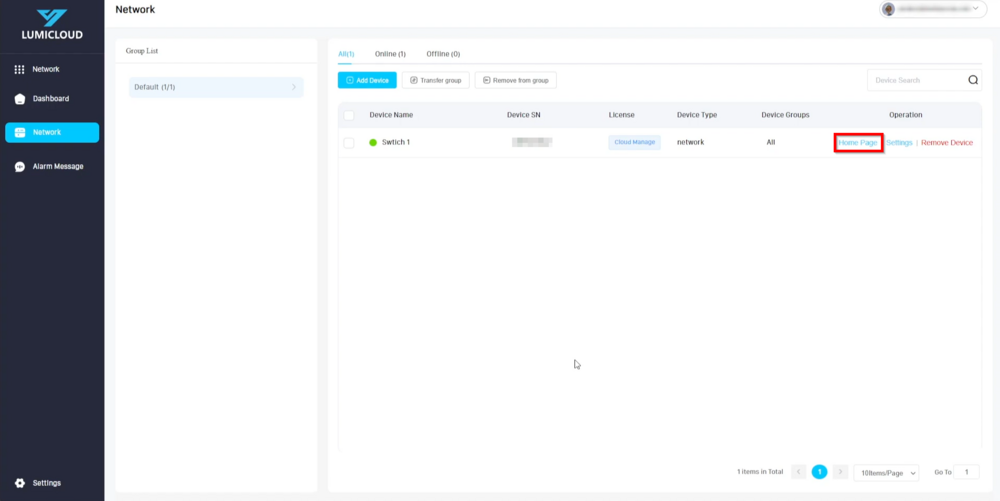
9. After completing the settings, click on "Home Page" to return to the network switch's home screen.
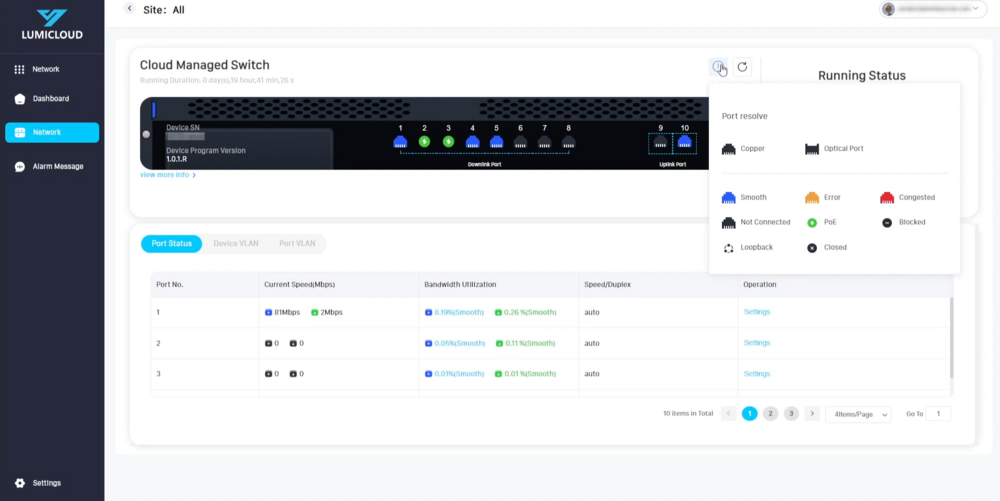
Clicking on the “Information” button (an exclamation mark inside a circle) displays a legend table explaining port indicators:
- Copper/Optical Port: Available on all network switches; note that not all have optical ports.
- Blue: Indicates smooth operation.
- Orange: Indicates an error.
- Red: Indicates congestion.
- Black: Indicates the port is not connected.
- Lightning icon with green circle: Shows the port is supplying PoE power.
- Circle with a minus sign: Indicates the port is blocked.
- Three connected dots: Indicates a loopback on the port.
- X sign with a circle: Shows the port is closed.
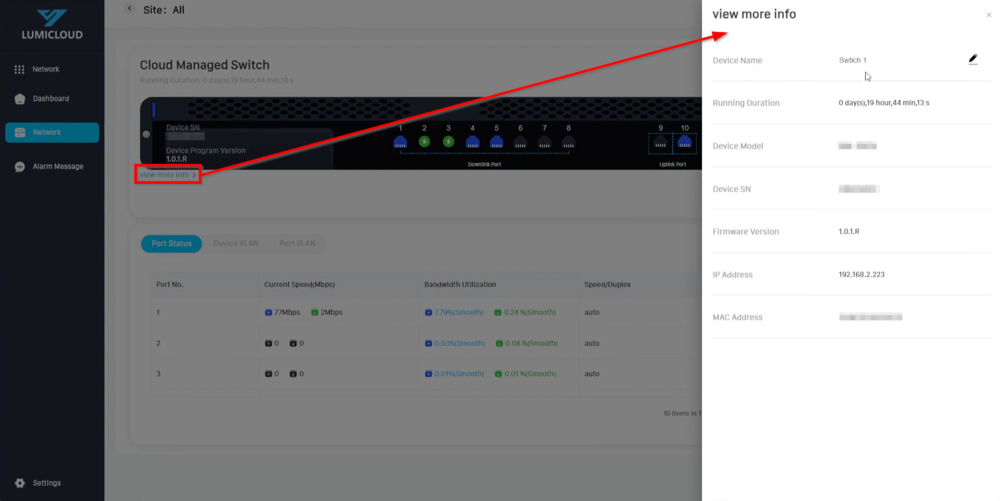
10. Clicking on “View More Info” expands a list on the right-hand side, displaying details such as:
- Device Name: The user-defined name, which can be changed if needed.
- Running Duration: The amount of time the network switch has been powered on.
- Device Model: The model name of the network switch.
- Device SN: The serial number of the network switch.
- Firmware Version: The current firmware version running on the network switch.
- IP Address: The current IP address being used by the network switch.
- MAC Address: The MAC address associated with the network switch.
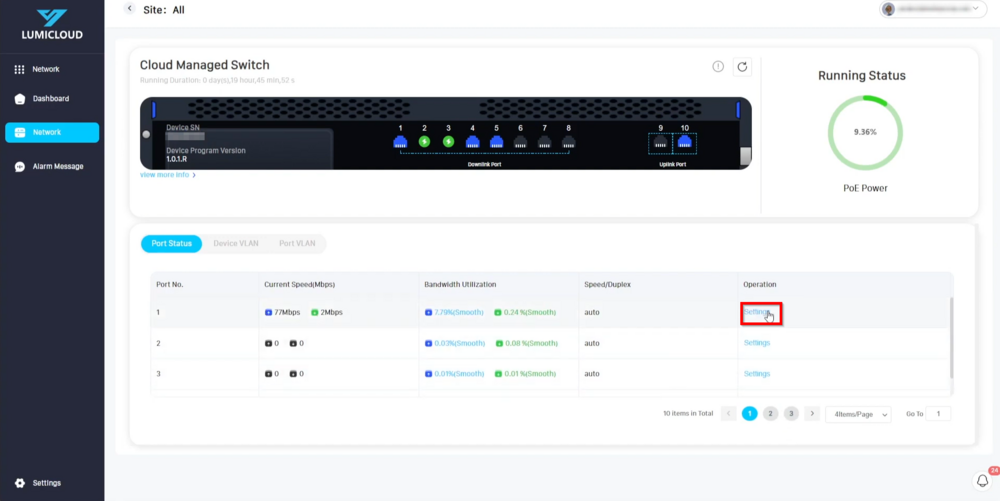
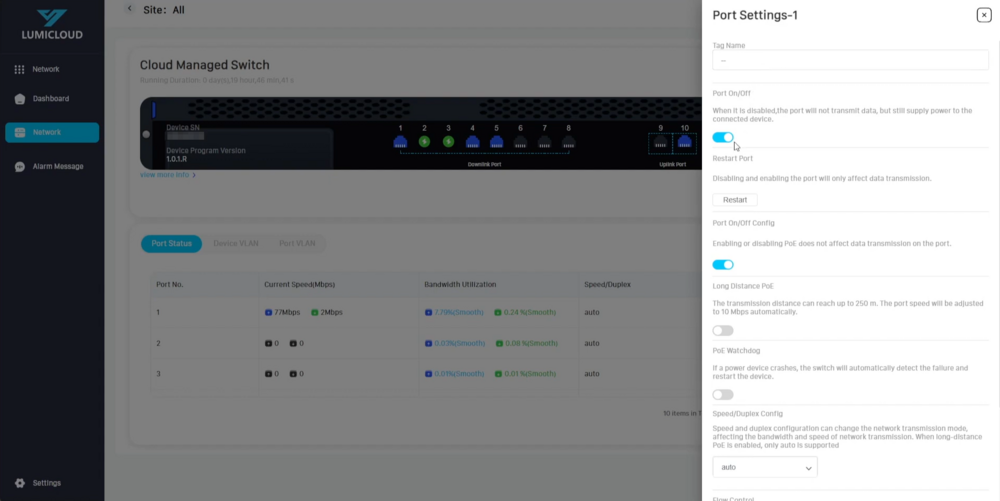
11. Click on "Settings" for each individual port to configure additional settings:
- Tag Name: A user-defined name for the port.
- Port On/Off: Disabling the port prevents data transmission but still supplies power to the connected device.
- Restart Port: Disabling and re-enabling the port only affects data transmission.
- Port On/Off Config: Enabling or disabling PoE does not affect data transmission on the port.
- Long Distance PoE: Extends the transmission distance up to 250 meters, automatically adjusting the port speed to 10Mbps.
- PoE Watchdog: Automatically detects and restarts a powered device if it crashes.
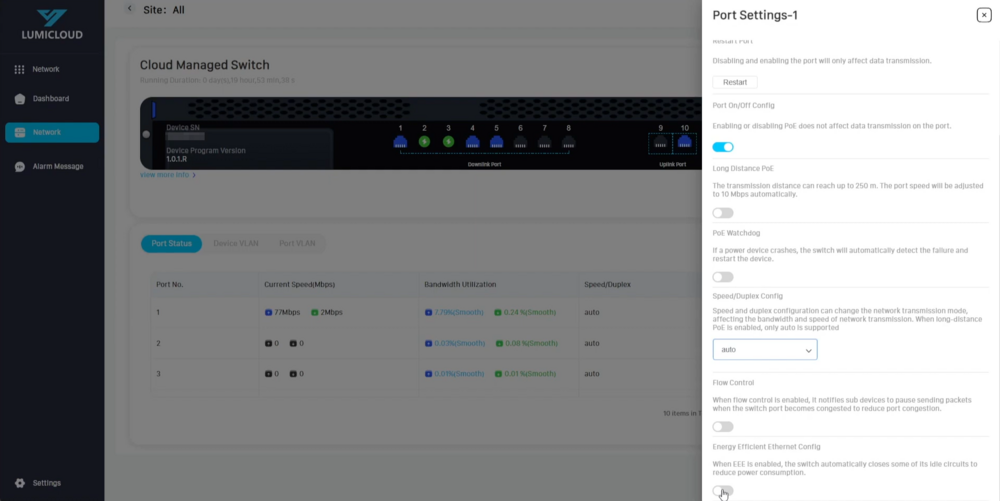
- Speed/Duplex Config: With flow control enabled, sub-devices are notified to pause packet transmission when the switch port is congested, reducing port congestion.
- Energy Efficient Ethernet Config: When enabled, the switch automatically shuts down idle circuits to reduce power consumption.
Once all settings are configured, click anywhere outside the list to save the changes.
12. Click on "Dashboard" to view information including sites, devices, licenses, and the device health monitor.
13. Click on "Alarm Message" to view information such as loopback alarms, network connection issues, port congestion, and email notifications. The "Suppression Duration" in seconds determines the interval between each notification.


