LumiCenter/How to Create Storage Archives: Difference between revisions
Techsupport (talk | contribs) No edit summary |
Techsupport (talk | contribs) No edit summary |
||
| Line 43: | Line 43: | ||
[[File:3.1.2.Storage_Creation.png|1000px|link=https://wiki.luminyscorp.com/images/6/60/3.1.2.Storage_Creation.png]] | [[File:3.1.2.Storage_Creation.png|1000px|link=https://wiki.luminyscorp.com/images/6/60/3.1.2.Storage_Creation.png]] | ||
[[File:3.1.3.Storage_Creation.png| | [[File:3.1.3.Storage_Creation.png|500px|link=https://wiki.luminyscorp.com/images/1/12/3.1.3.Storage_Creation.png]] | ||
4. Storage type: Block | 4. Storage type: Block | ||
Revision as of 15:19, 8 November 2024
How to Create Storage Archives
Description
This tutorial will go over how to create storage in LumiCenter.
Prerequisites
- Separate hard drives already installed on the computer.
Step by Step Instructions
1. To record videos to LumiCenter server drives or remote drives, it is necessary to configure storage archives. An unlimited number of storage locations can be created on the server as needed.
The three types of storage options are:
Local storage: Storage may include one or multiple partitions, which can take the form of an AFS file with a specific size, an expandable folder, or a logical drive. These partitions within a single storage archive are distributed across multiple logical disks on the server.
Remote storage: Storage can consist of one or multiple volumes across various remote storage locations. Partitions within the storage archive are limited to AFS files of a specific size.
Cloud storage: Storage can be kept in a single cloud location and may include multiple partitions of unlimited size, with the option to adjust size at any time.
Note: In over 99% of scenarios, local storage is recommended, and this tutorial will focus on that setup.
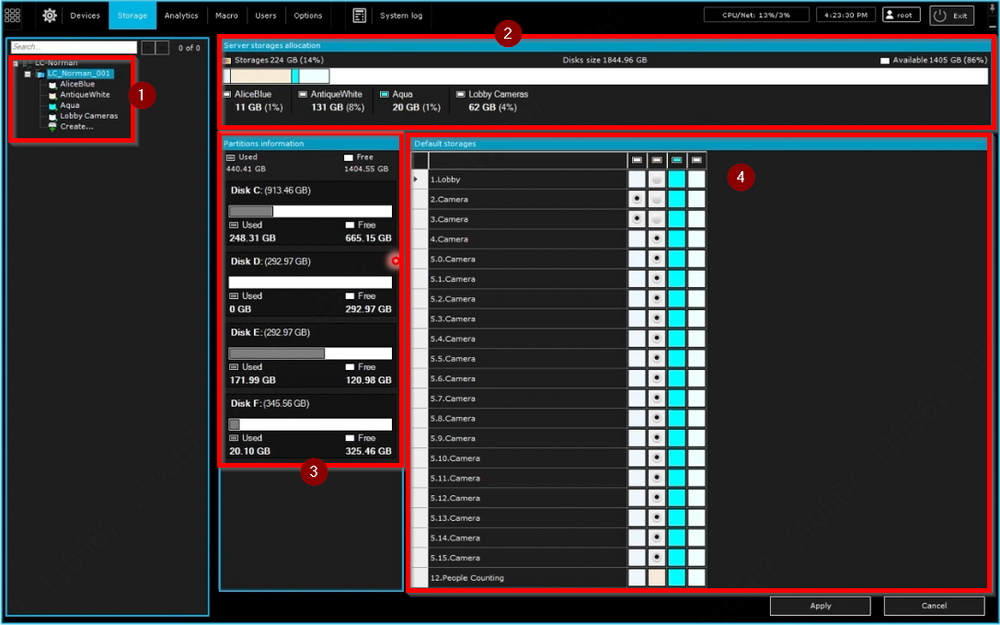
2. Select “Storage” to open the storage configuration panel.
- A list displays all configured storage archives under the domain object. For first-time storage archive creation, select "Create."
- Server storage allocation displays the server object's disk size, the size of each storage archive, and the space each archive occupies within the total storage capacity.
- Partition information provides the size of each logical disk within the server object, along with details on used and free space.
- Default storages allow cameras to record to multiple storage archives; however, each camera is assigned only one default storage archive. This default archive is designated for recording images when an alarm is manually triggered.
3. Key parameters of the storage archive:
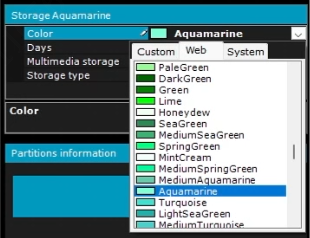
Color: choose a color to identify the archive. This color cannot be changed later, as it serves as the ID for the storage archive.
Days: this option allows for limiting the availability of footage for viewing by users. Consequently, only recordings within the specified number of days will be accessible. If a value of 0 is set, the entire archive will be available for viewing.
Storage type: Block or Object
4. Storage type: Block
To ensure lower latency and higher performance in various situations, such as tasks involving a large read and write load, select Block.
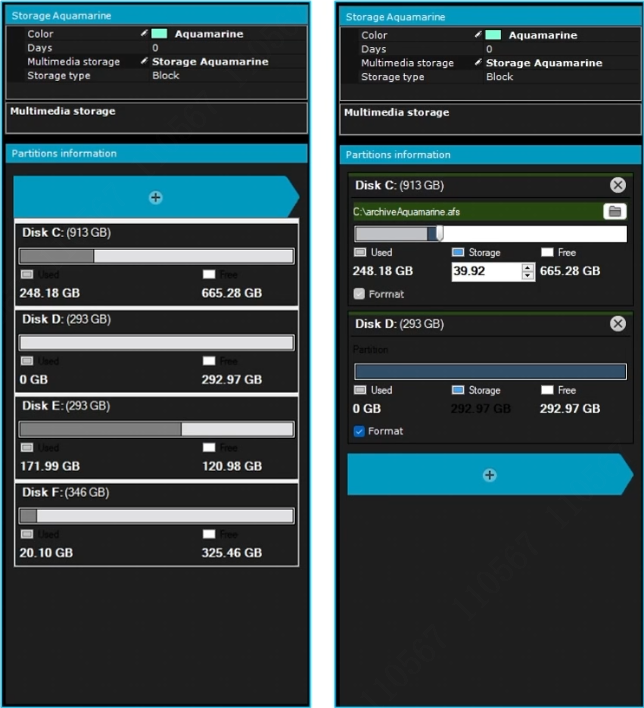
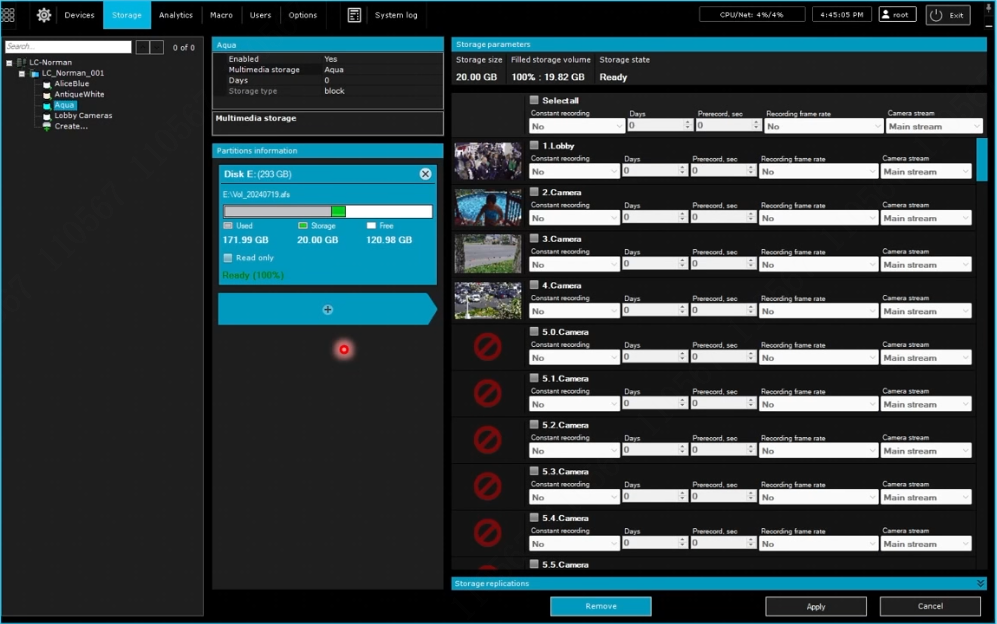
Click the “+” button and choose a logical drive with a file system to create a partition.
Specify the size of the partition.
The previous step can be repeated to create multiple partitions.
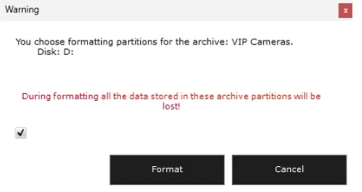
If a drive does not have a file system, the entire disk can be used as a storage archive partition. In this case, check the Format checkbox.
Finally, click on Apply to save the configuration.
Note: When selecting an unformatted drive to be used as a storage archive, formatting is required before use.
5. If the configuration is correct, the Partition information will display all the partitions associated with this storage archive.
On the right side, additional information will be provided regarding the amount of storage used in the archive, along with a list of all the cameras associated with the server object.
Important: Relying on a storage archive with only one partition is not recommended. It is more practical to divide the storage archive into multiple partitions across different hardware devices. It is advisable to create a storage archive with each partition no larger than 30 TB.
6. Now, if navigating to the logical drive, an .afs file will be visible. The size of the .afs file corresponds exactly to the specified size entered when adding the partition in the storage archive. The .afs file is named after the color selected during the creation of the storage archive. Space on the logical drive is pre-occupied to enhance I/O performance. The .afs file cannot be expanded; to enlarge a storage archive of the Block type, an additional partition can be added.
7. Storage type: Object:
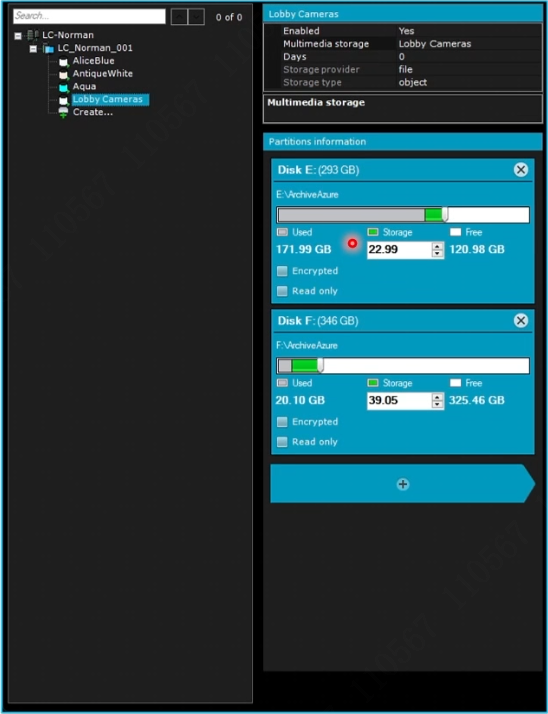
For greater flexibility in storage space planning, selecting the object under Storage type is advisable. The size of the partition can be adjusted after creating the storage archive. Similarly, click the plus button and choose a logical drive with a file system to create an archive partition. Specify the size of the partition. The previous step can be repeated to create multiple partitions. Drives without a file system will not be listed under Partition information. A logical drive cannot be used as a partition in object mode.
8. Now, upon navigating to the logical drive, an Archive folder will be visible. The size of the folder is 550 bytes, as it is not currently being used for recording. The folder is named after the color selected during the creation of the archive. The folder can be expanded later by entering the new size of the partition and clicking Apply. Similarly, to enlarge a storage archive of the Object type, an additional storage partition can be added.
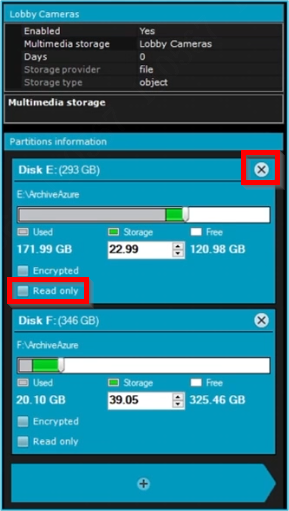
9. Read only: Check the Read only box to prevent recordings in the partition from being overwritten.
The blue X button: click this button to remove the partition from the storage archive if necessary.
This setting can be useful when expanding a storage archive without overwriting previously recorded footage.
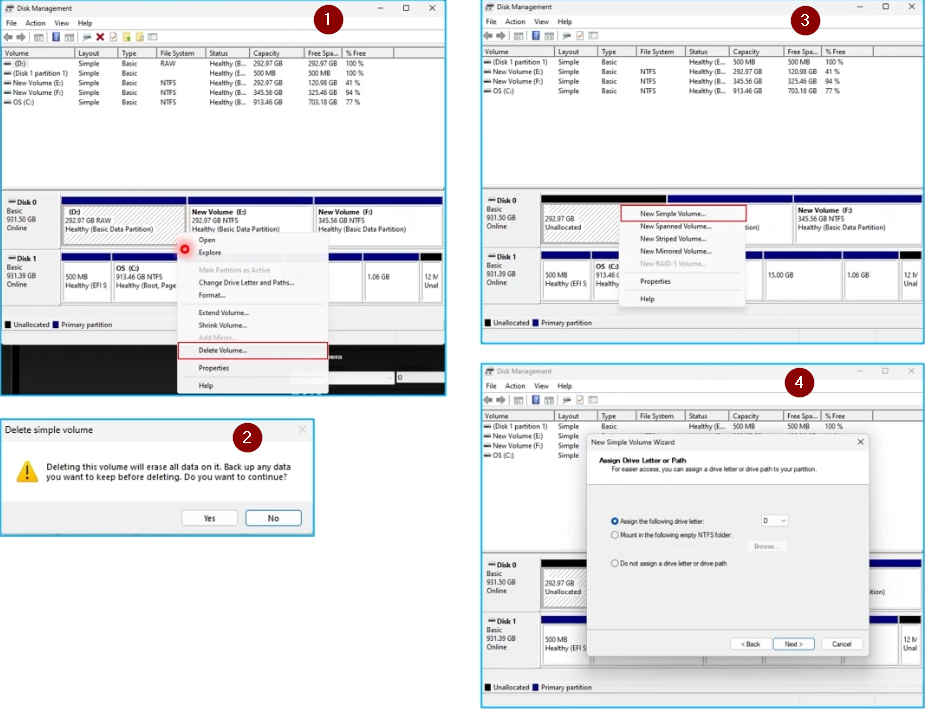
10. An alternative method to make a logical drive available for LumiCenter:
Step 1: Select the partition intended for use as a storage partition in LumiCenter. Step 2: Choose Yes in the prompt to delete it. Step 3: A new unallocated partition will appear; right-click it and select New Simple Partition. Step 4: Assign a letter to the partition.
Step 5: Select Do not format this partition to ensure that the logical drive remains without a file system. Step 6: Confirm the creation of the newly created partition. Step 7: The new partition will be displayed as RAW, indicating that it does not have a file system.
Important:
- The color assigned to the storage archive during creation serves as the ID for that archive and cannot be changed later.
- A storage archive may contain multiple partitions; however, all partitions must be located on different logical drives. Two partitions cannot exist on the same logical drive.
- Conversely, a logical drive can contain multiple partitions, which are assigned to different storage archives.
- The size of a storage partition should not exceed 30 TB.

