IP Speaker/Add to LumiCenter via External IP: Difference between revisions
From Luminys WIKI
Techsupport (talk | contribs) |
Techsupport (talk | contribs) |
||
| Line 10: | Line 10: | ||
===Initial IP Speaker Setup=== | ===Initial IP Speaker Setup=== | ||
1. Parameters setting for IP speaker: | 1. Parameters setting for IP speaker: | ||
After | After logging in, go to Interface Protocol > ONVIF tab > Click on "Enable" button. Configure the Username, Password, ONVIF Port, RTSP Port, RTP Port, NAT IP Address, and NAT ONVIF Port as shown in the images below:<br> | ||
<span style="color:red; font-style:italic;"> | <span style="color:red; font-style:italic;"> | ||
Tip: | Tip: Use 554 as the RTSP port.<br> | ||
RTP | Set the RTP port range to 8000–8005 and use UDP for port forwarding.<br> | ||
NAT IP Address is the static IP address | The NAT IP Address is the network’s static public IP address.<br> | ||
NAT ONVIF Port is the | The NAT ONVIF Port is the public ONVIF port used for adding the device.<br> | ||
</span> | </span> | ||
[[File:IPSpeakertoLumiCenter1a.png|700px|link=https://wiki.luminyscorp.com/images/a/a0/IPSpeakertoLumiCenter1a.png]] | [[File:IPSpeakertoLumiCenter1a.png|700px|link=https://wiki.luminyscorp.com/images/a/a0/IPSpeakertoLumiCenter1a.png]] | ||
<br>[[File:IPSpeakertoLumiCenter1b.png|700px|link=https://wiki.luminyscorp.com/images/e/ea/IPSpeakertoLumiCenter1b.png]] | <br>[[File:IPSpeakertoLumiCenter1b.png|700px|link=https://wiki.luminyscorp.com/images/e/ea/IPSpeakertoLumiCenter1b.png]] | ||
Revision as of 12:39, 3 June 2026
Description
This is used in LumiCenter to remotely add an IP speaker and enable audio playback and two-way communication.
Prerequisites
- The IP speaker must be on a network with a static public IP address.
- The IP speaker firmware must be version V1.43.1(260522B) or later.
Step by Step Instructions
Initial IP Speaker Setup
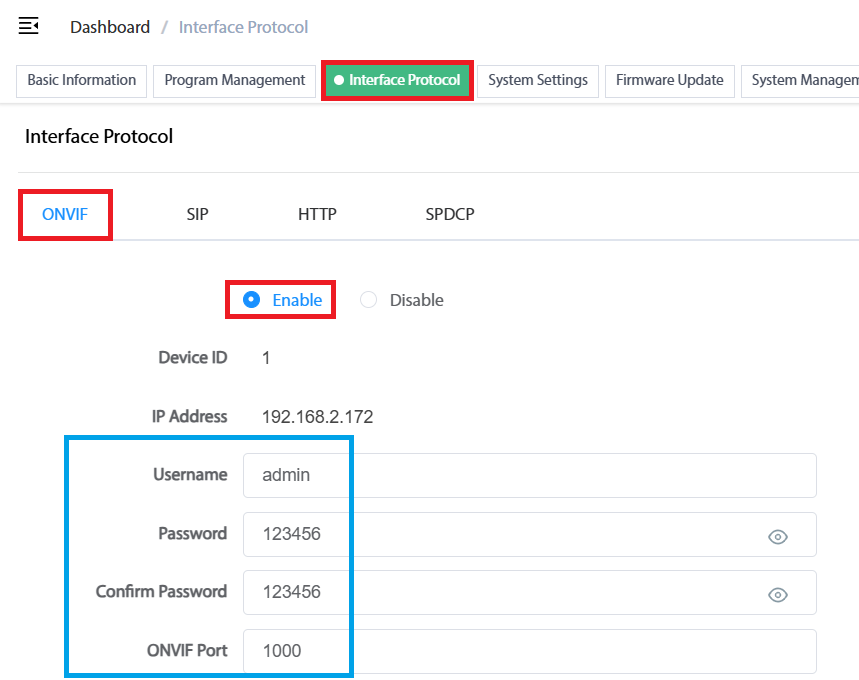
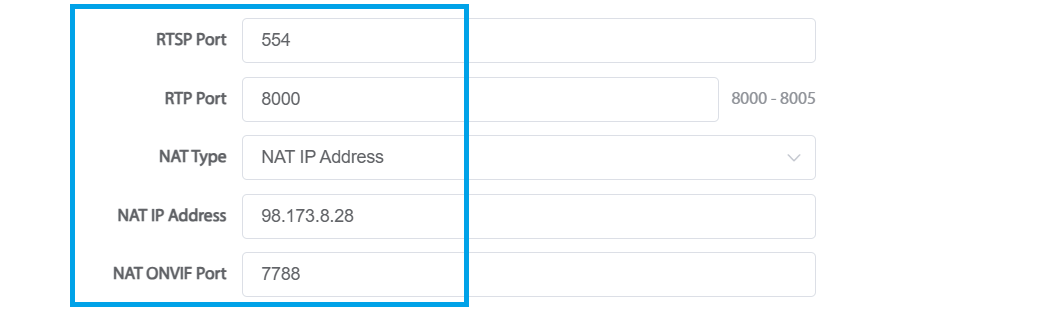
1. Parameters setting for IP speaker:
After logging in, go to Interface Protocol > ONVIF tab > Click on "Enable" button. Configure the Username, Password, ONVIF Port, RTSP Port, RTP Port, NAT IP Address, and NAT ONVIF Port as shown in the images below:
Tip: Use 554 as the RTSP port.
Set the RTP port range to 8000–8005 and use UDP for port forwarding.
The NAT IP Address is the network’s static public IP address.
The NAT ONVIF Port is the public ONVIF port used for adding the device.