NVR/ How To Set Up VCA (Video Content Analysis)
How To Set Up VCA (Video Content Analysis)
Description
This tutorial will go over how to set up VCA via NVR webui.
Prerequisites
- NVR powered on and connected to the local network.
Video Instructions
Coming soon.
Step by Step Instructions
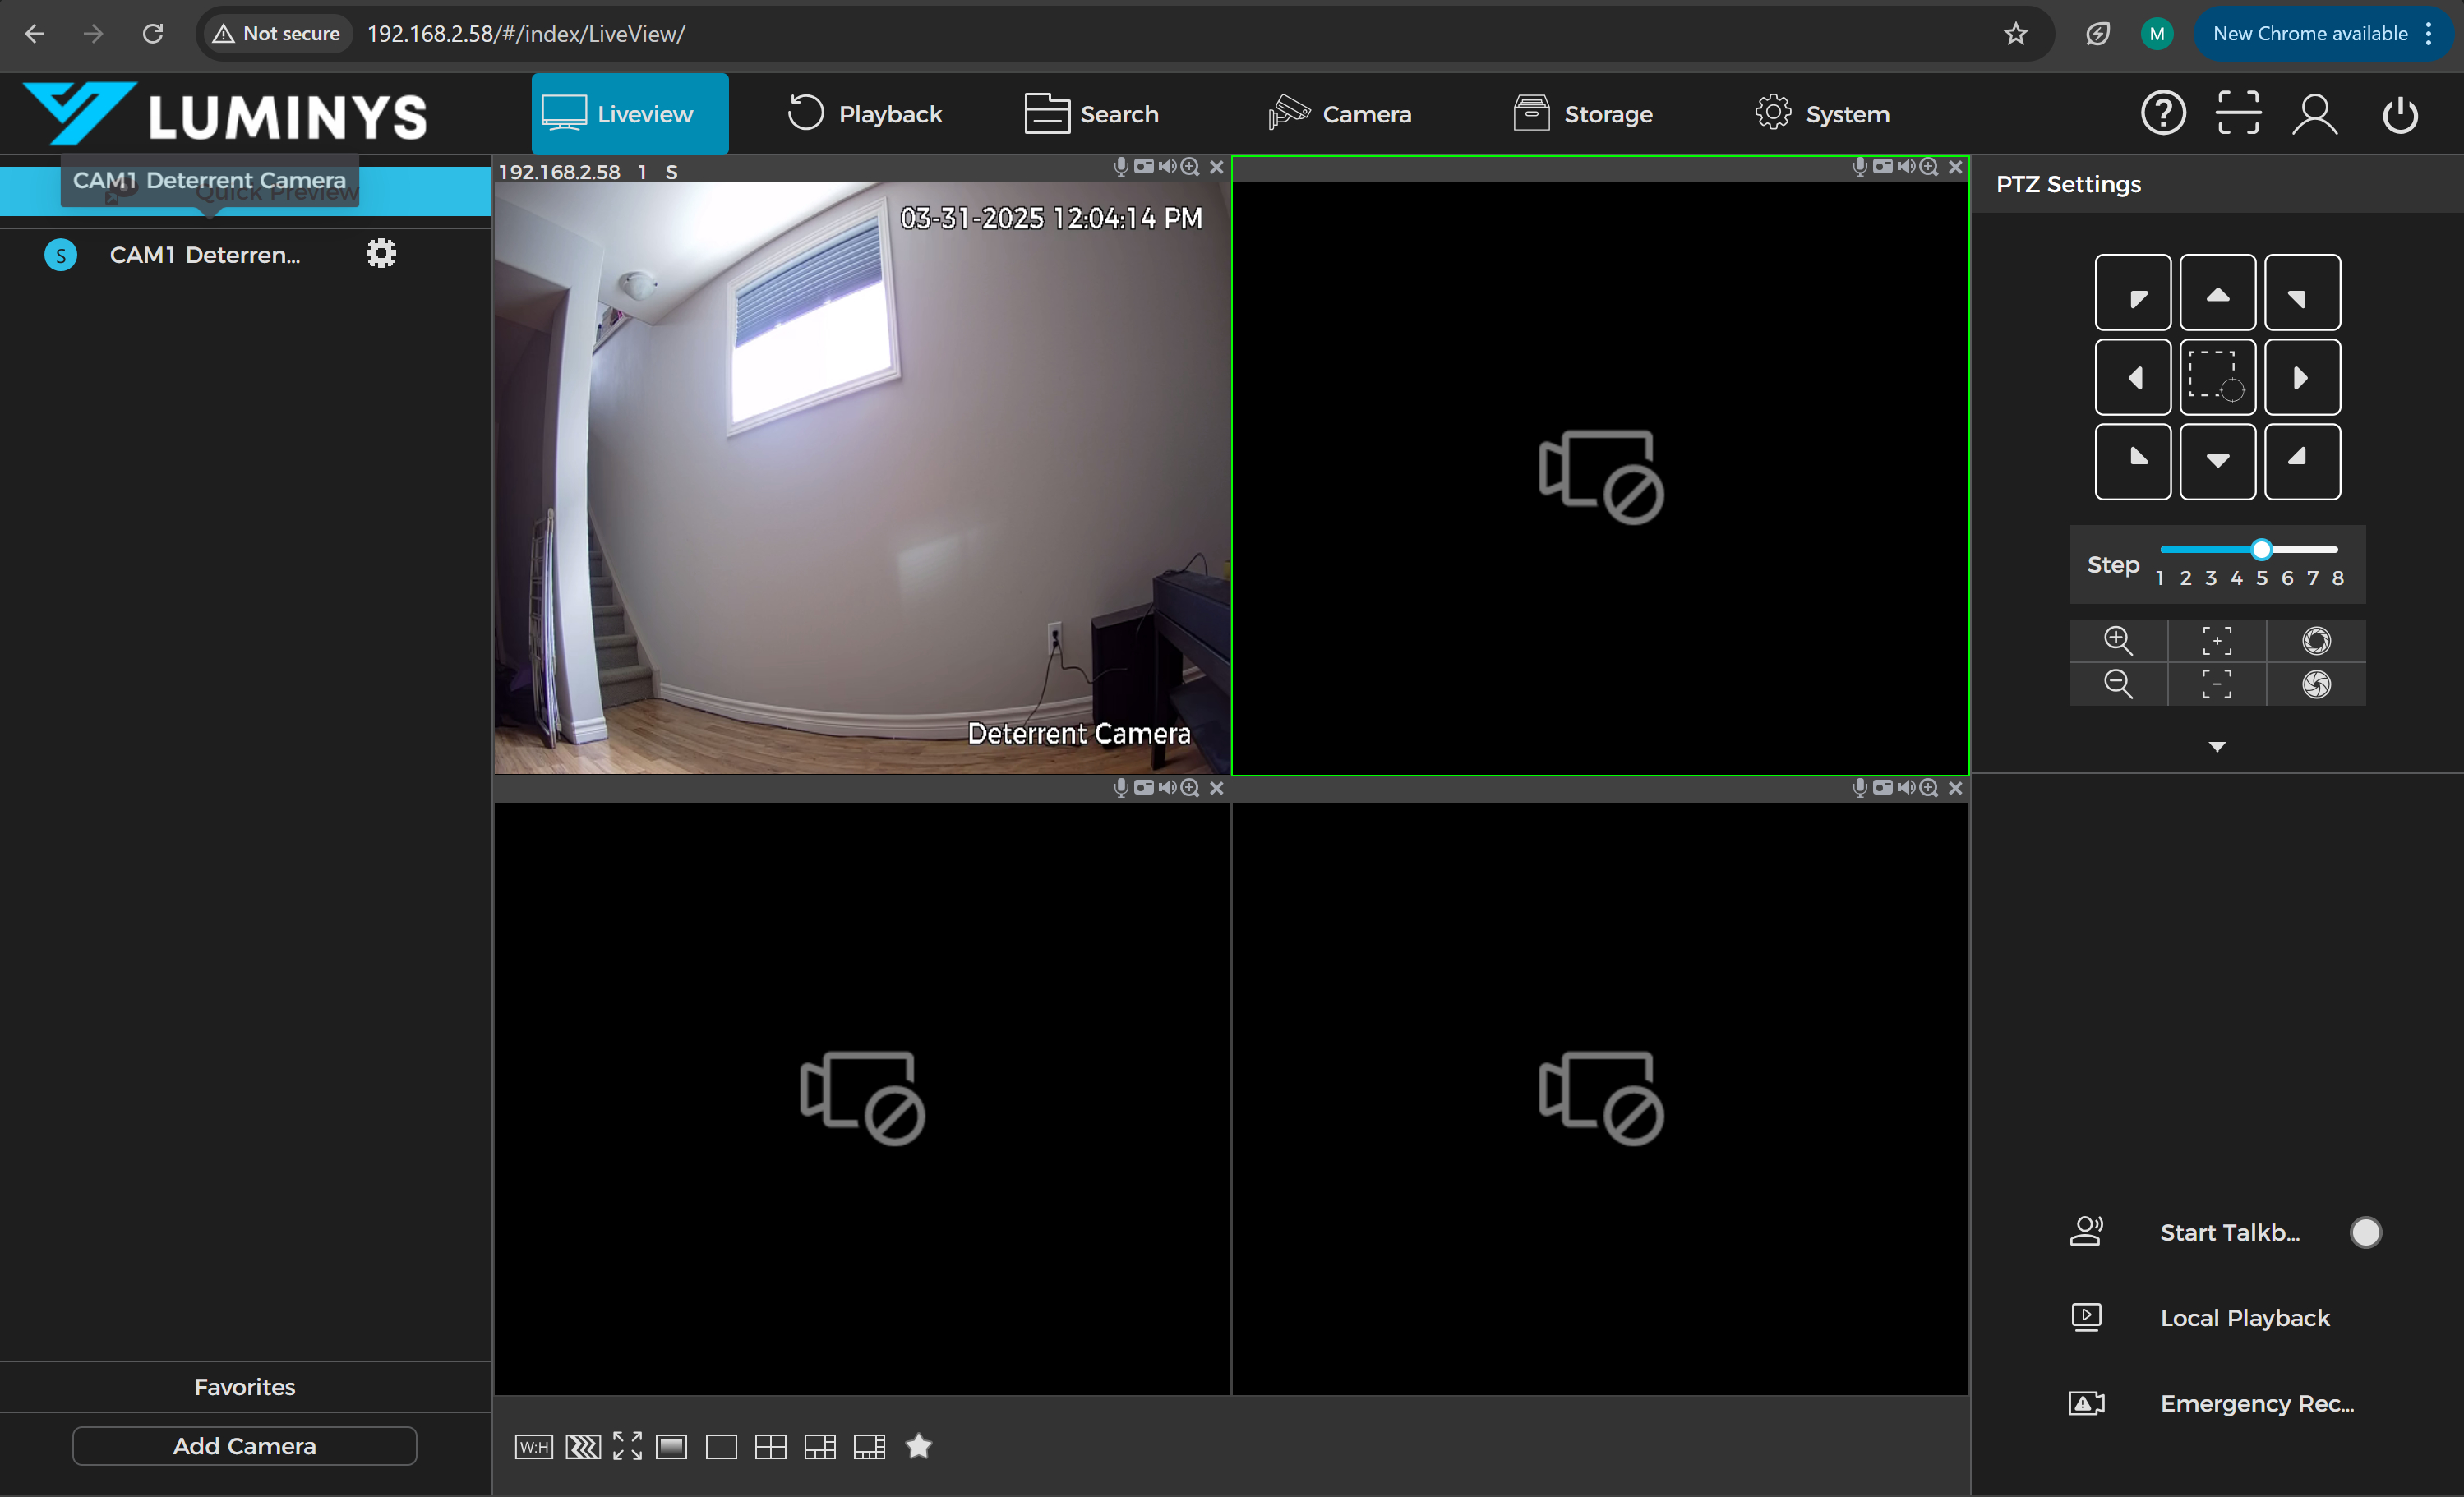
1. Today we will be learning how to set up VCA on one of our cameras which will be done through the NVRs interface. The first step we will be doing is accessing the NVR via it’s web interface and then logging in.
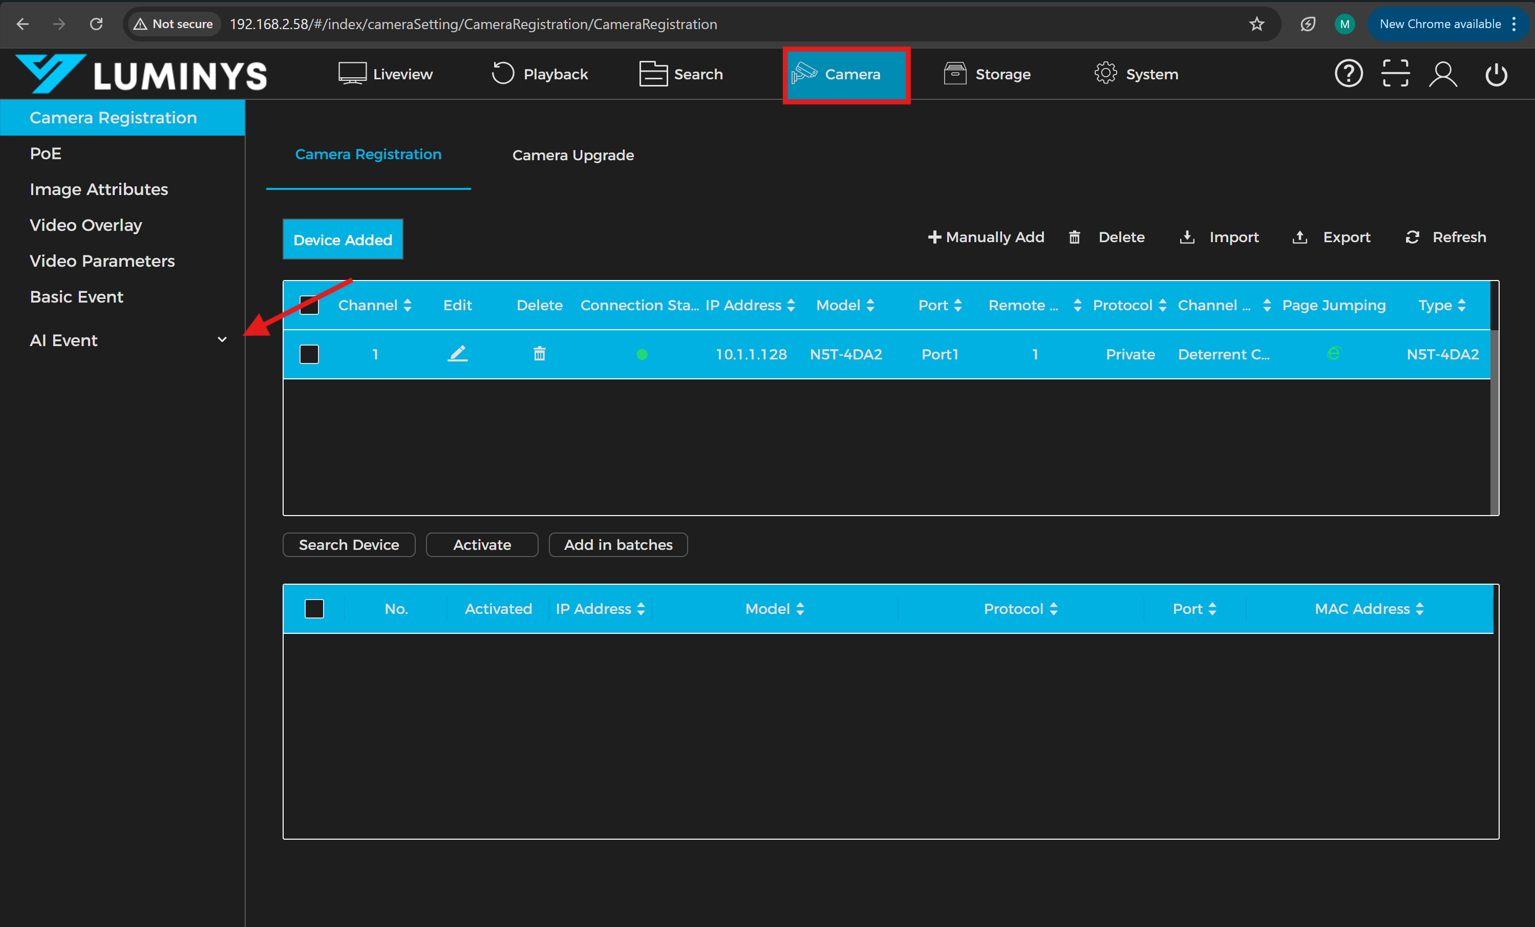
2. Once logged in, you will start on the liveview page. From here, you will want to click on camera along the top. Once on the camera page, you will then want to expand the AI Event Menu.
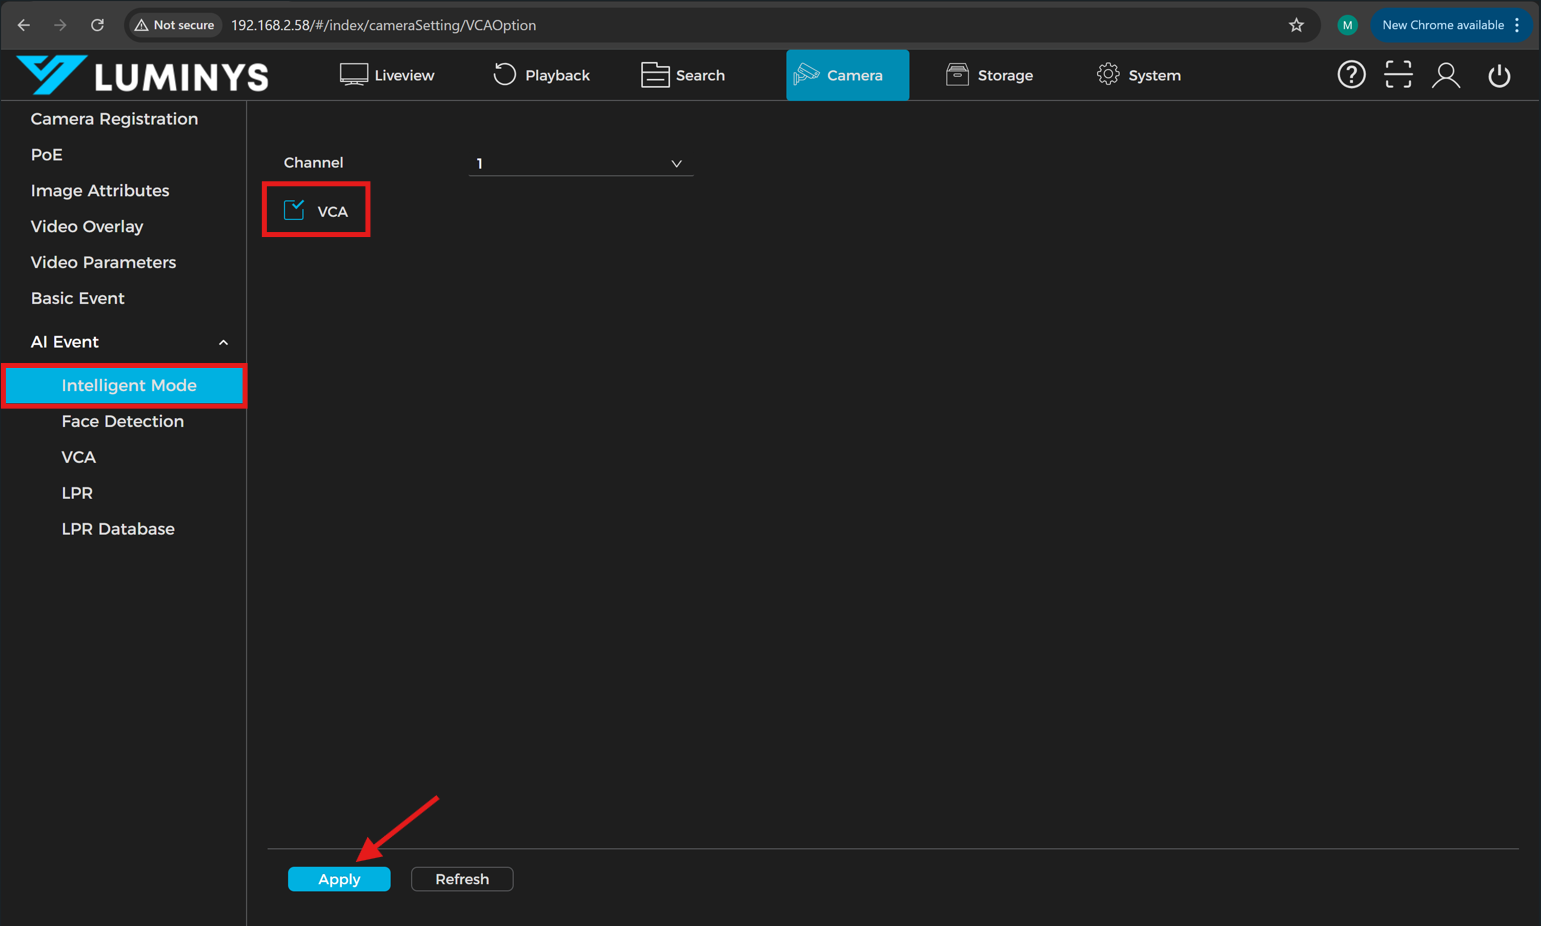
3. Once you have expanded the AI Event menu, the first place we want to go is Intelligent mode. This is to enable the specific AI function you want to use. Some cameras will have multiple options, in this case, the camera we are using only has the VCA option. If you have more than one camera added, make sure to click the drop down to choose the channel you want to set it up on. Then you will want to put a check the in VCA box and click apply to save.
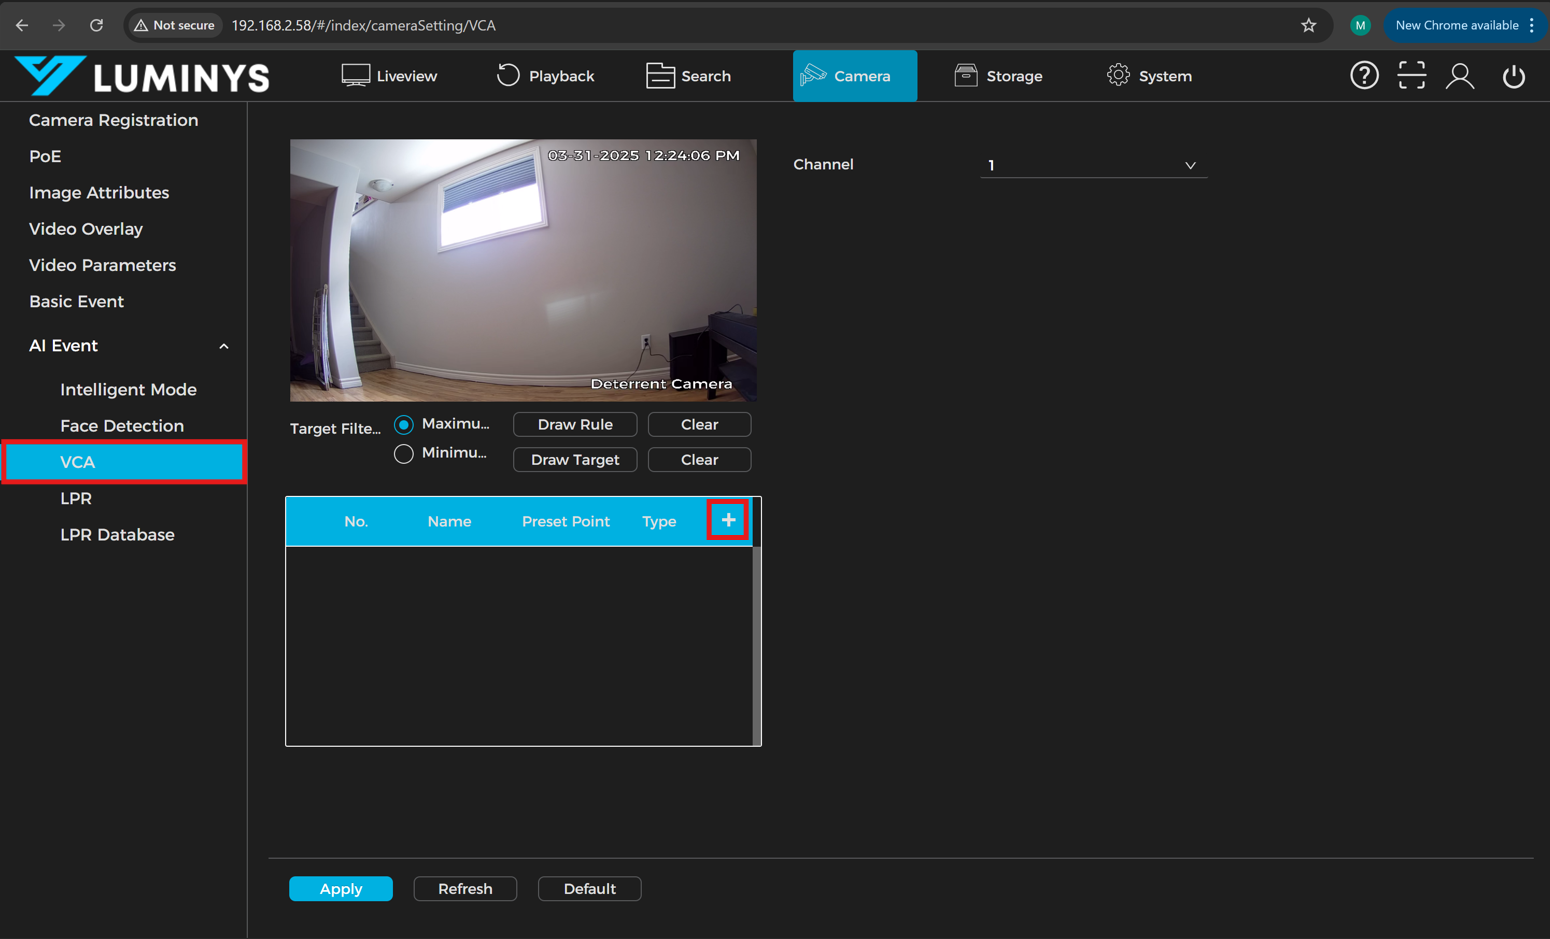
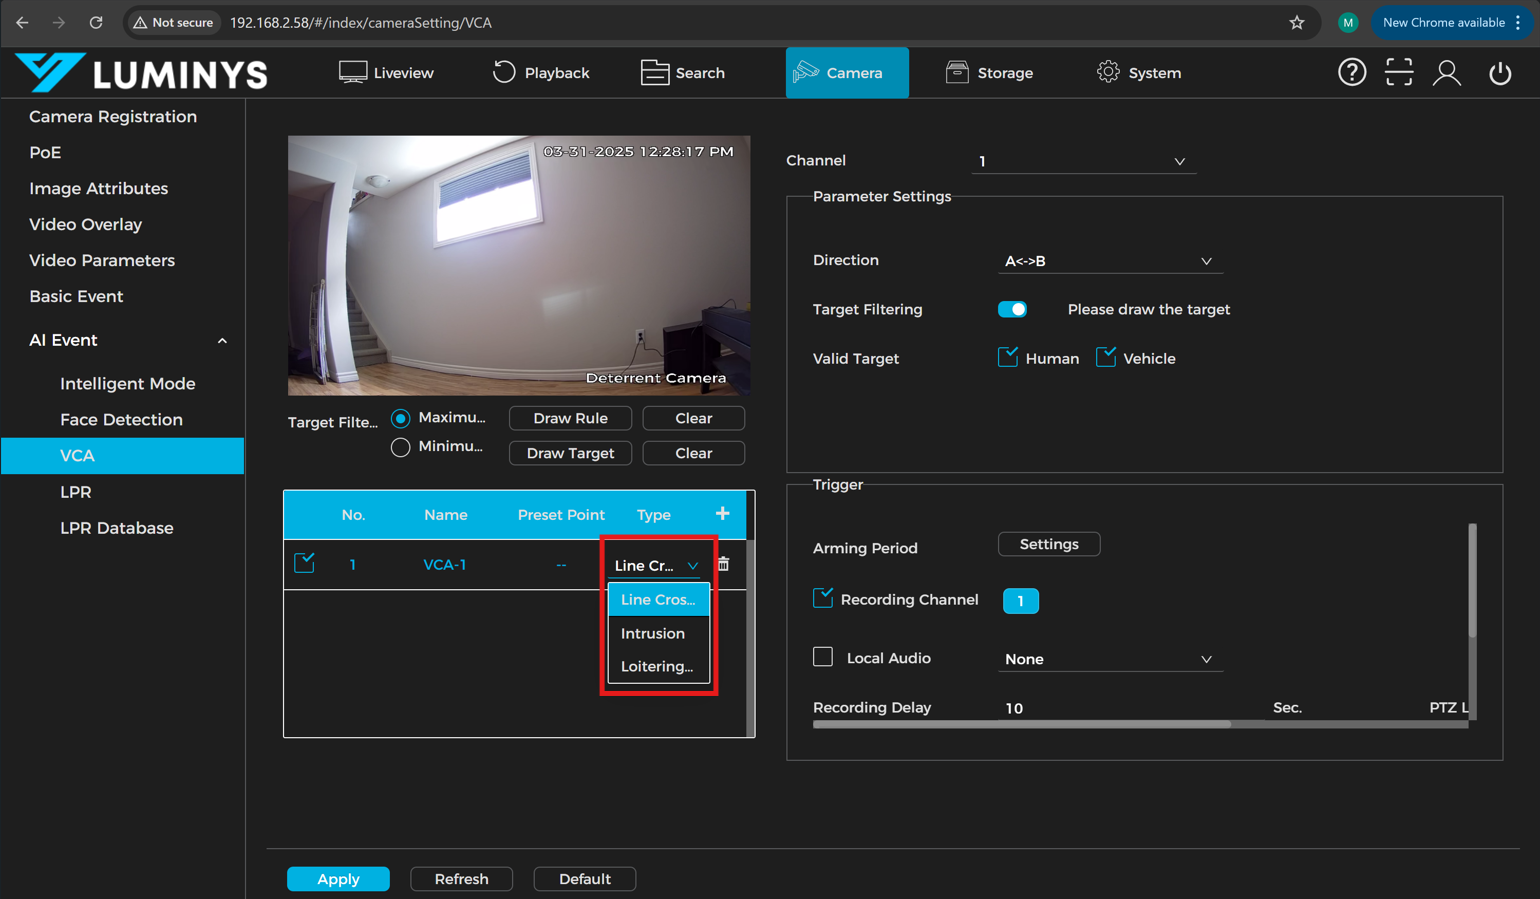
4. Next thing we need to set is the actual VCA rule. To do this click on the VCA option on the left hand side. Once the VCA options appear, the same thing will apply, you will first want to select the channel drop down at the top and choose the proper channel you want to set up. Once you have chosen the channel, the next step will be to click on the (+) button to start creating a rule.
5. After you click on the plus button, it will create a rule using the first option available, in this case that is tripwire. If you double click on the tripwire option in that menu you will get the option to drop the menu down. In this case you can see 2 additional options, Intrusion as well as Loitering Detection. For the sake of this demo we will choose intrusion.
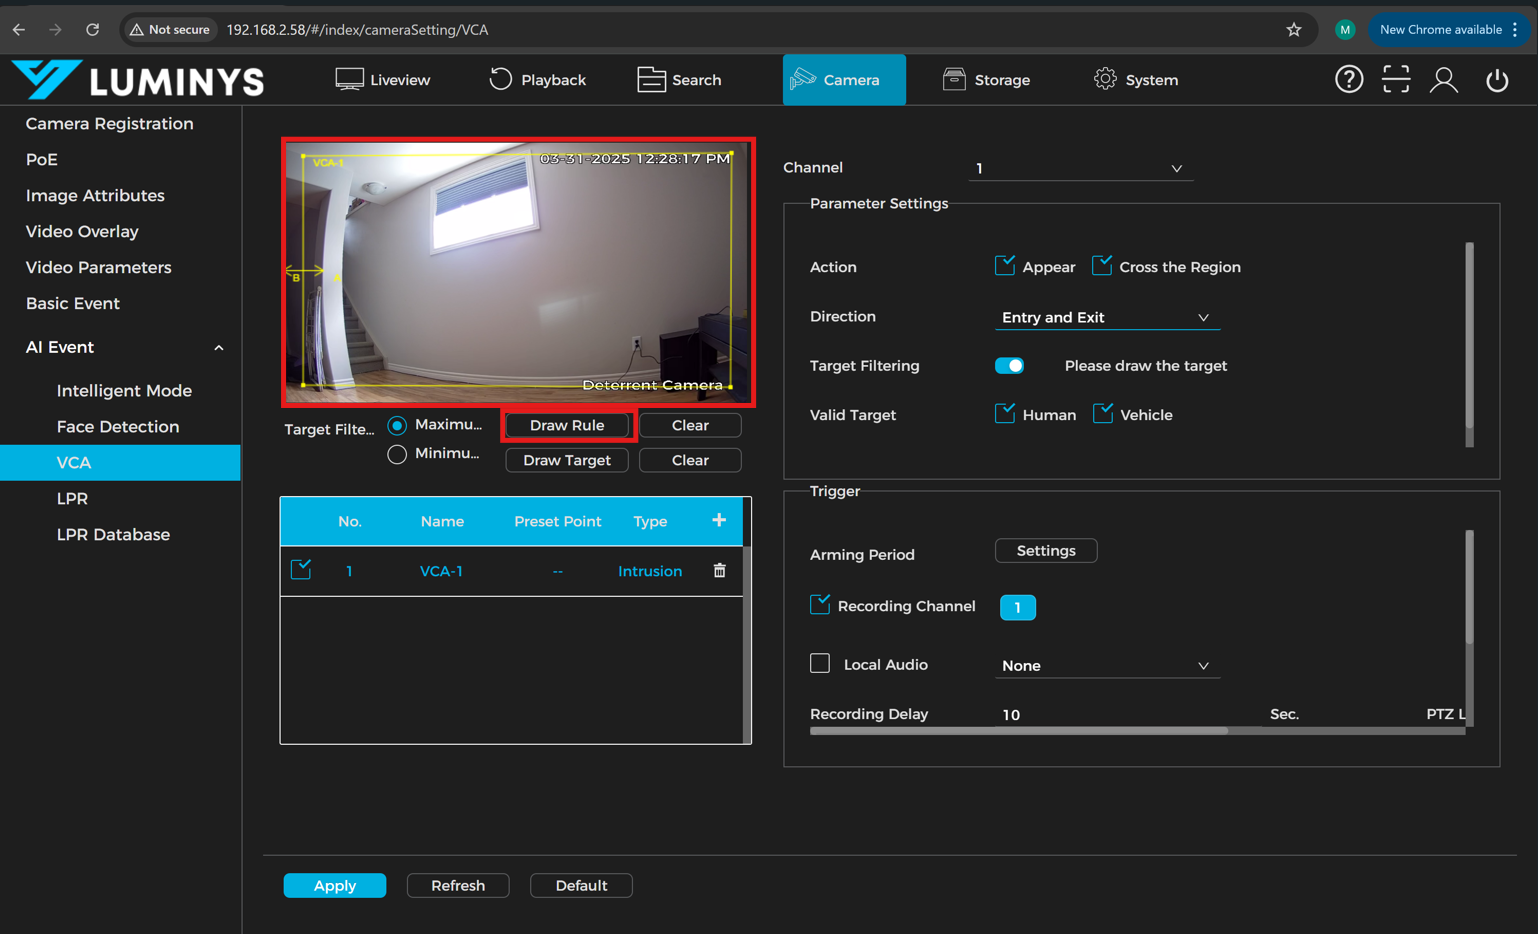
6. After choosing intrusion from the list, the next step will be to draw the rule. Below the preview window, there is a “Draw Rule” option, this is typically already selected by default, but if you try and draw the rule and it doesn’t work, you will want to click this option. Now to draw the rule it is nice and easy, the first thing you want to do is left click in the preview window where you want to start drawing the rule. You do not need to hold the button, you just click once and then it will set the first point, you then move your mouse to the next point you want to add and left click again. Continue to do this until you have drawn the intrusion box how you want, then when you want to complete the box, you will right click once and that will automatically close the box for you. After creating your rule, make sure to apply to save.
7. Technically the above completes the rule and it should now function, however in this step we will go over the options on the right to better understand what you may use them for.
Parameter Settings:
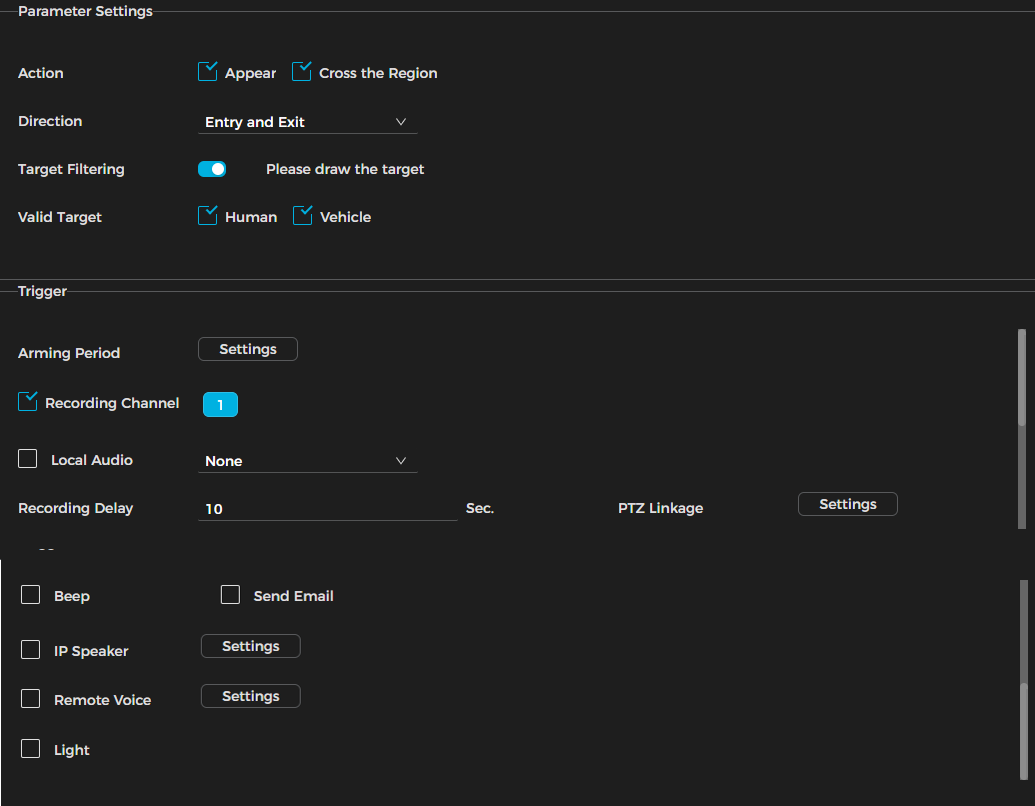
- Action – In the case of the intrusion rule, this determines what action needs to happen in order for the rule to trigger. “Appear” Indicates that the object appeared inside of the box without crossing into the box. The example here would be if the box surrounds a door as an example, when someone walks through the door they would already be inside of the box. “Cross the region” is what it sounds like which is an object has crossed into or out of the box.
- Direction – For direction you can have it enter and exit, enter or just exit.
- Target Filtering & Valid Target – This is used to filter out specific types of objects, in this case either human or vehicle. You can select both options or a single option depending on the application.
Trigger:
- Arming Period – This is a schedule for when this rule will be active. Blue line would indicate active, no line indicates inactive.
- Recording Channel – This is the channel that would be recorded when the rule activates. The default would be that it would record the channel it is associated with, however if you have more than one camera added you can also have it record other channels too.
- Local Audio –
- Recording Delay – This is the amount of time that the recorder will continue to record after the event has ended.
- PTZ Linkage (Far right side hard to see in pictures) – This allows you to link a PTZ to perform an action when the rule activates. The example would be to call the PTZ to a specific preset so it can also see the scene.
- Beep – If you enable this function, it will cause the NVR to beep when the rule triggers.
- Send Email – If you have set up the email function within the NVR, if you enable this function, the NVR will send an email to the recipients when the rule triggers.
- IP Speaker – If you have an IP Speaker added into the recorder, you can have the IP Speaker play a sound when the rule triggers.
- Remote Voice – If the camera has the built in ability to play audio, then enabling this function will cause the camera to play audio when the rule triggers.
- Light – If the camera has a built in deterrent light, if you enable this option it will cause the camera to activate the deterrent light when the rule triggers.
8. After setting up the settings you want and hitting apply, you have now officially set up a VCA rule and can go ahead and test it. This concludes how to set up a VCA rule.


