LumiCenter/How to Add Video Encoder Devices Cameras, Recorders
How to Add Devices to LumiCenter
Description
This tutorial will go over on how to add devices.
Prerequisites
- LumiCenter server and client installed on a computer.
Video Instructions
Step by Step Instructions
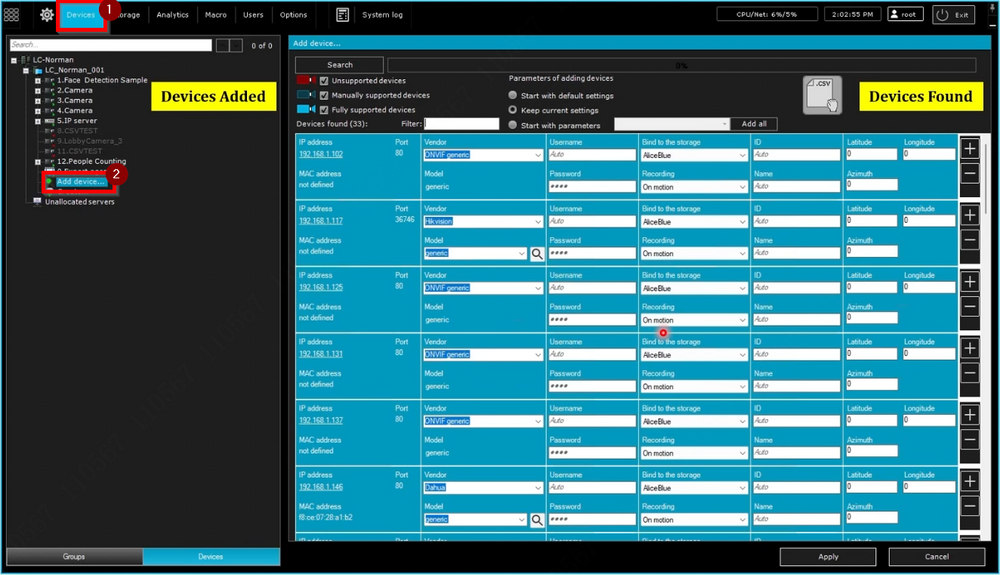
1. Select “Devices” and then “Add device…” to begin adding a new device.
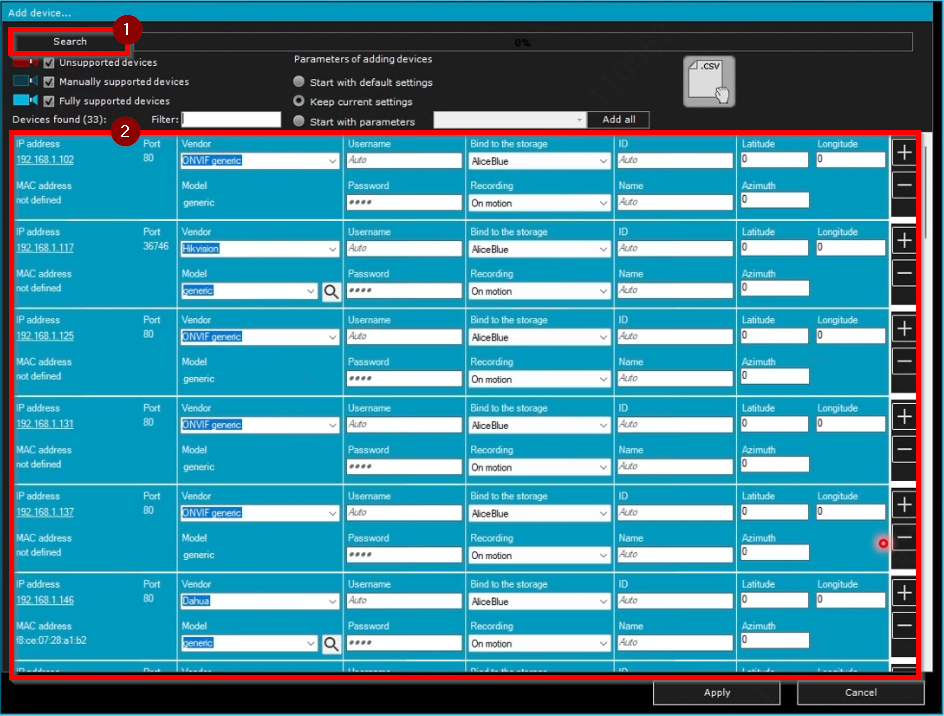
2. Select “Search” to start the automatic process of searching for all devices locally.
3. Once the search is complete, the network will display searched devices in three different colors.
- Light Blue/Teal colored devices are fully supported in LumiCenter.
- Blue/Dark Blue colored devices have limited support in LumiCenter. Some features will require manual configuration.
- Red colored devices are currently not supported by LumiCenter.
4. Under Device Configuration, there are some key details to be aware of before adding devices.
- Device Network Information: This section displays the device's IP address and port number. Clicking the IP address will redirect you to the device's web interface.
- Vendor and Model: This section displays the brand and model of the device. This information can be manually adjusted if it is incorrect. If the correct model is not listed, select "generic" from the dropdown menu.
- Username and Password: Insert the device's username and password for LumiCenter to access it.
- Bind to the storage: If pre-configured storage is available, assign the device to one of them for immediate recording upon addition to LumiCenter. Choose between "On Motion" or "Always" recording modes based on needs. If pre-configured storage is not available, configure it later.
5. Under Device Parameters:
- Device ID and Name: you can assign an ID and a Name to the device
The ID can contain numbers, Latin letters and the "_" sign. The ID will also be used as the device’s short name. The full name of the device is displayed in the format of <Short name>.<Name>. For example, if the device short name is 1, and the Name is Lobby, the device will be shown as 1.Lobby. Device ID cannot be changed, since it is used to maintain the connection with storages. You can use the device short name to easily search it later in the User Interface. If you leave ID and Name blank, LumiCenter will automatically assign an ID and a Name to the device. Device ID: cannot be changed Device short name: can be changed later Device name: can be changed later
- Device Geo Location: The coordinates (latitude, longitude, and azimuth) of the device location can be specified.
- Plus Button: Click to add the device to LumiCenter. Minus Button: Click to remove the device from the list.
6. For Device Search Panel:
- Device Filter - by Status:
- Unsupported devices
- Fully supported device
- Manual configuration required
- Device Filter – Blank Field
- Insert device IP, Vendor or Model to filter devices
Device searching panel: select the way in which the device will be added.
- Parameters of adding devices:
- Start with default settings - The IP device is added to the configuration using default settings, as determined by LumiCenter. Adding a device in this mode will modify the current settings of the device specified in the web interface.
- Keep current settings - The IP device is added to the configuration with its current settings, as specified in the web interface.
- Start with parameters - The IP device is added to the configuration with settings previously specified for a device of the same model. Select a device of the same model from the drop-down menu, which is especially useful when configuring a batch of cameras of the same model. Only devices of the same model will appear in the list of search results for choosing the template device. This mode is ideal when multiple cameras of the same model are used at a site. In this case, it is advised to:
- Add and configure one device
- Add the remaining devices, copying settings from the "template device" as described previously
- Bulk creation of IP devices - Create a CSV file with device parameters listed as follows:
- Port, Vendor, Model, Login, Password, Identifier, Object name, Latitude, Longitude, Azimuth, Storage name, Recording mode
- For each added camera, three parameters are mandatory: IP address, Vendor and Model. The parameters that aren't specified will be automatically set to their default values.
- Even if no additional parameters are set, commas should still be included.
- All parameters are case-sensitive.
- To separate the integer and fractional parts in coordinates, use a point.
- If there is a comma in the device model name, in order not to violate the logic of the CSV file, it is necessary to add the character before the comma in the model name. Example: the device model name is CO-120DY2(2,7-9) (CO-YUC-HM96-279). In the CSV file, it is necessary to specify the model name as CO-120DY2(2,7-9) (CO-YUC-HM96-279).
- CSV file example:
192.168.2.3,80,ONVIF generic,generic,admin,password123,11,CSVTEST,,,,, 192.168.2.4,80,Device_Name,generic,admin,password!,9,LobbyCamera_3,,,,,,


