Video doorbell/Initial Setup Instructions: Difference between revisions
Techsupport (talk | contribs) |
Techsupport (talk | contribs) |
||
| (15 intermediate revisions by the same user not shown) | |||
| Line 6: | Line 6: | ||
==Prerequisites== | ==Prerequisites== | ||
*[https://wiki.luminyscorp.com/Video_doorbell/Installation_Instruction Installation instruction] | *[https://wiki.luminyscorp.com/Video_doorbell/Installation_Instruction Installation instruction] | ||
*[https://wiki.luminyscorp.com/LumiViewer_Mobile_App/How_to_Register_an_Account_in_LumiViewer] | *[https://wiki.luminyscorp.com/LumiViewer_Mobile_App/How_to_Register_an_Account_in_LumiViewer Register an account in LumiViewer] | ||
*Power on the doorbell and wait for the blue LED indicator to begin flashing. | *Power on the doorbell and wait for the blue LED indicator to begin flashing. | ||
*Download and open LumiViewer app | |||
==Step by Step Instructions== | ==Step by Step Instructions== | ||
| Line 13: | Line 14: | ||
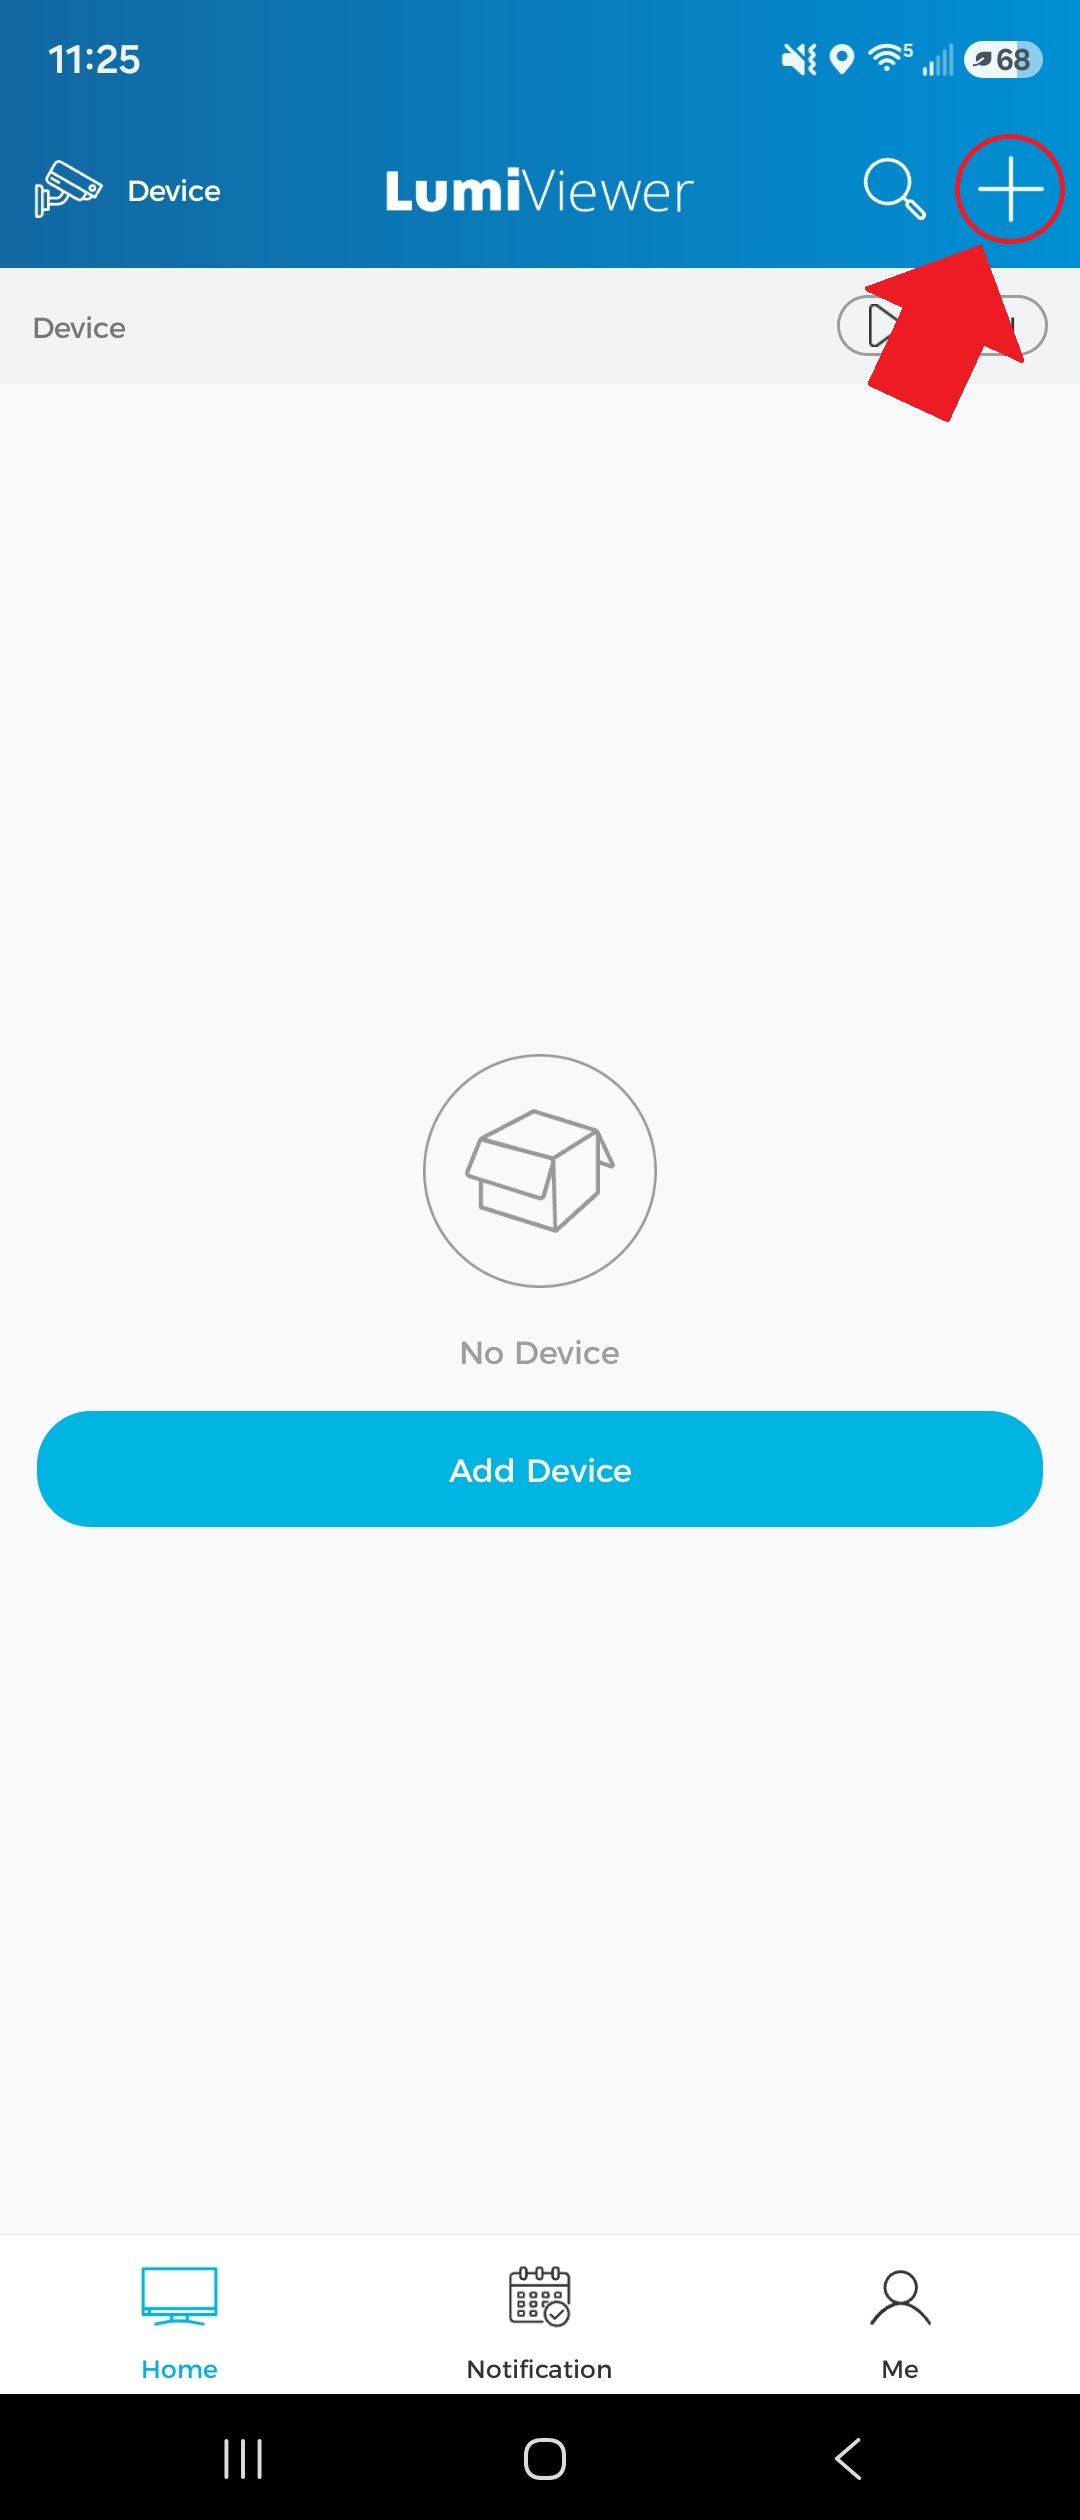
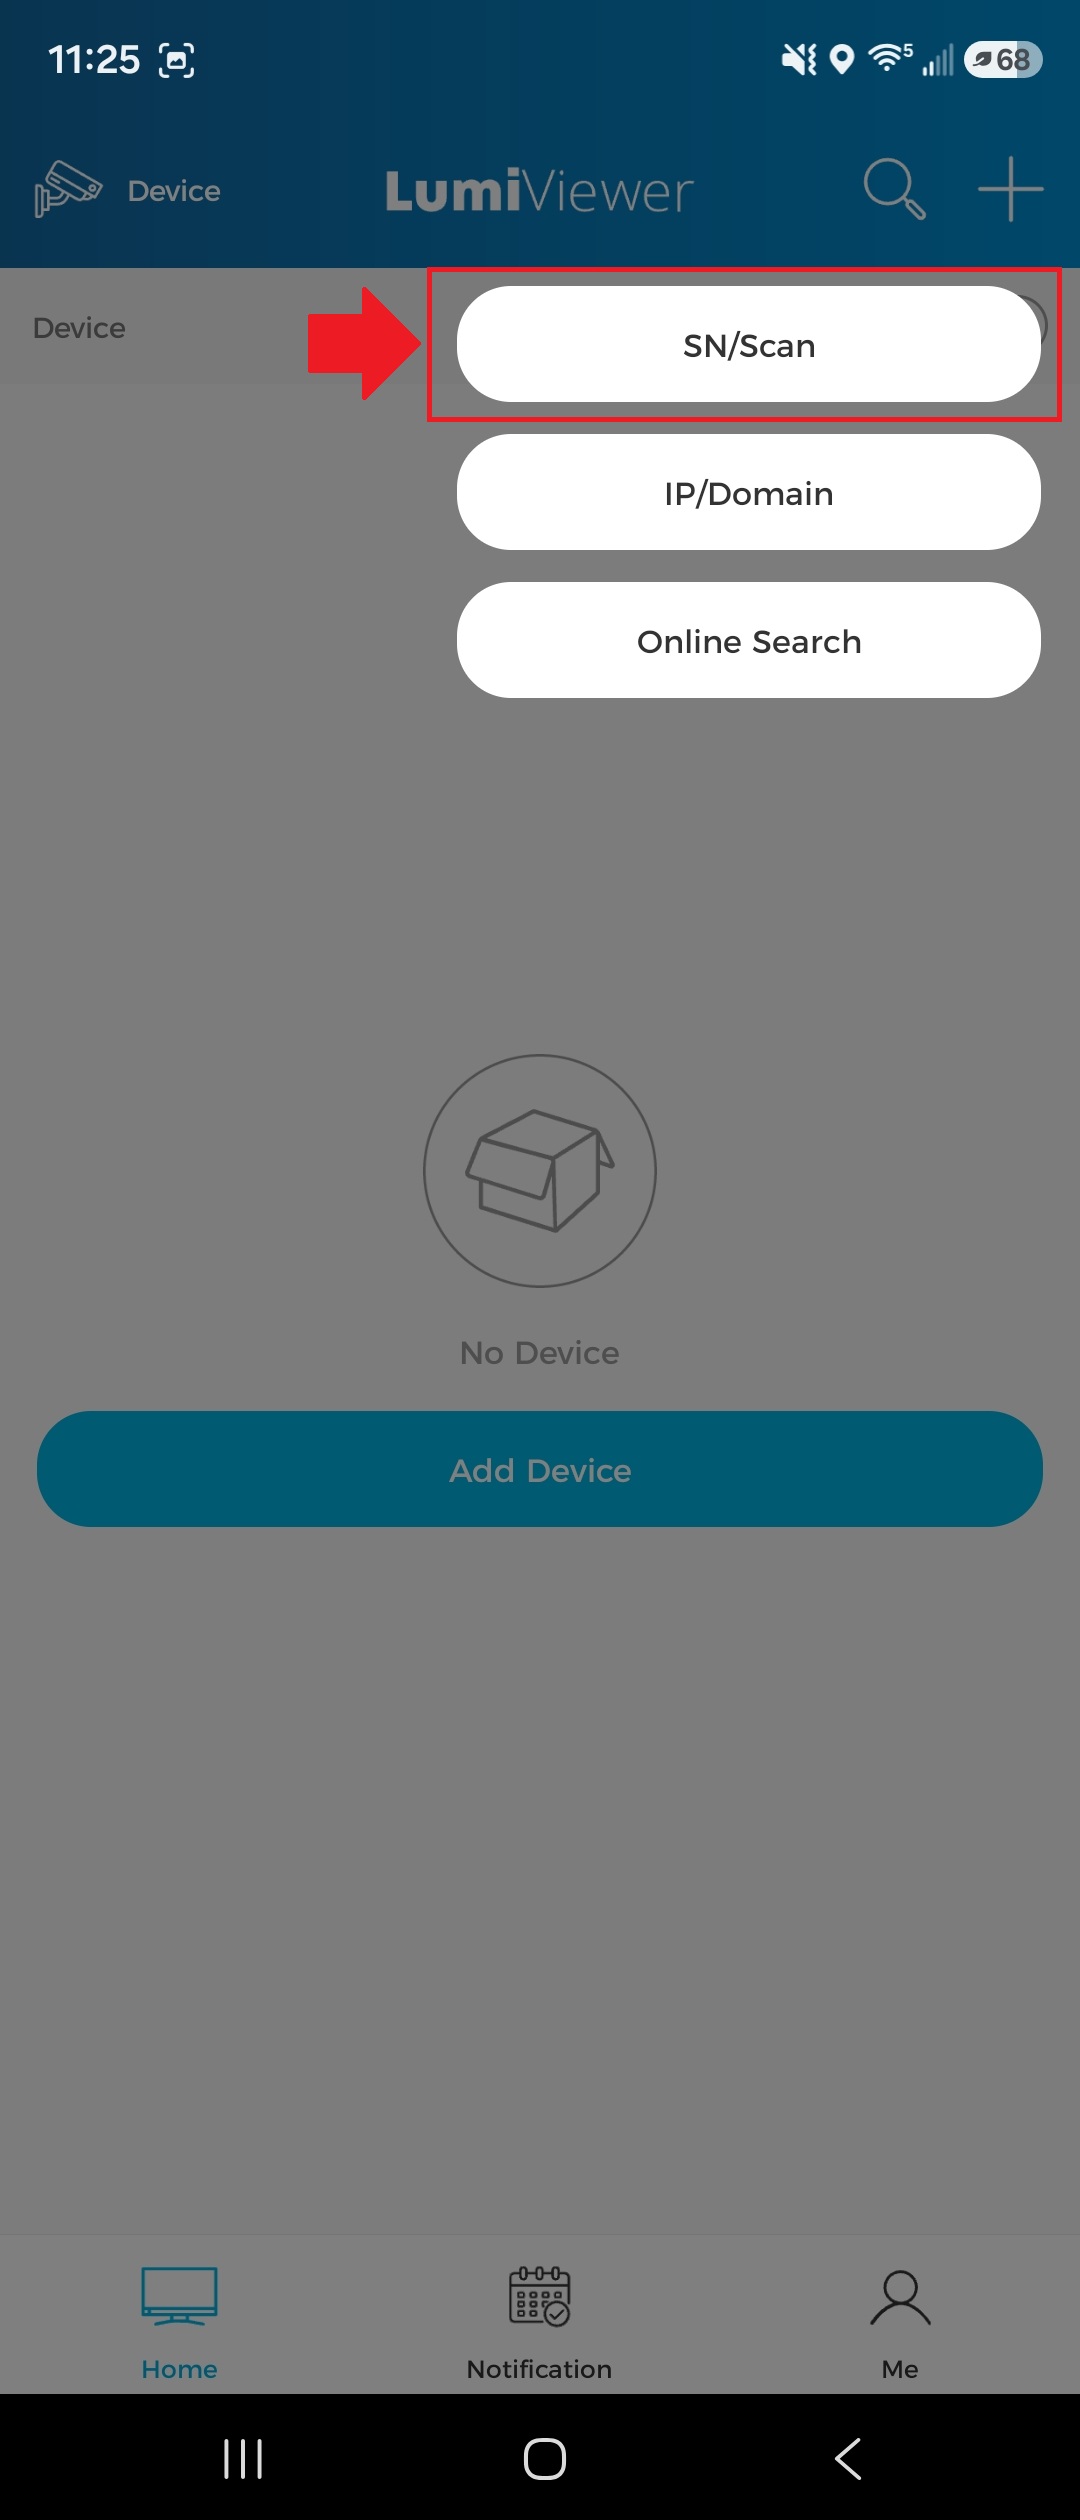
1. Tap the "+" icon in the top-right corner of the app, then select “SN/Scan.” | 1. Tap the "+" icon in the top-right corner of the app, then select “SN/Scan.” | ||
[[File:Vdb_config_1a.jpg| | [[File:Vdb_config_1a.jpg|256px|link=https://wiki.luminyscorp.com/images/3/39/Vdb_config_1a.jpg]] | ||
[[File:Vdb_config_1b.jpg| | [[File:Vdb_config_1b.jpg|256px|link=https://wiki.luminyscorp.com/images/3/36/Vdb_config_1b.jpg]] | ||
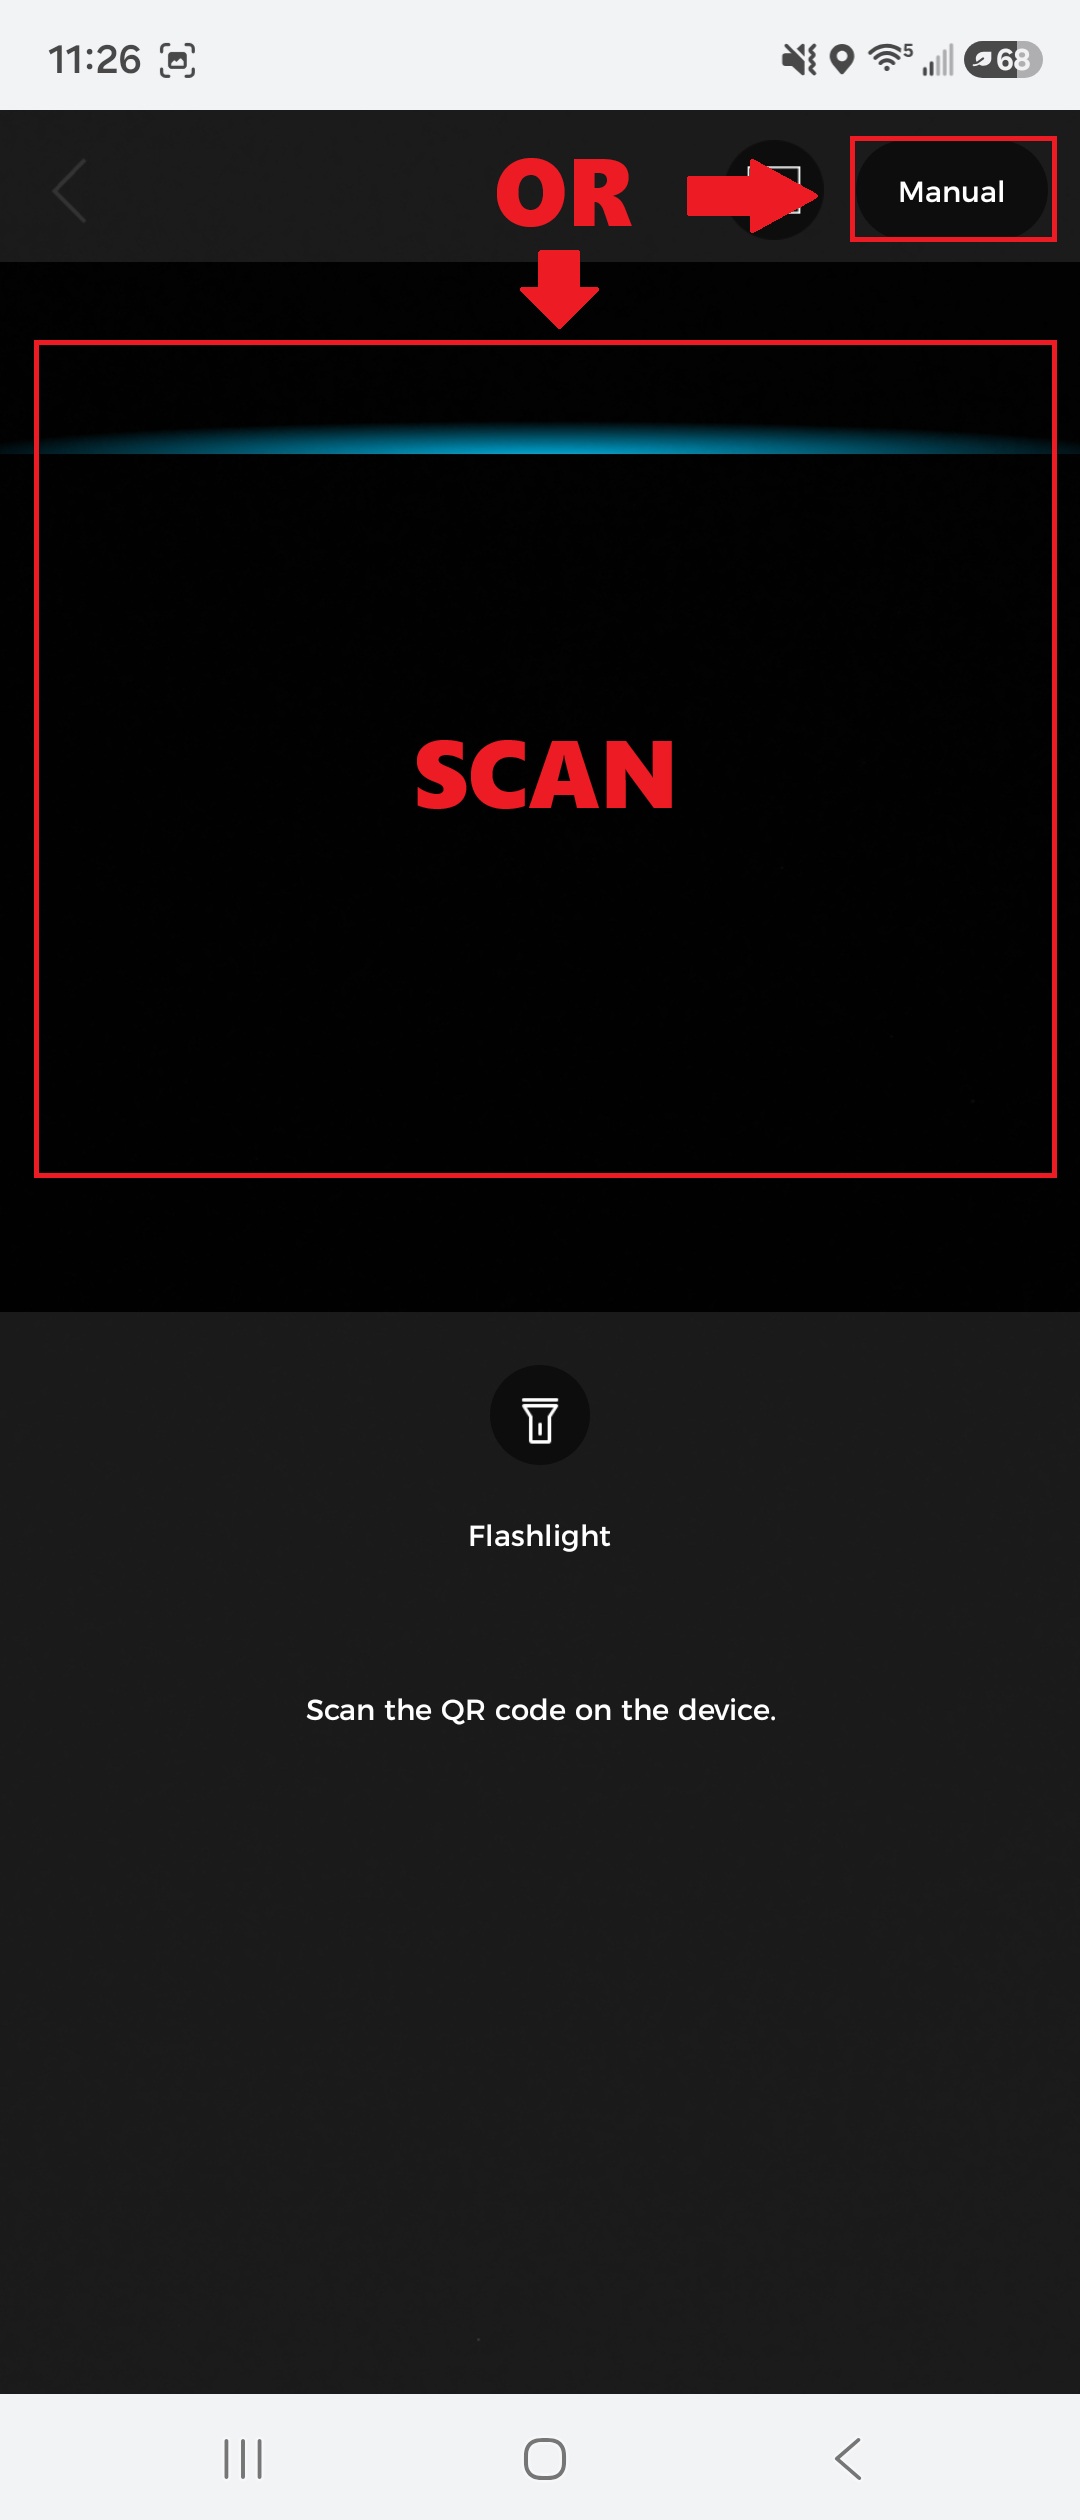
2. Scan the QR code on the product’s serial number (SN). Alternatively, tap the “Manual” button in the top-right corner to enter the SN manually. | |||
[[File:Vdb_config_2.jpg|256px|link=https://wiki.luminyscorp.com/images/1/1d/Vdb_config_2.jpg]] | |||
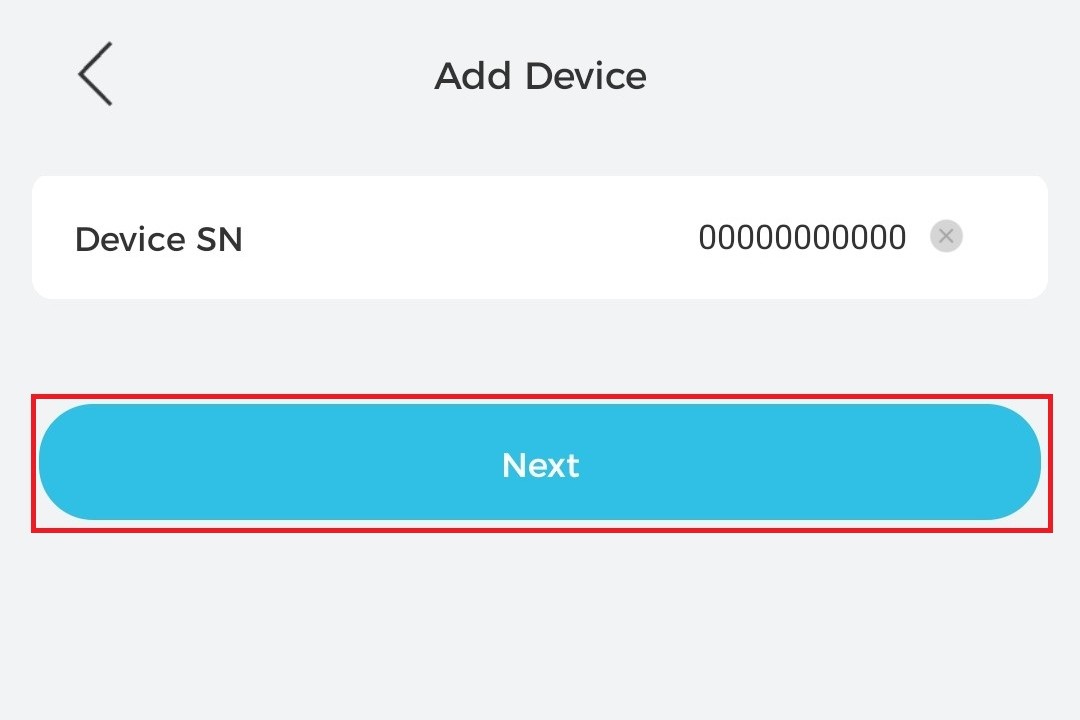
3. If you scanned the QR code in the previous step, tap “Next” to continue. If you selected “Manual,” enter the serial number (SN) and then tap “Next” to proceed. | |||
[[File:Vdb_config_3.jpg|256px|link=https://wiki.luminyscorp.com/images/d/d7/Vdb_config_3.jpg]] | |||
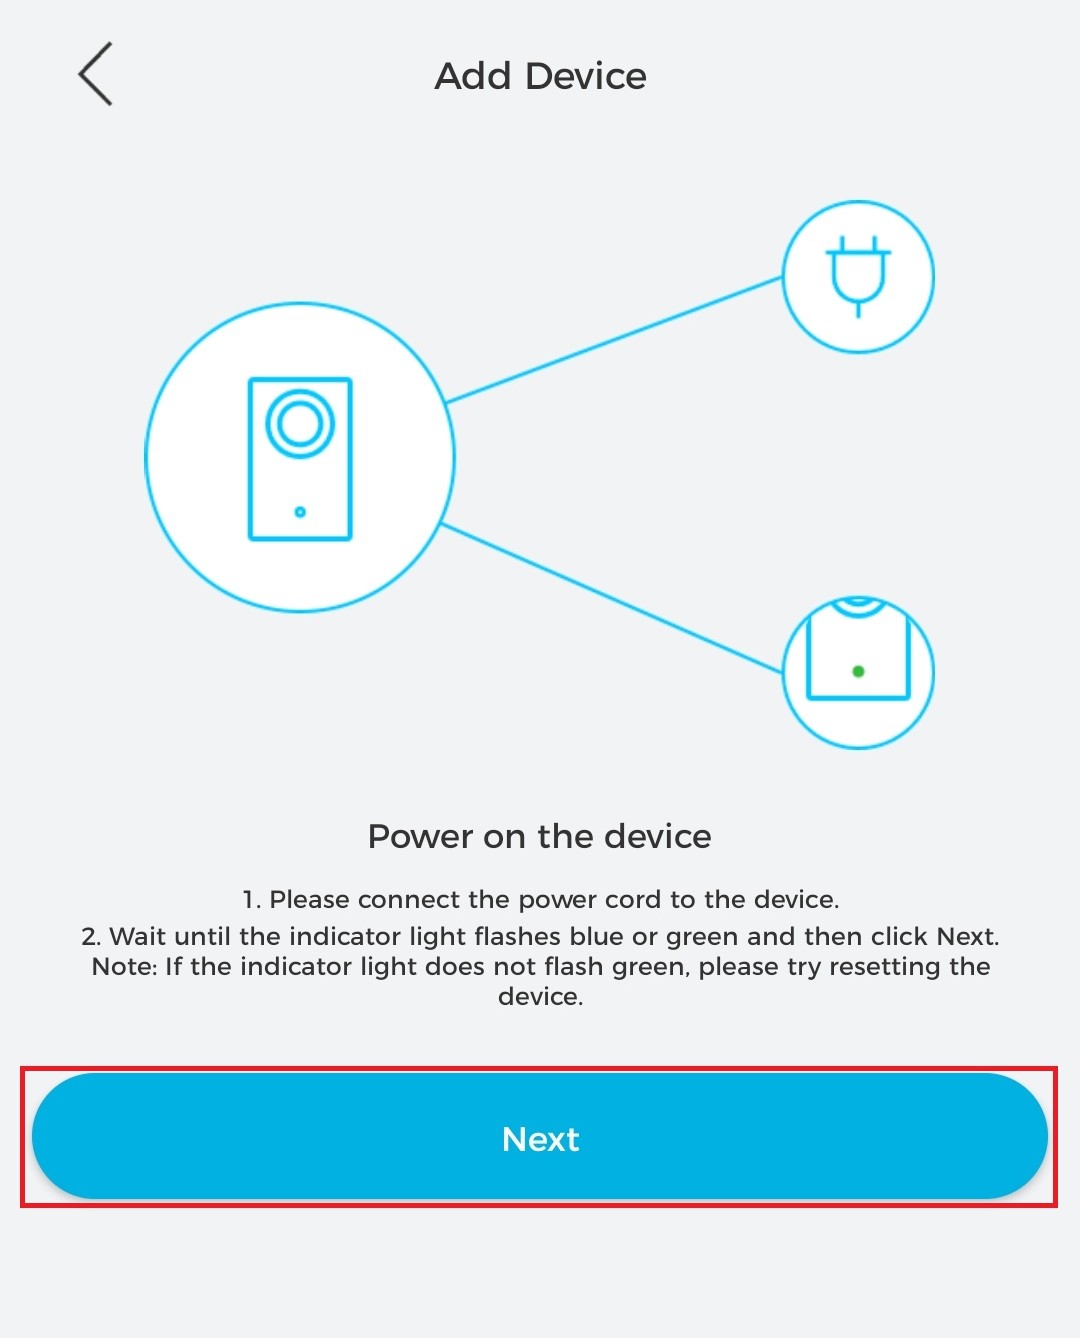
4. Follow the on-screen instructions, then tap “Next” to continue. | |||
[[File:Vdb_config_4.jpg|256px|link=https://wiki.luminyscorp.com/images/e/e6/Vdb_config_4.jpg]] | |||
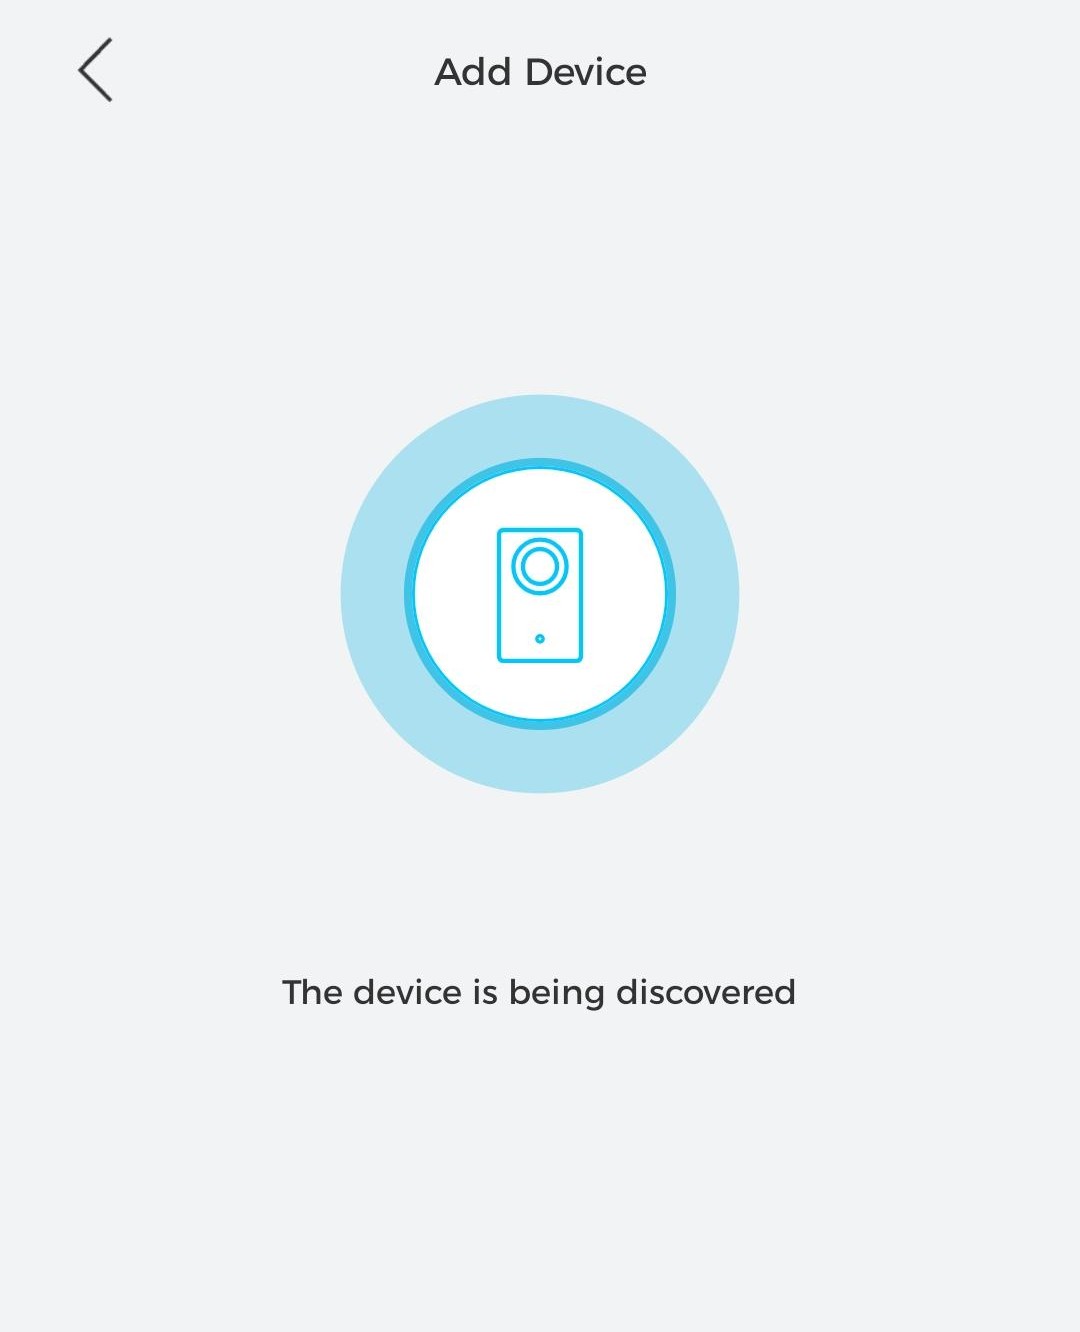
5. At this step, the following screen will appear. Please wait and keep your phone close to the doorbell. | |||
[[File:Vdb_config_5.jpg|256px|link=https://wiki.luminyscorp.com/images/0/0a/Vdb_config_5.jpg]] | |||
6. Create a password for the doorbell. Providing an email address is optional. Tap "Next" to continue | |||
[[File:Vdb_config_6.jpg|256px|link=https://wiki.luminyscorp.com/images/2/29/Vdb_config_6.jpg]] | |||
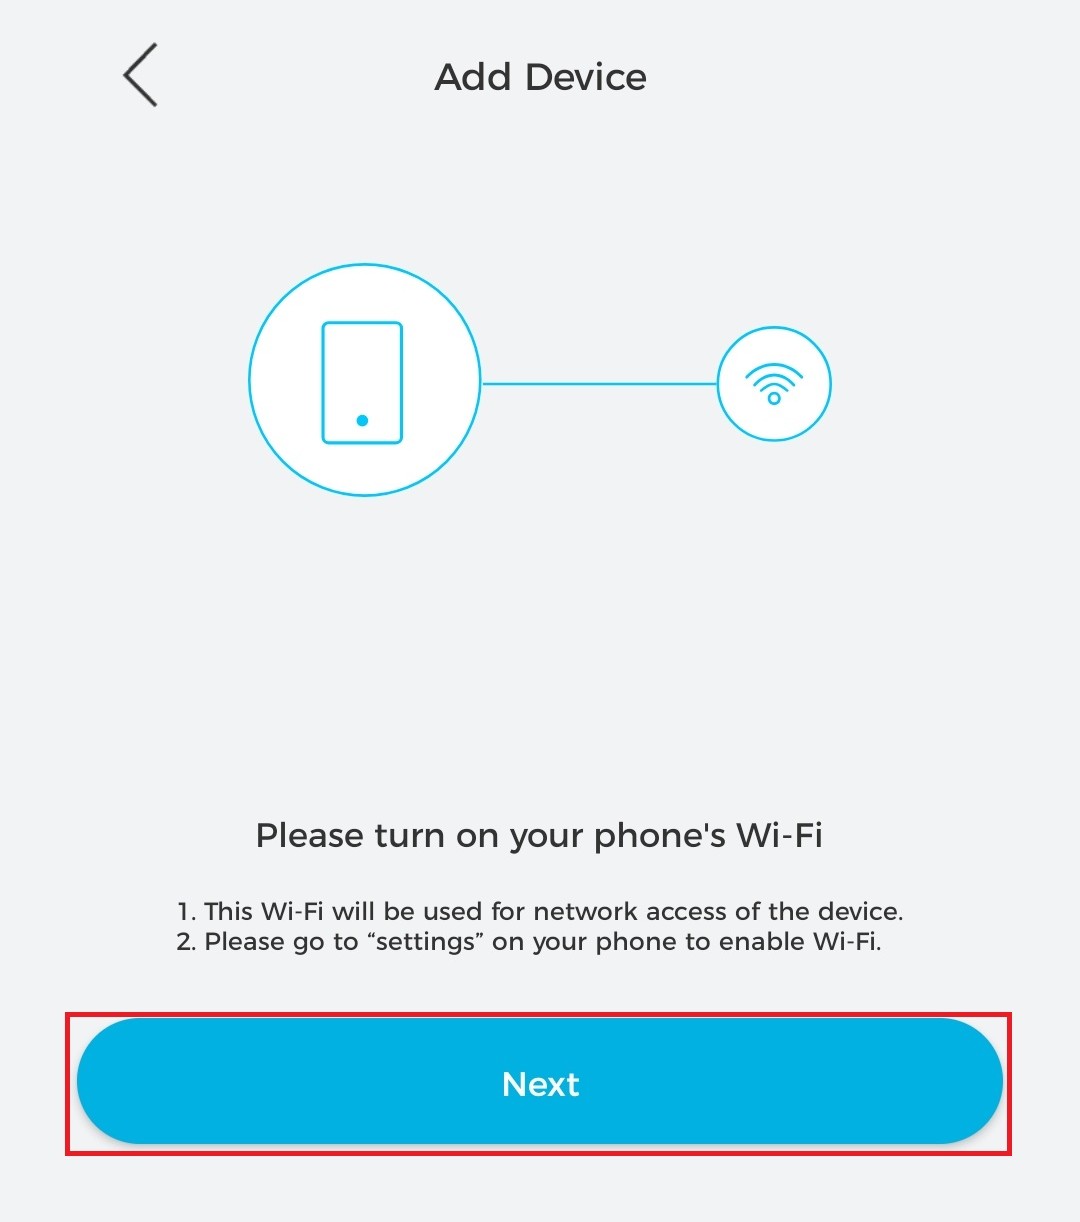
7. Ensure your phone’s Wi‑Fi is enabled, then tap “Next” to continue. | |||
[[File:Vdb_config_7.jpg|256px|link=https://wiki.luminyscorp.com/images/3/3a/Vdb_config_7.jpg]] | |||
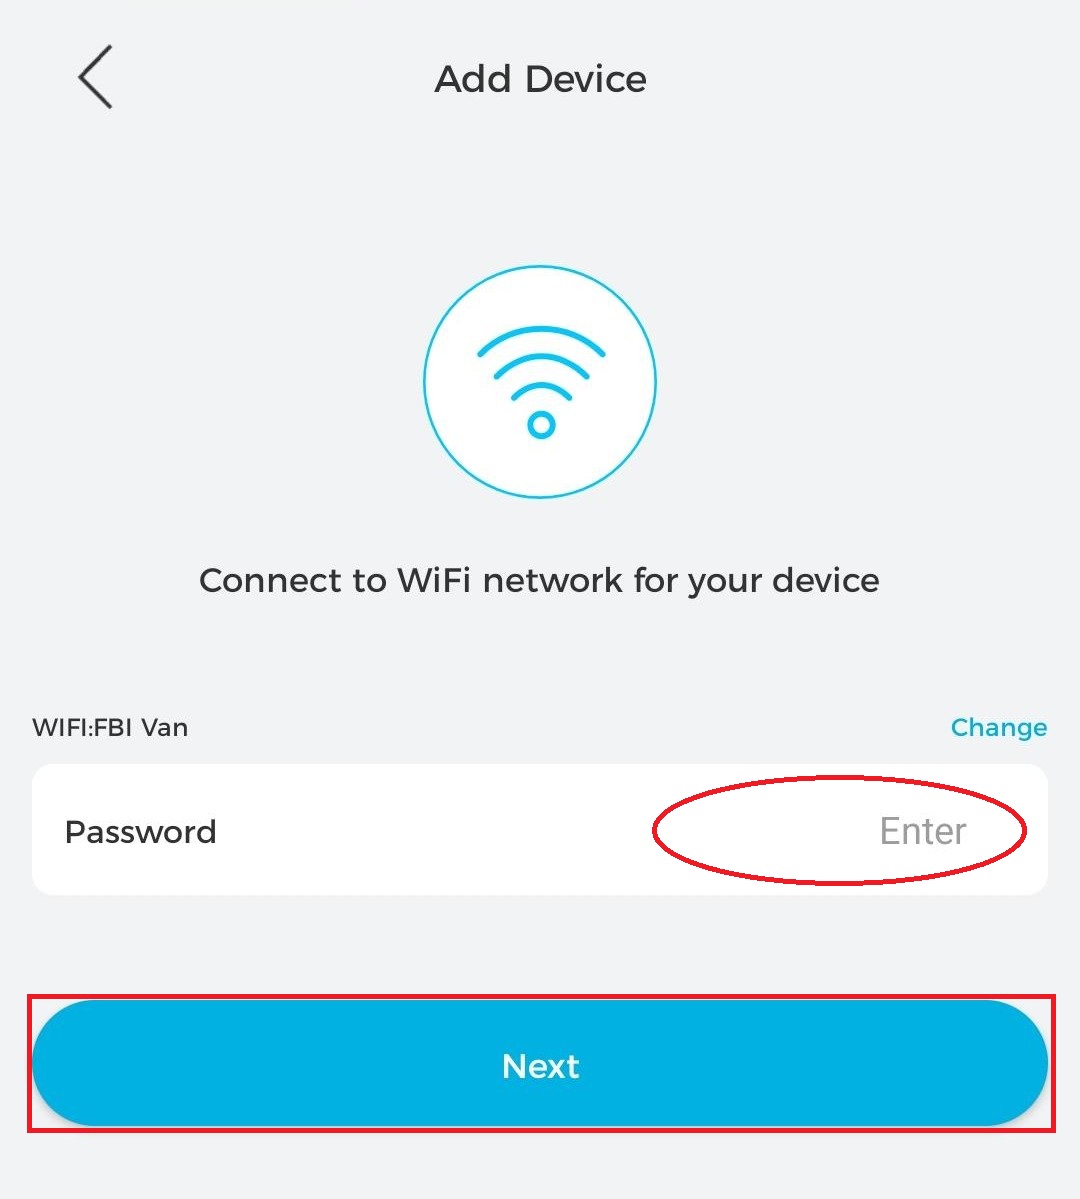
8. Enter your Wi‑Fi password, then tap “Next” to continue. | |||
[[File:Vdb_config_8.jpg|256px|link=https://wiki.luminyscorp.com/images/e/ec/Vdb_config_8.jpg]] | |||
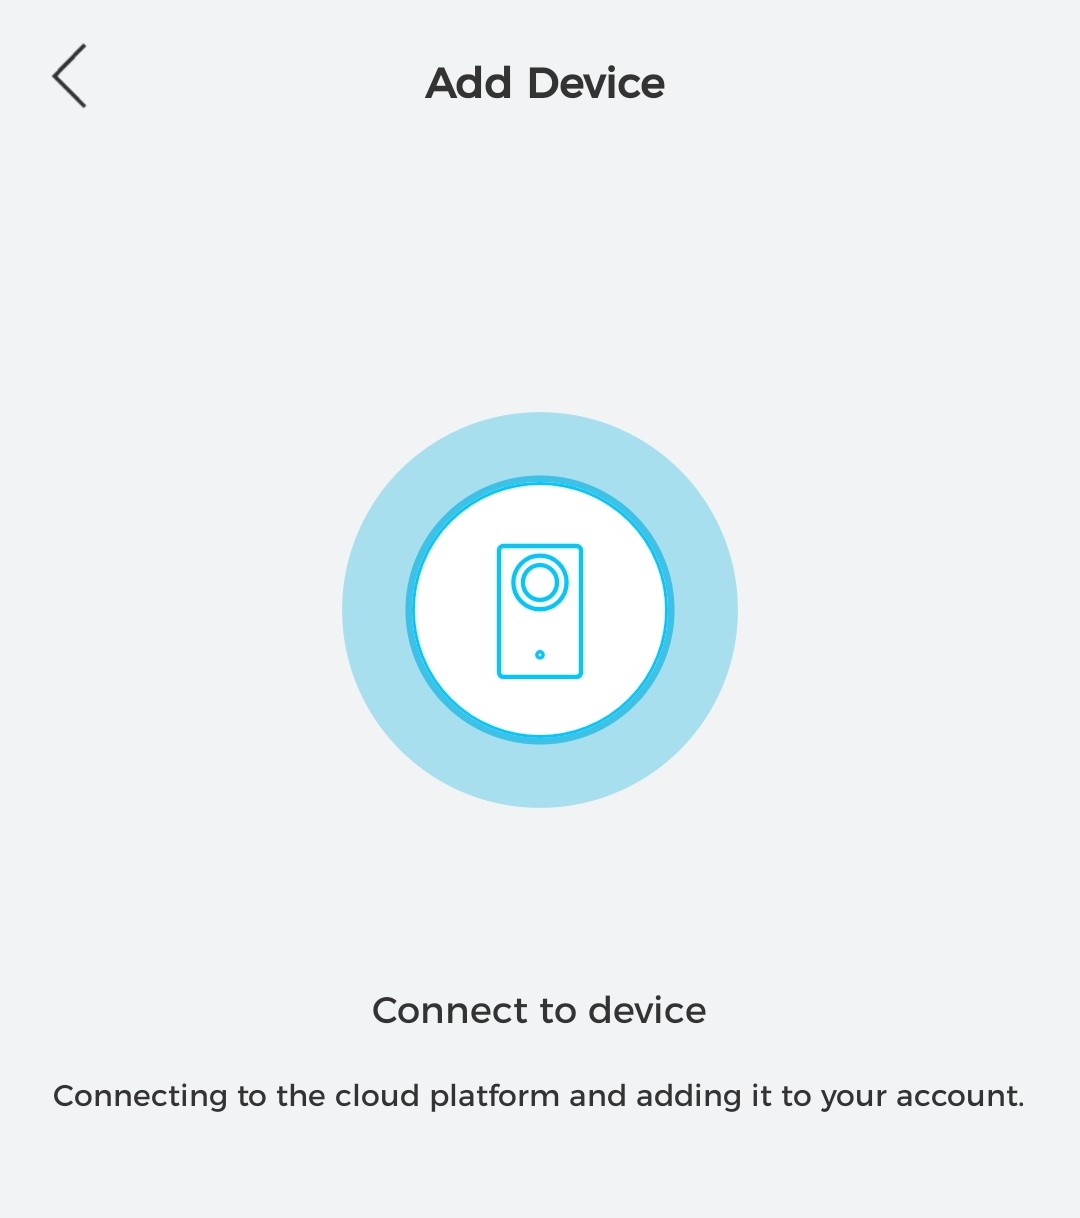
9. On this screen, wait without moving your phone too far away from the doorbell. This process may take several minutes to complete. | |||
[[File:Vdb_config_9.jpg|256px|link=https://wiki.luminyscorp.com/images/f/f9/Vdb_config_9.jpg]] | |||
10. Assign a name to the doorbell, then tap “Next” to continue. | |||
[[File:Vdb_config_10.jpg|256px|link=https://wiki.luminyscorp.com/images/0/03/Vdb_config_10.jpg]] | |||
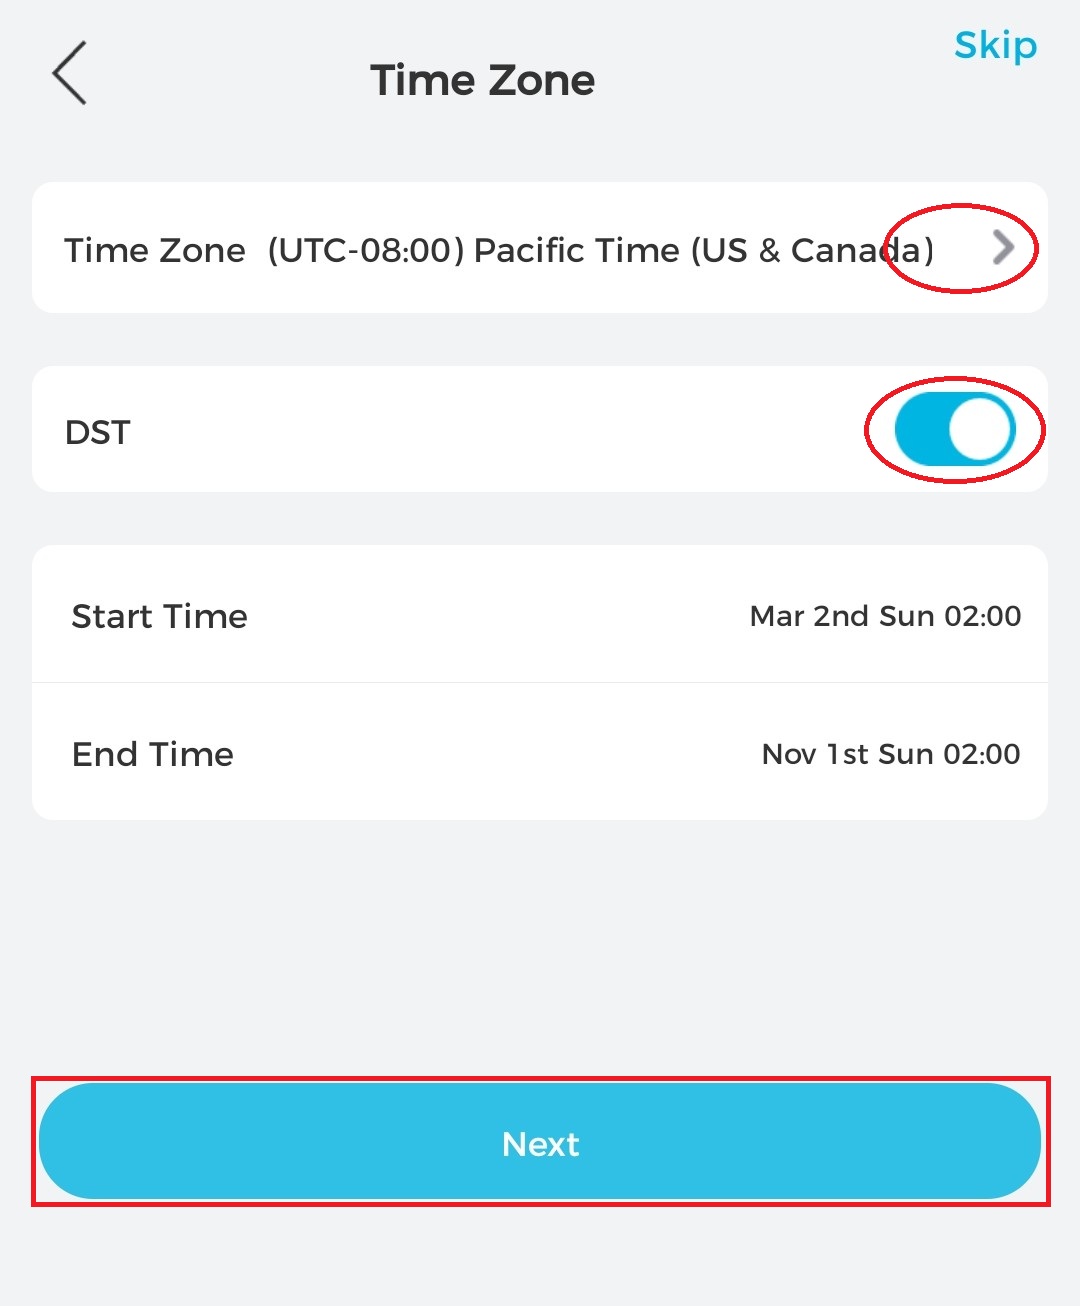
11. Adjust the time zone and daylight saving time (DST) settings as needed, then tap “Next” to continue. | |||
[[File:Vdb_config_11.jpg|256px|link=https://wiki.luminyscorp.com/images/4/46/Vdb_config_11.jpg]] | |||
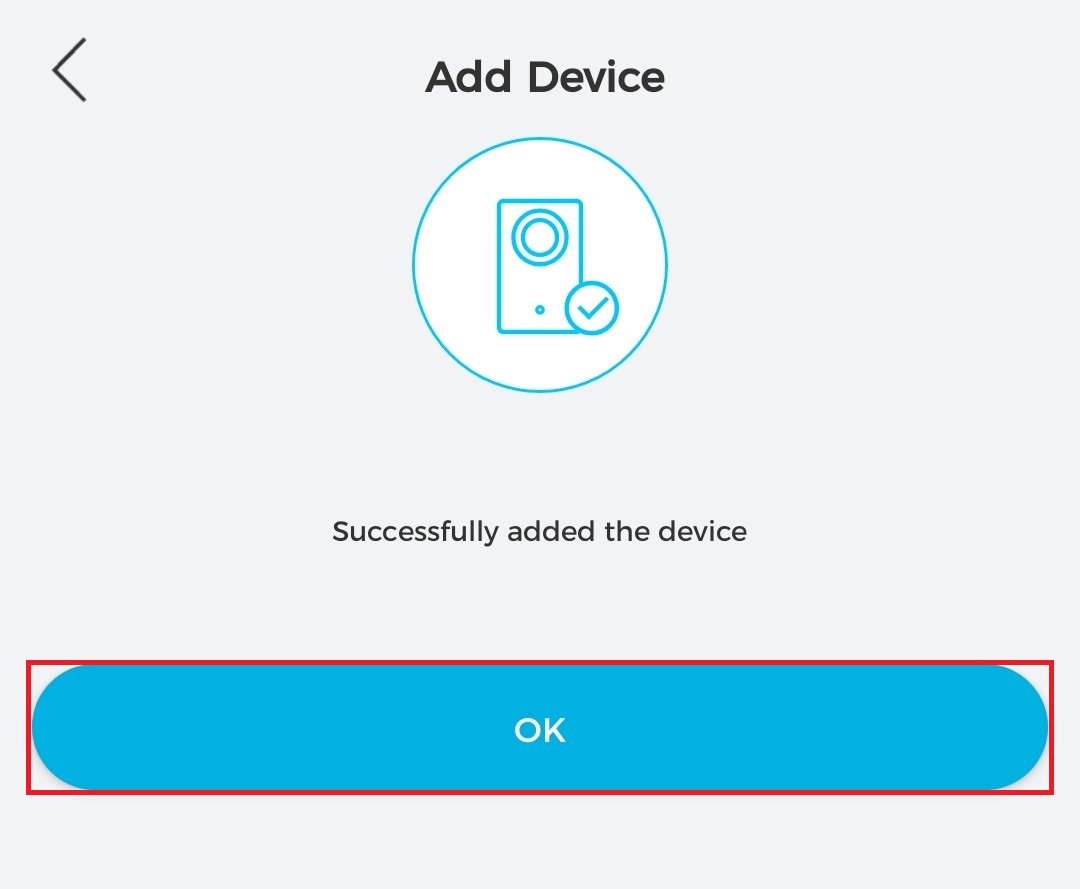
12. If this screen appears, the doorbell has been successfully added to your account. Tap “OK” to complete the setup. | |||
[[File:Vdb_config_12.jpg|256px|link=https://wiki.luminyscorp.com/images/a/ae/Vdb_config_12.jpg]] | |||
Latest revision as of 16:55, 8 June 2026

Description
This guide provides instructions for configuring your video doorbell for first-time use.
Prerequisites
- Installation instruction
- Register an account in LumiViewer
- Power on the doorbell and wait for the blue LED indicator to begin flashing.
- Download and open LumiViewer app
Step by Step Instructions
1. Tap the "+" icon in the top-right corner of the app, then select “SN/Scan.”
2. Scan the QR code on the product’s serial number (SN). Alternatively, tap the “Manual” button in the top-right corner to enter the SN manually.
3. If you scanned the QR code in the previous step, tap “Next” to continue. If you selected “Manual,” enter the serial number (SN) and then tap “Next” to proceed.
4. Follow the on-screen instructions, then tap “Next” to continue.
5. At this step, the following screen will appear. Please wait and keep your phone close to the doorbell.
6. Create a password for the doorbell. Providing an email address is optional. Tap "Next" to continue

7. Ensure your phone’s Wi‑Fi is enabled, then tap “Next” to continue.
8. Enter your Wi‑Fi password, then tap “Next” to continue.
9. On this screen, wait without moving your phone too far away from the doorbell. This process may take several minutes to complete.
10. Assign a name to the doorbell, then tap “Next” to continue.

11. Adjust the time zone and daylight saving time (DST) settings as needed, then tap “Next” to continue.
12. If this screen appears, the doorbell has been successfully added to your account. Tap “OK” to complete the setup.