NVR/Enabling and Using LumiSearch via WebGUI: Difference between revisions
Techsupport (talk | contribs) |
Techsupport (talk | contribs) |
||
| (8 intermediate revisions by the same user not shown) | |||
| Line 1: | Line 1: | ||
{{DISPLAYTITLE:Enabling and Using LumiSearch via WebGUI}} | |||
<div class="lm-banner">[[File:LuminysMainPageBanner2.png]]</div> | <div class="lm-banner">[[File:LuminysMainPageBanner2.png]]</div> | ||
| Line 4: | Line 6: | ||
===Description=== | ===Description=== | ||
This tutorial provides instructions for [[NVR/ | This tutorial provides basic instructions for [[NVR/Enabling_and_Using_LumiSearch_via_WebGUI#Enabling_LumiSearch|enabling]] and performing LumiSearch via [[NVR/Enabling_and_Using_LumiSearch_via_WebGUI#LumiSearch_via_Playback|Playback]] or [[NVR/Enabling_and_Using_LumiSearch_via_WebGUI#LumiSearch_via_Live_View|Live View]] in the webGUI. A more in-depth guide of the available LumiSearch features can be found [[NVR/LumiSearch_Features_via_WebGUI|here]]. | ||
===Prerequisites=== | ===Prerequisites=== | ||
| Line 10: | Line 12: | ||
* NVR with LumiSearch capabilities | * NVR with LumiSearch capabilities | ||
* IP Camera with LumiSearch capabilities | * IP Camera with LumiSearch capabilities | ||
===Enabling LumiSearch=== | ===Enabling LumiSearch=== | ||
| Line 29: | Line 28: | ||
===LumiSearch via Playback=== | ===LumiSearch via Playback=== | ||
<youtube>https://youtu.be/Ld0Q4648oe8</youtube> | |||
1. From the Playback tab, click the small 'person icon' at the bottom right of the screen—this is the LumiSearch button. You can click while playback is actively displaying a target, or you can pause the video while a target is in frame. | 1. From the Playback tab, click the small 'person icon' at the bottom right of the screen—this is the LumiSearch button. You can click while playback is actively displaying a target, or you can pause the video while a target is in frame. | ||
| Line 56: | Line 57: | ||
===LumiSearch via Live View=== | ===LumiSearch via Live View=== | ||
<youtube>https://youtu.be/Op4_AGUp36Q</youtube> | |||
1. Searching from Live View is very similar to doing it from Playback, but without the advantage of being able to pause while the target is on screen. To start, open the Live View tab at the top of the WebGUI and click a LumiSearch capable camera to start the live feed. When a target is in frame, click the LumiSearch button at the bottom of the screen. | 1. Searching from Live View is very similar to doing it from Playback, but without the advantage of being able to pause while the target is on screen. To start, open the Live View tab at the top of the WebGUI and click a LumiSearch capable camera to start the live feed. When a target is in frame, click the LumiSearch button at the bottom of the screen. | ||
Latest revision as of 11:55, 9 September 2025

Enabling and Using LumiSearch via WebGUI
Description
This tutorial provides basic instructions for enabling and performing LumiSearch via Playback or Live View in the webGUI. A more in-depth guide of the available LumiSearch features can be found here.
Prerequisites
- Access NVR's webGUI
- NVR with LumiSearch capabilities
- IP Camera with LumiSearch capabilities
Enabling LumiSearch
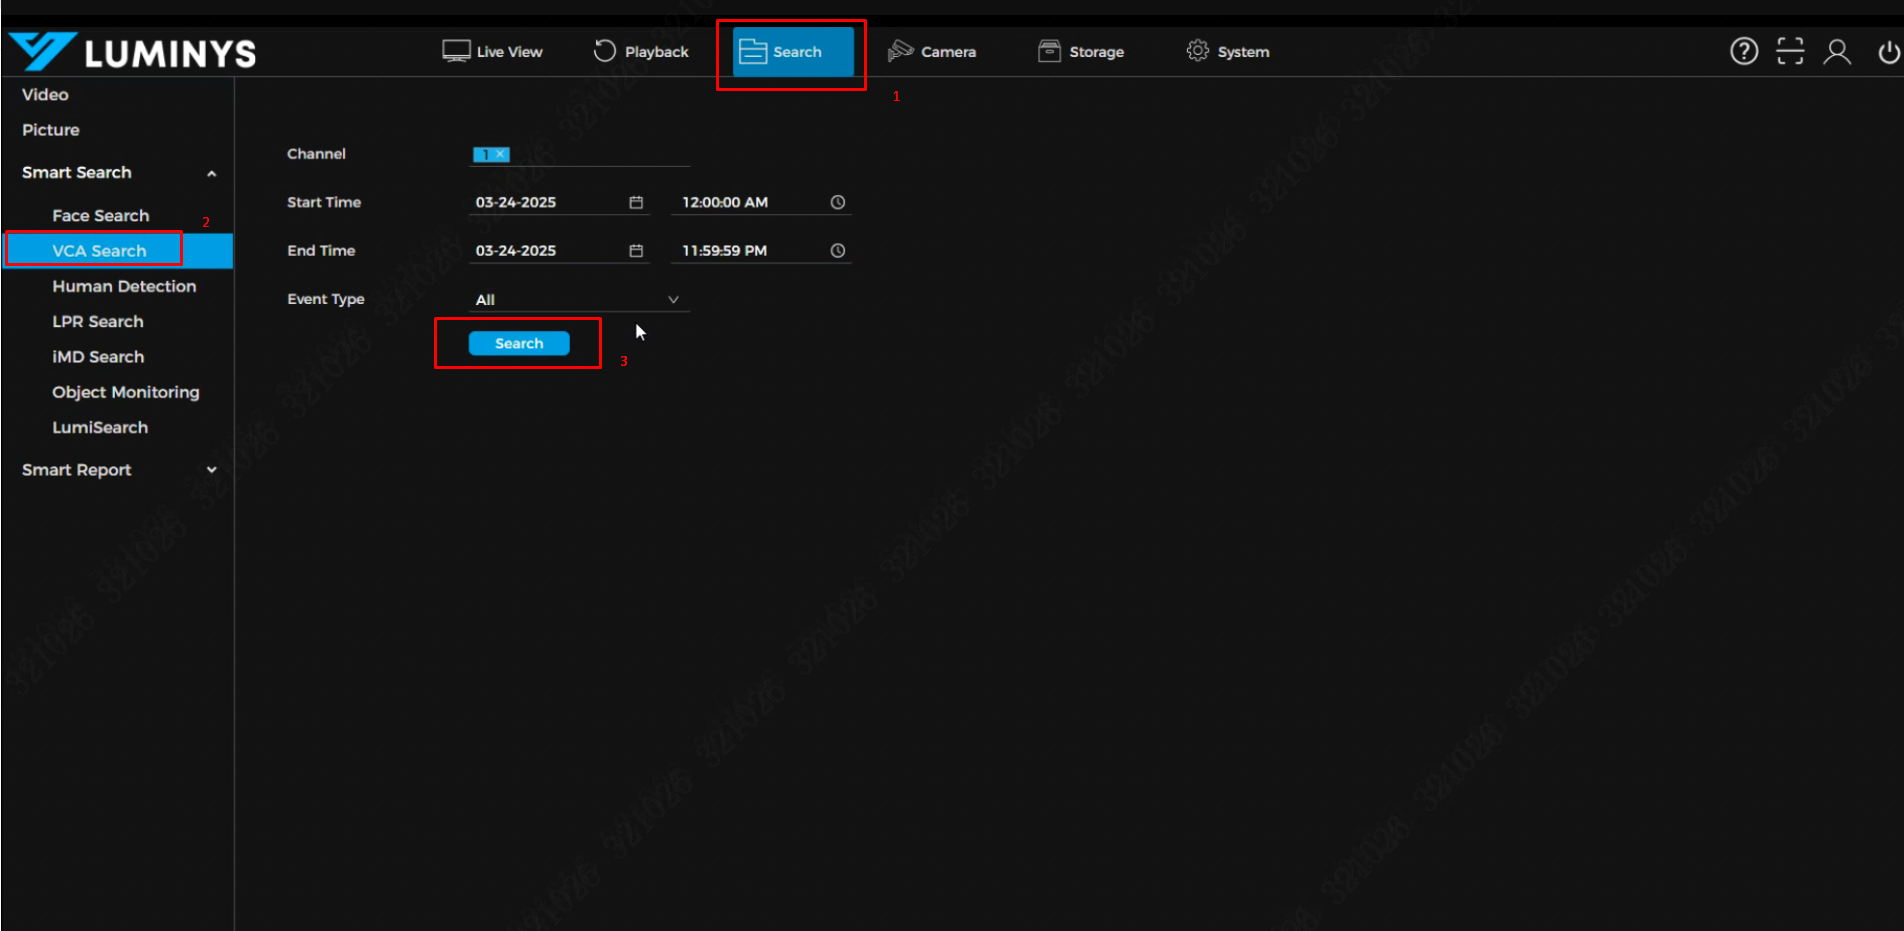
1. Start by accessing the NVR's web GUI and entering the login credentials.
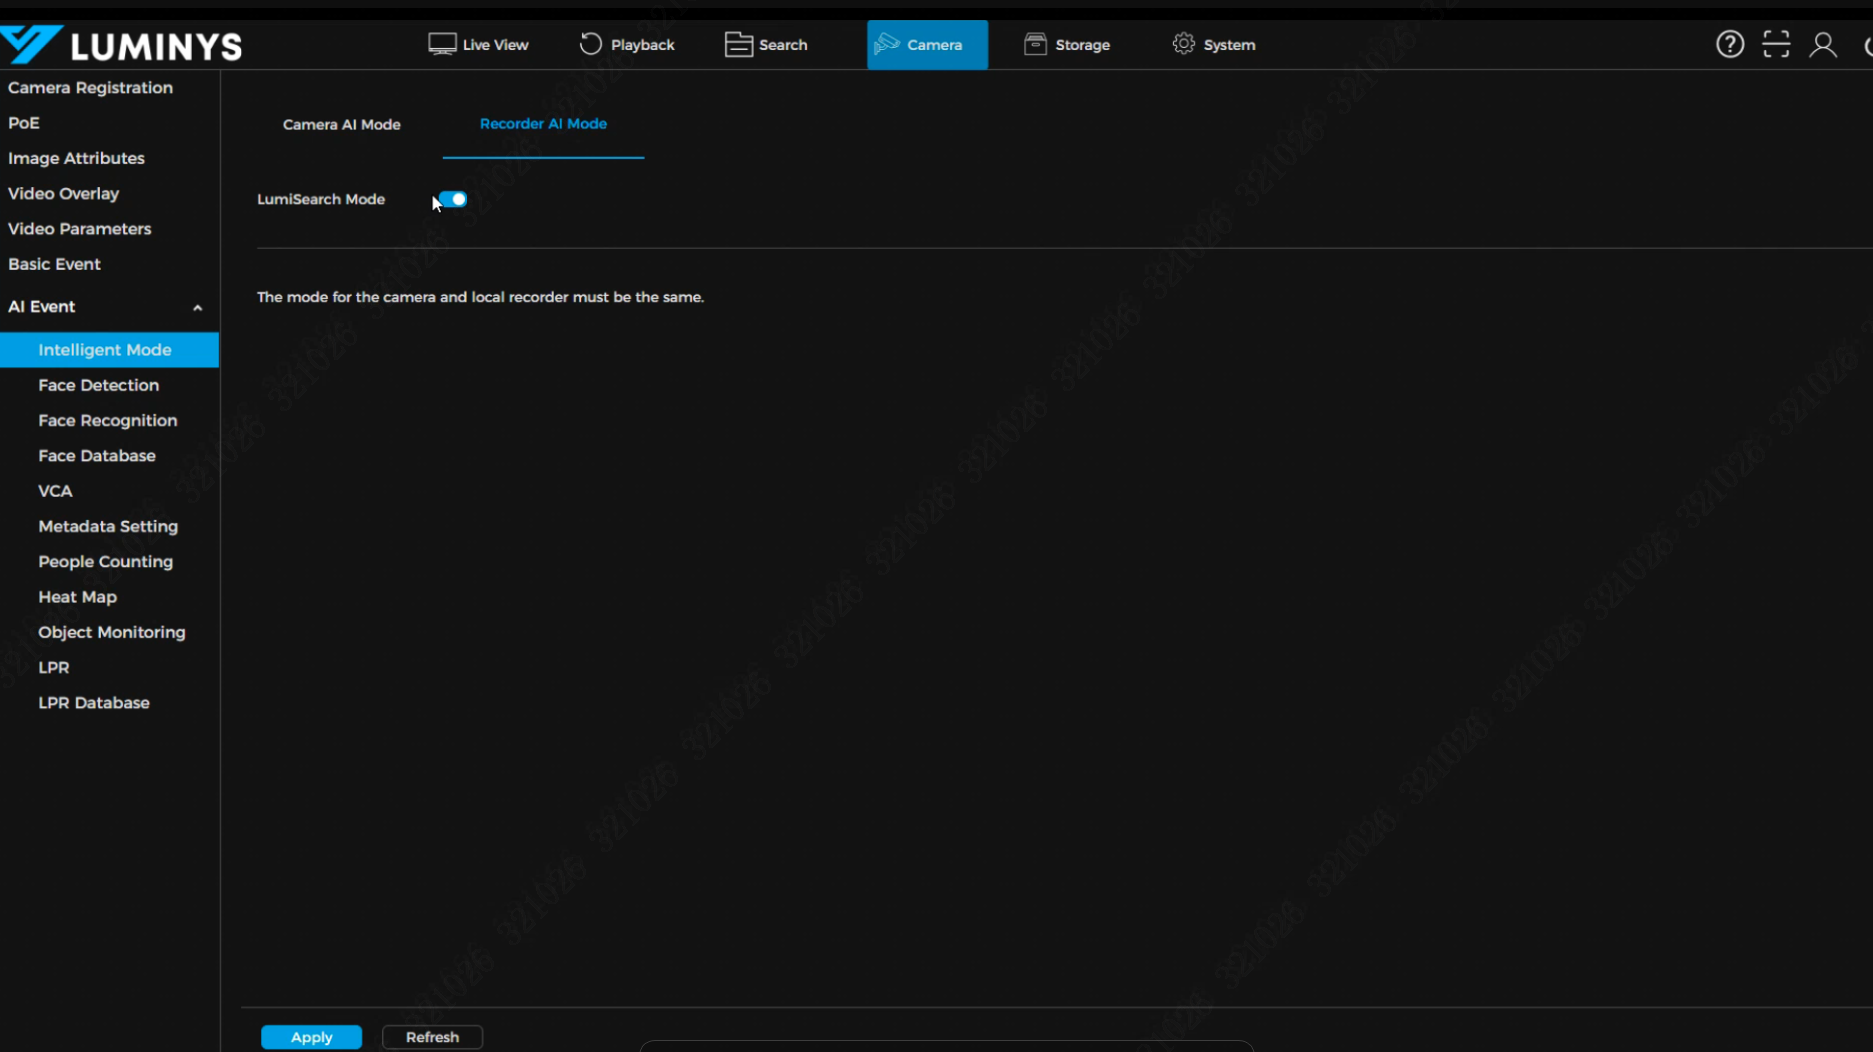
2. After logging in, verify that LumiSearch mode is enabled on the NVR.
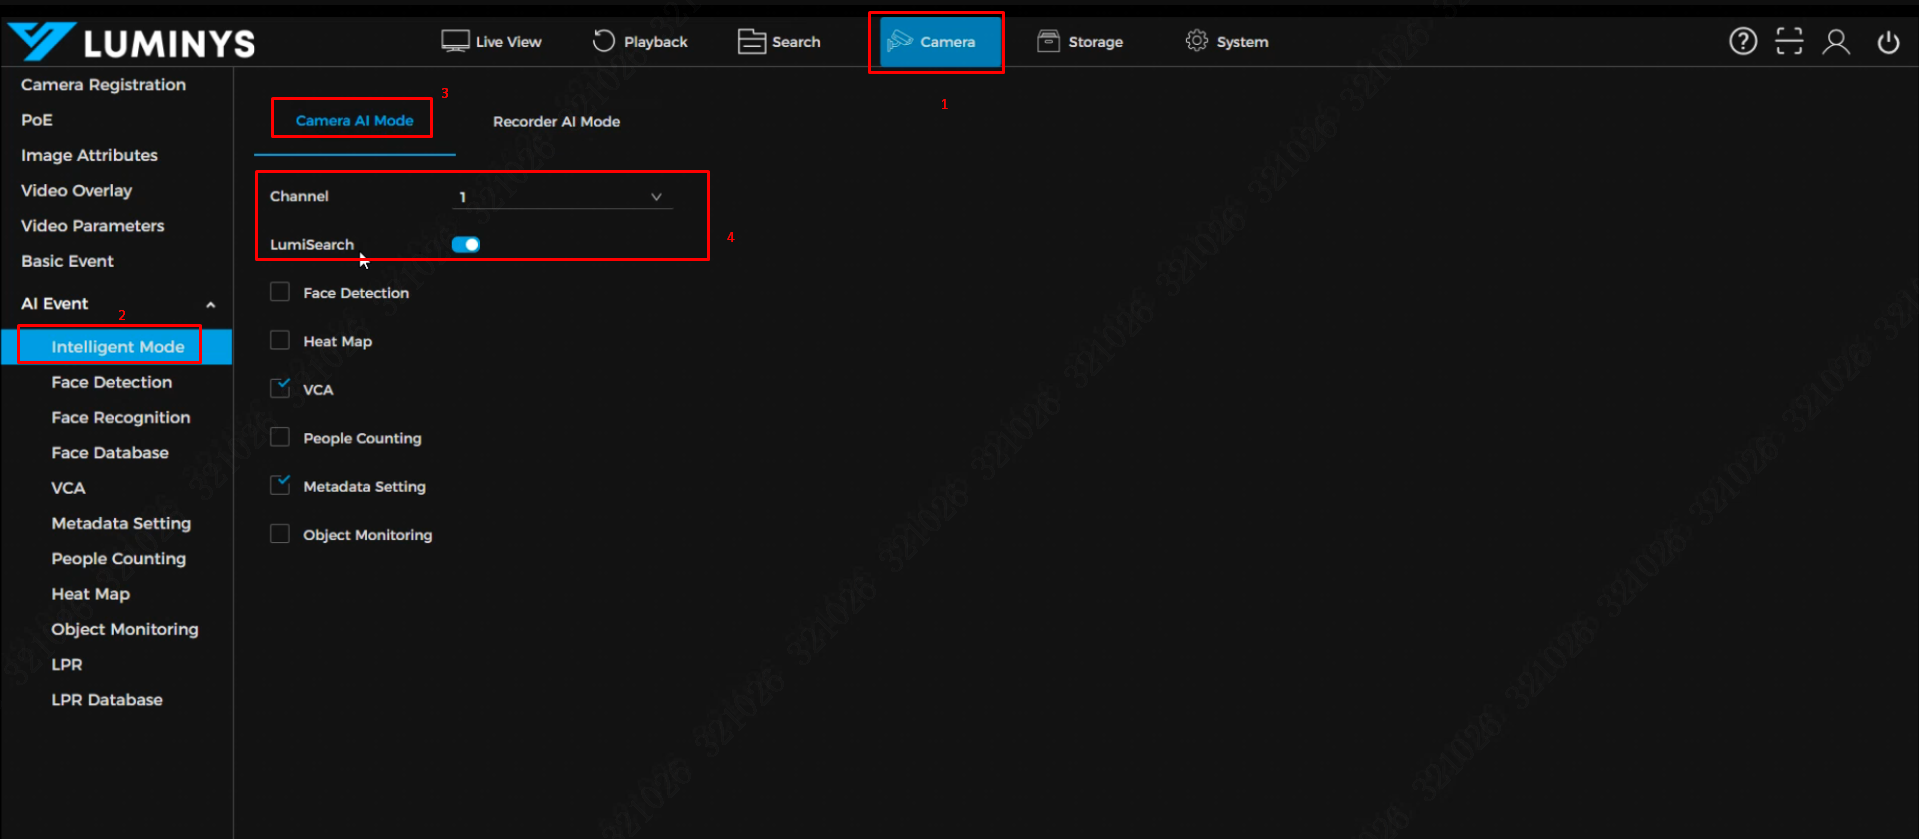
3. Additionally, confirm that the connected cameras support LumiSearch and that LumiSearch mode is enabled.
LumiSearch via Playback
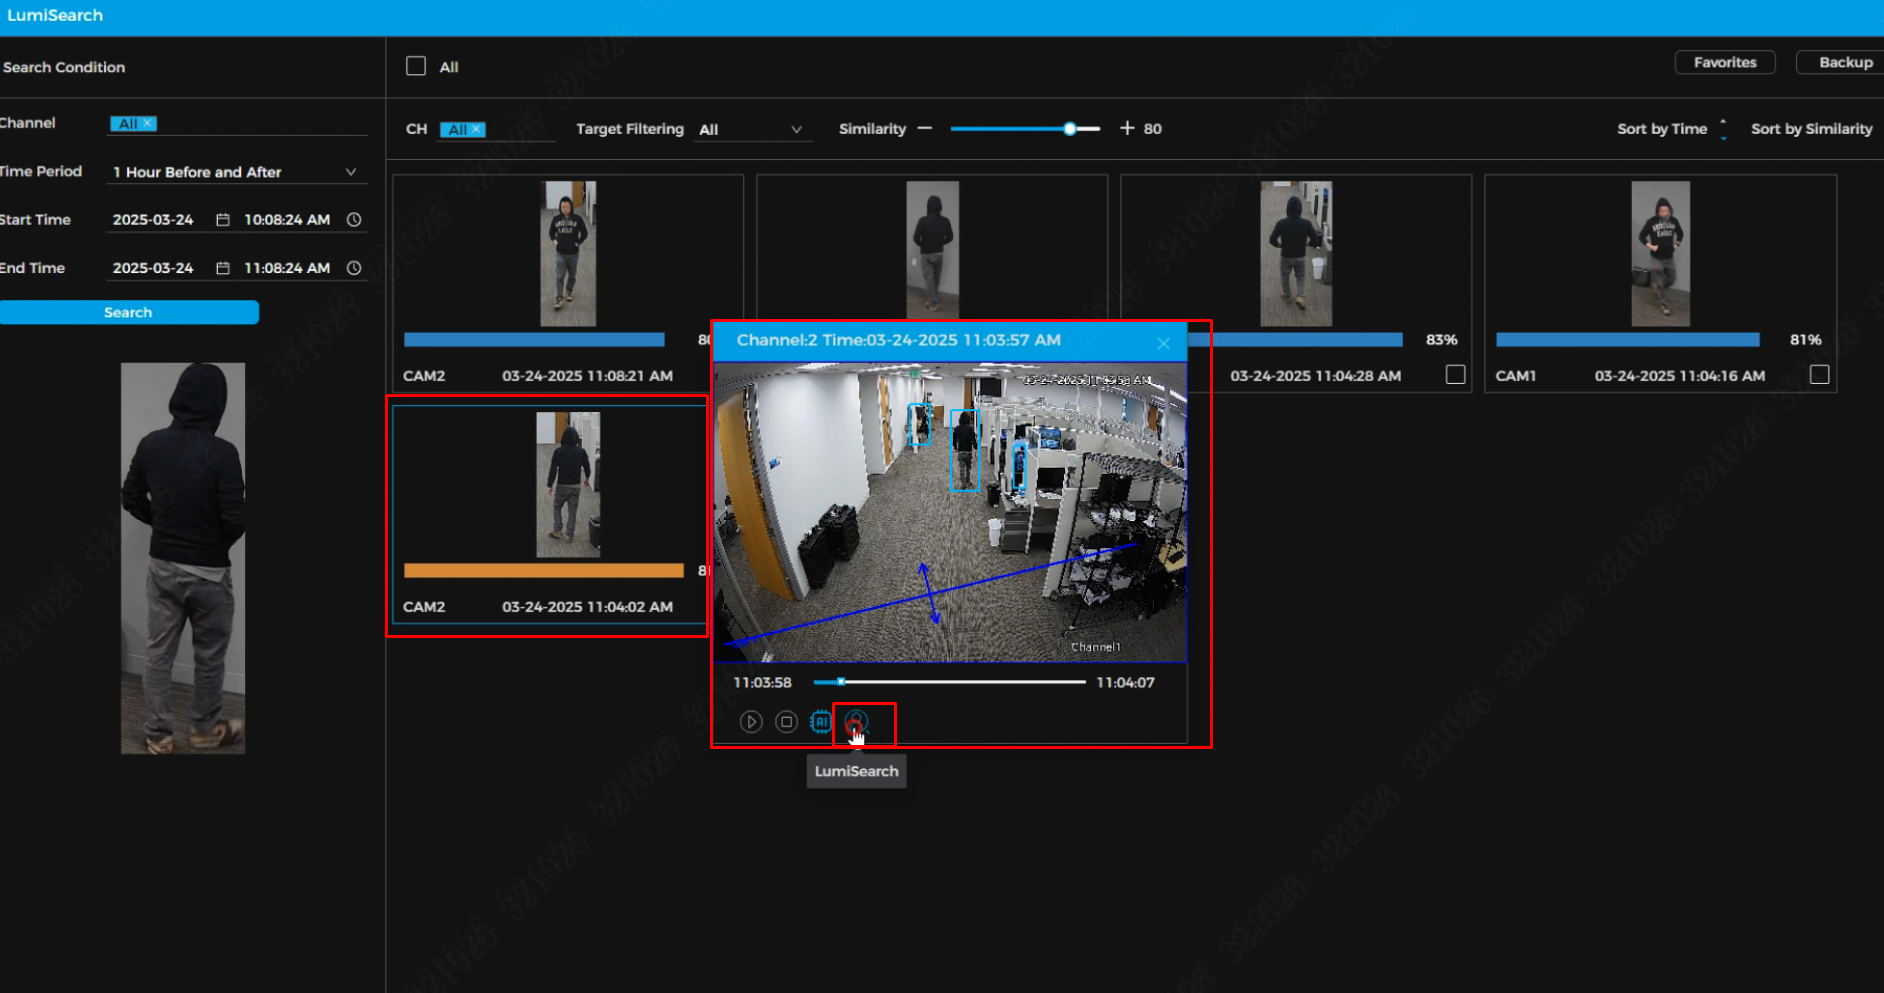
1. From the Playback tab, click the small 'person icon' at the bottom right of the screen—this is the LumiSearch button. You can click while playback is actively displaying a target, or you can pause the video while a target is in frame.
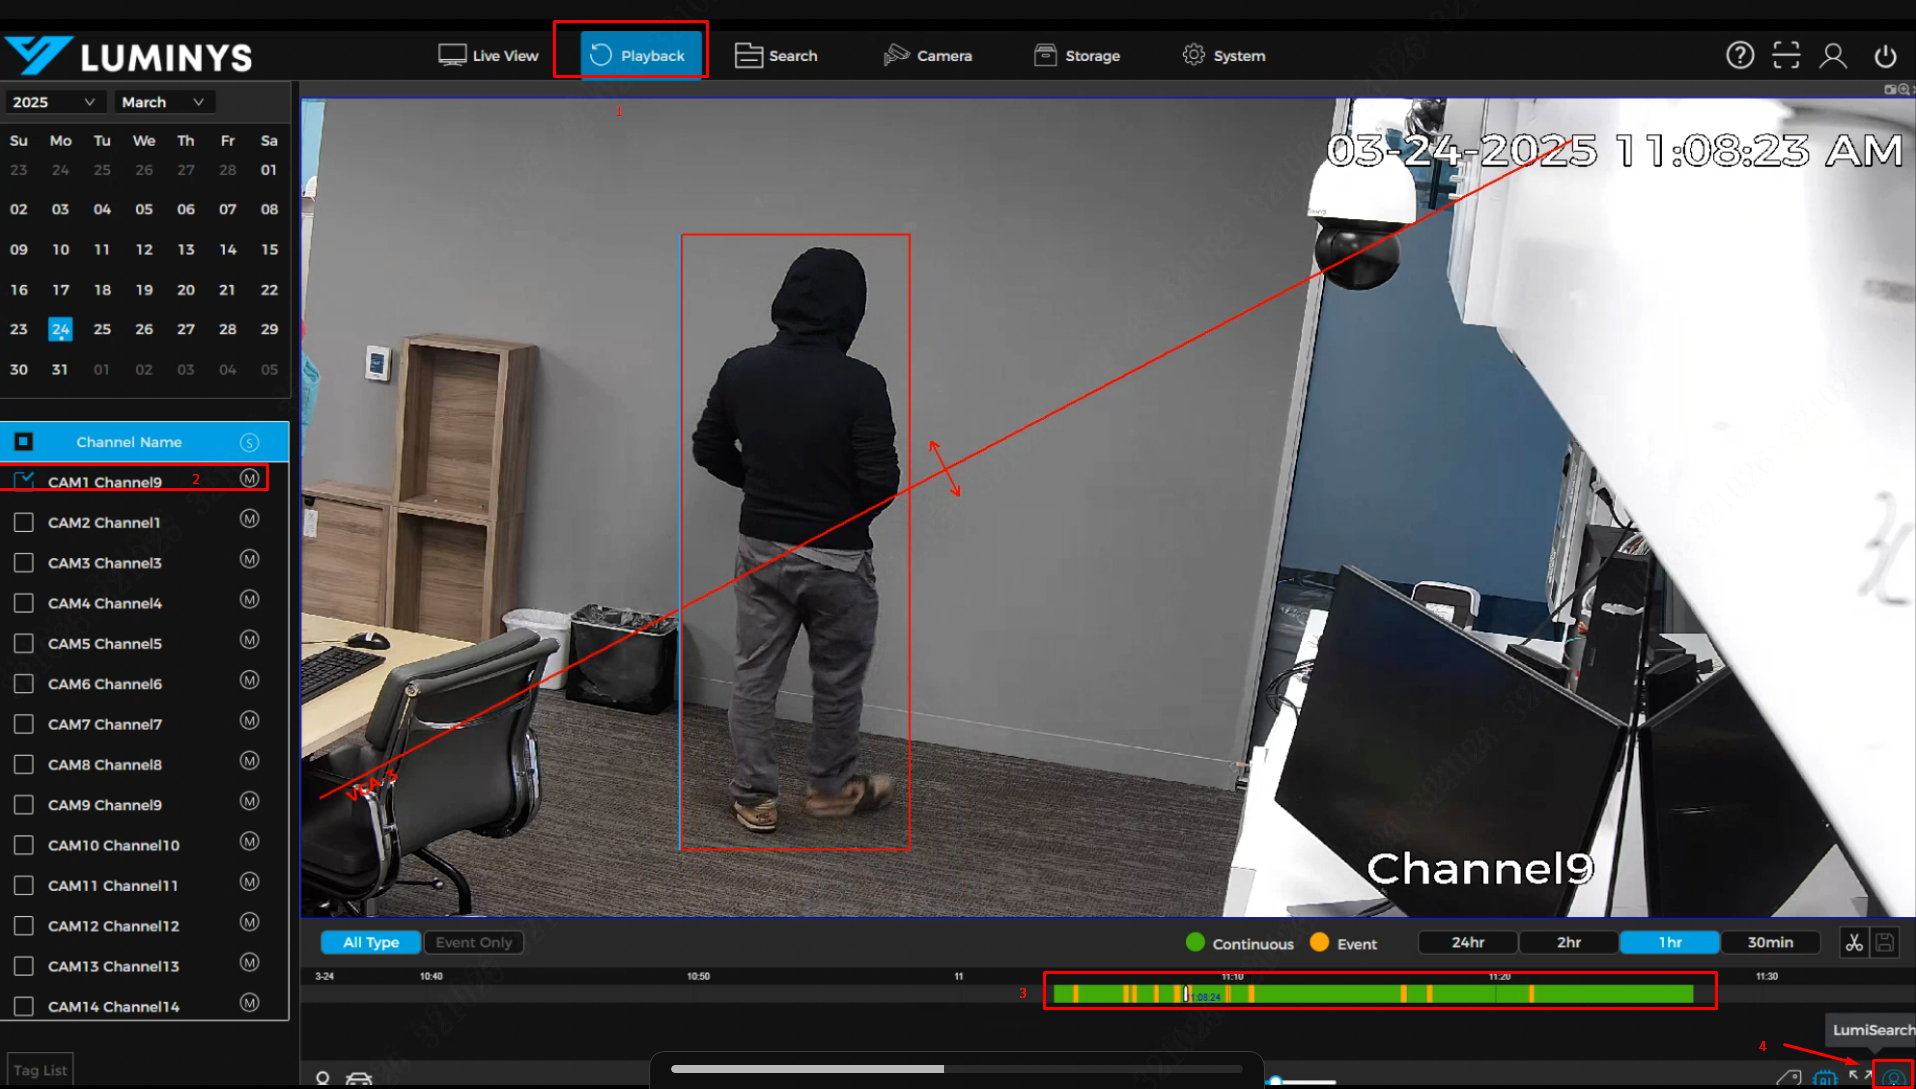
2. Once the LumiSearch icon is clicked, the screen will zoom in on the target and highlight it with a blue rectangle. Next, click the magnifying glass icon to proceed.

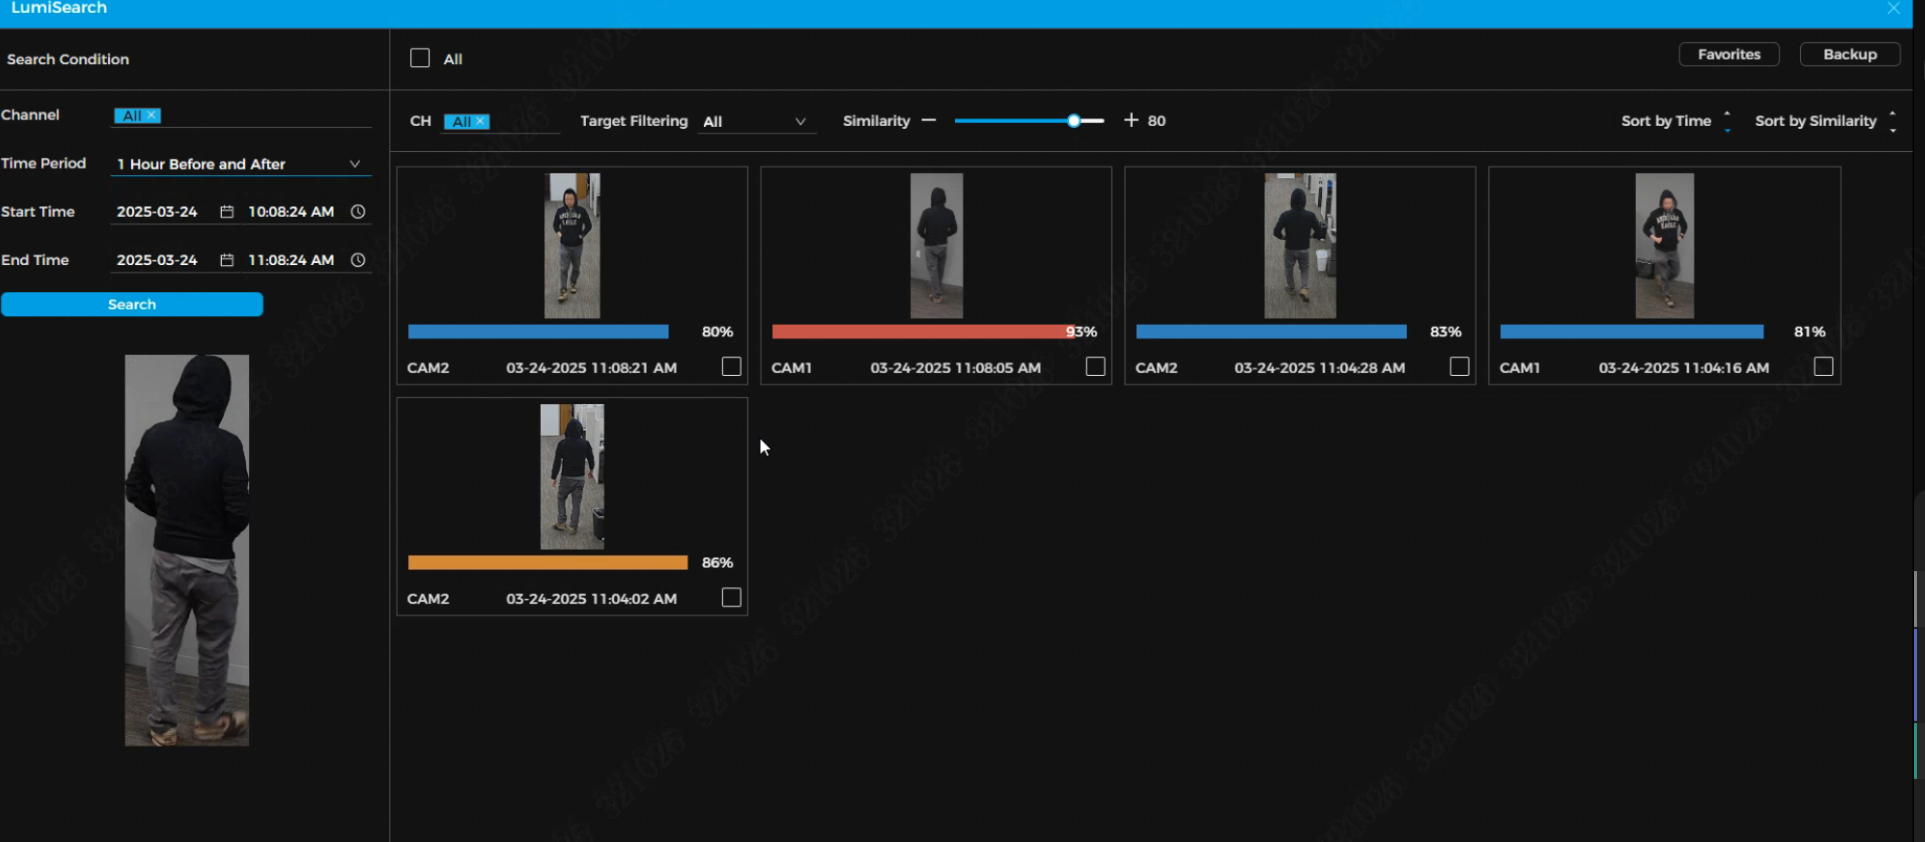
3. All results from the LumiSearch cameras will then be displayed. In this example, the results will be from Camera 1 and Camera 2. The search time frame can be adjusted using the panel on the left. Additional search settings and features are covered in more detail in the LumiSearch Features via WebGUI guide.
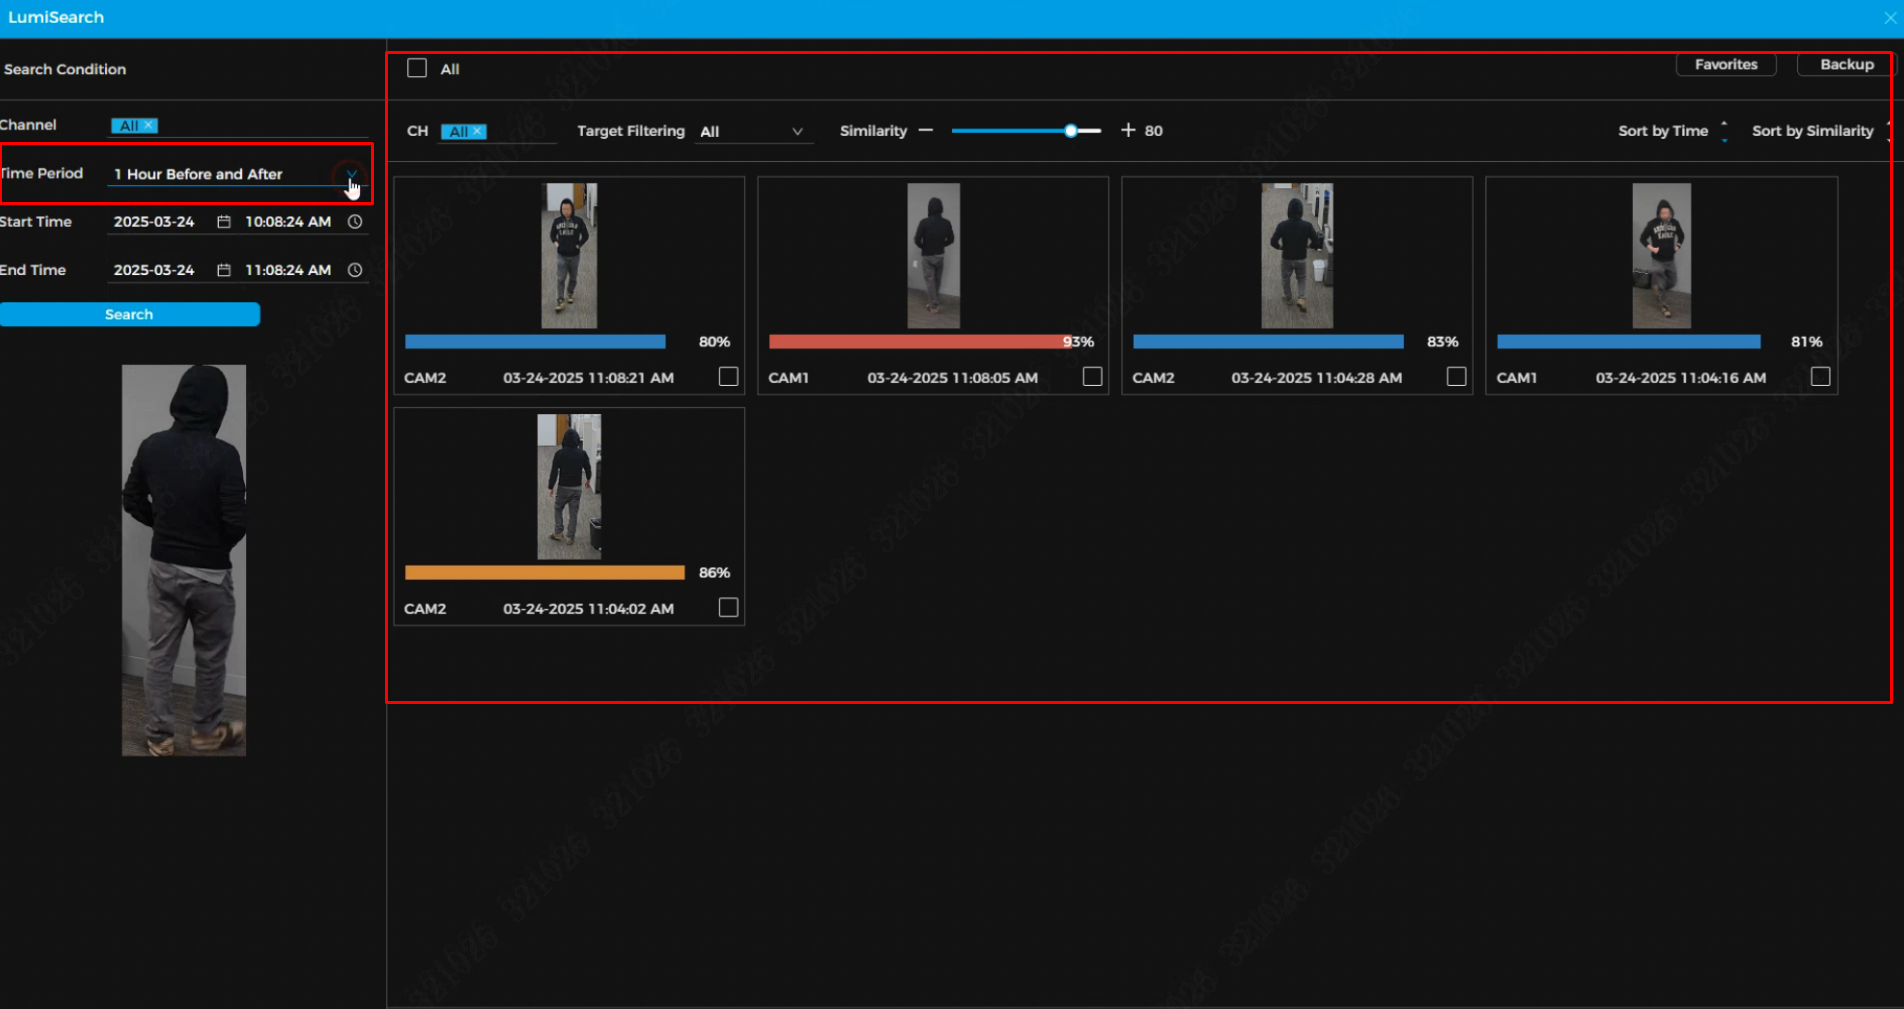
4. Any result can be selected for quick playback, and a secondary search can be performed from the displayed results.
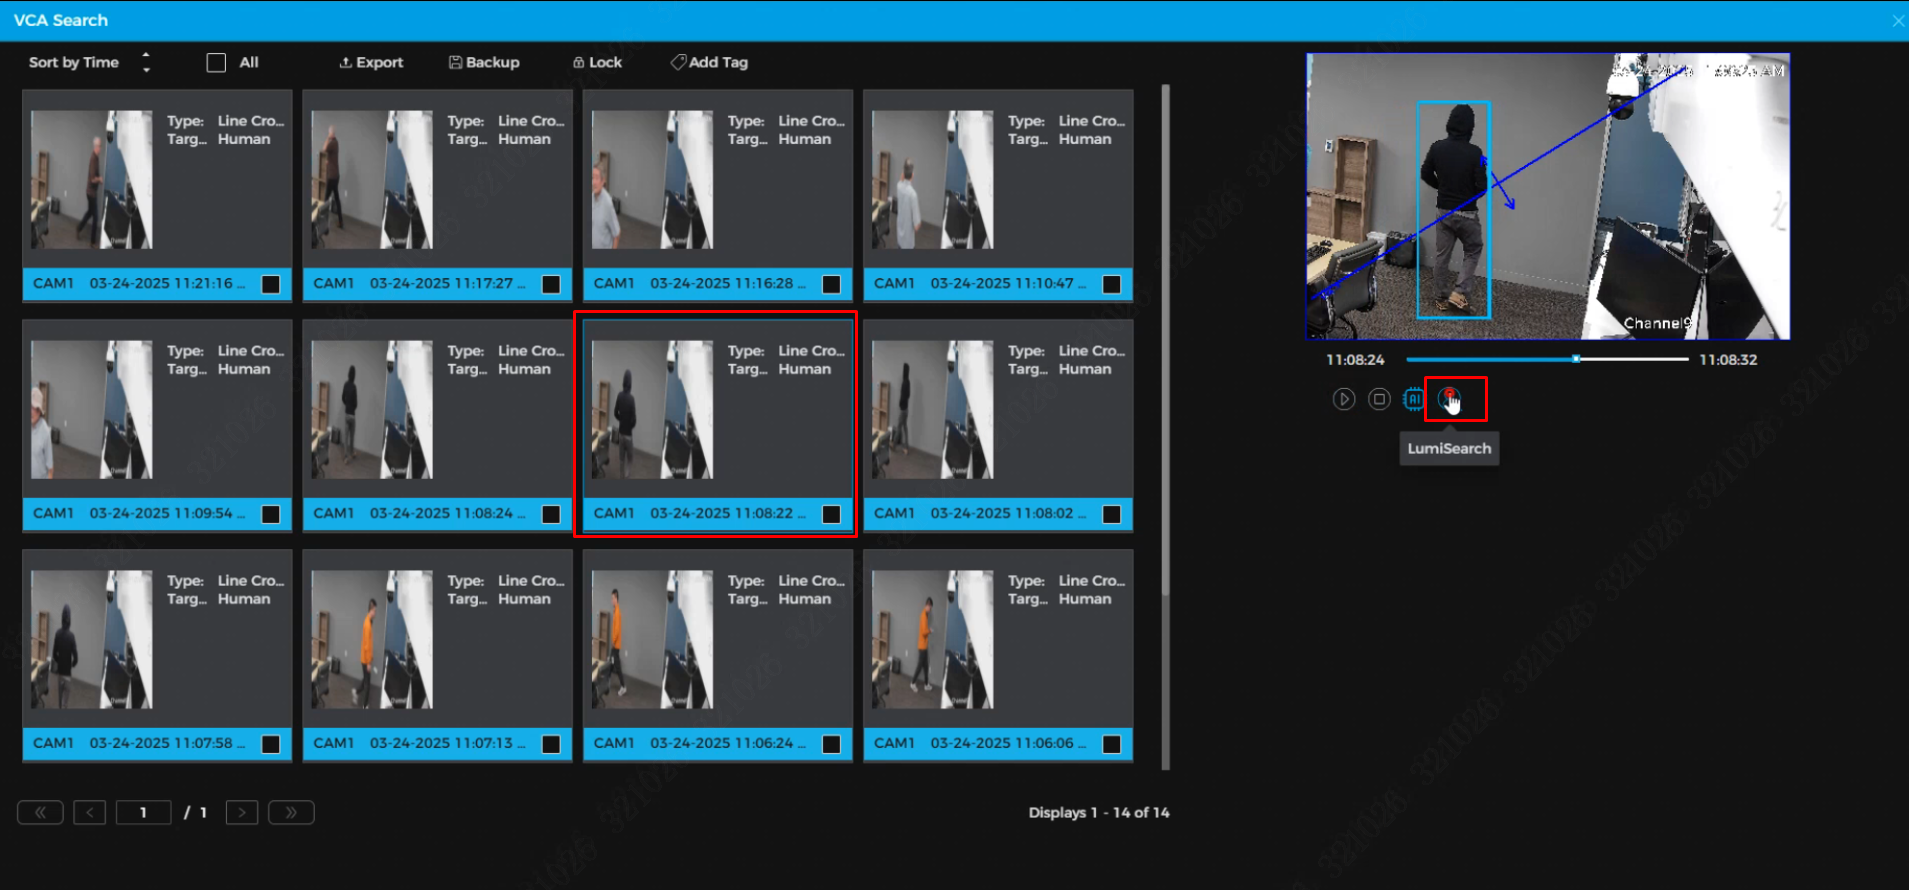
5. Additionally, LumiSearch allows searches based on events. In this example, the VCA/Tripwire results will be applied.
6. From the Tripwire results, the target can be selected for a secondary search, which will retrieve the secondary LumiSearch results.
LumiSearch via Live View
1. Searching from Live View is very similar to doing it from Playback, but without the advantage of being able to pause while the target is on screen. To start, open the Live View tab at the top of the WebGUI and click a LumiSearch capable camera to start the live feed. When a target is in frame, click the LumiSearch button at the bottom of the screen.

2. After clicking the LumiSearch button, you will be taken to a fullscreen frame of the camera with the target in a blue border. Click the magnifying glass in the bottom right of the target frame to LumiSearch the target.

3. Once the search has loaded, you can filter, adjust time frame, camera channels, and much more. This is covered in more detail in the LumiSearch Features via WebGUI guide.
