LumiGuardian/LumiGuardian Starlink setup: Difference between revisions
Techsupport (talk | contribs) No edit summary |
Techsupport (talk | contribs) |
||
| (14 intermediate revisions by the same user not shown) | |||
| Line 1: | Line 1: | ||
{{Header}} | {{Header}} | ||
<div class="center">Starlink setup for LumiGuardian</div> | = <div class="center">Starlink setup for LumiGuardian</div> = | ||
==Description== | ==Description== | ||
For Internal Use Only: A brief introduction to the idea of using Starlink for LumiWatch deployments. | |||
==Prerequisites== | ==Prerequisites== | ||
* | * Starlink device | ||
* [https://www.amazon.com/Starlink-Battery-12V-48V-Terminals-Off-Grid/dp/B0FGF7Y8TY/ref=sxin_16_pa_sp_search_thematic_sspa?content-id=amzn1.sym.4893857e-50c3-487f-b697-7c75058e4656%3Aamzn1.sym.4893857e-50c3-487f-b697-7c75058e4656&crid=2LQ1MIXD5B4FT&cv_ct_cx=starlink%2Bdc%2Bcable&keywords=starlink%2Bdc%2Bcable&pd_rd_i=B0FGFFCJ55&pd_rd_r=a6800ef5-38dd-4951-b51d-02ea591182b7&pd_rd_w=7qrDN&pd_rd_wg=tGMAE&pf_rd_p=4893857e-50c3-487f-b697-7c75058e4656&pf_rd_r=MQRPFWK5DTP5HBK4H550&qid=1793405922&sbo=RZvfv%2F%2FHxDF%2BO5021pAnSA%3D%3D&sprefix=starlink%2BDC%2Bcab%2Caps%2C158&sr=1-1-e169343e-09af-4d41-85b1-8335fe8f32d0-spons&aref=UrDwn4PlzI&sp_csd=d2lkZ2V0TmFtZT1zcF9zZWFyY2hfdGhlbWF0aWM&th=1 DC Power Cable with Fuse Holder for Starlink Mini] (The cable length is not fixed; adjust the cable as needed.) | |||
* Phillips screw driver | |||
* Voltmeter | |||
==Step by step== | ==Step by step== | ||
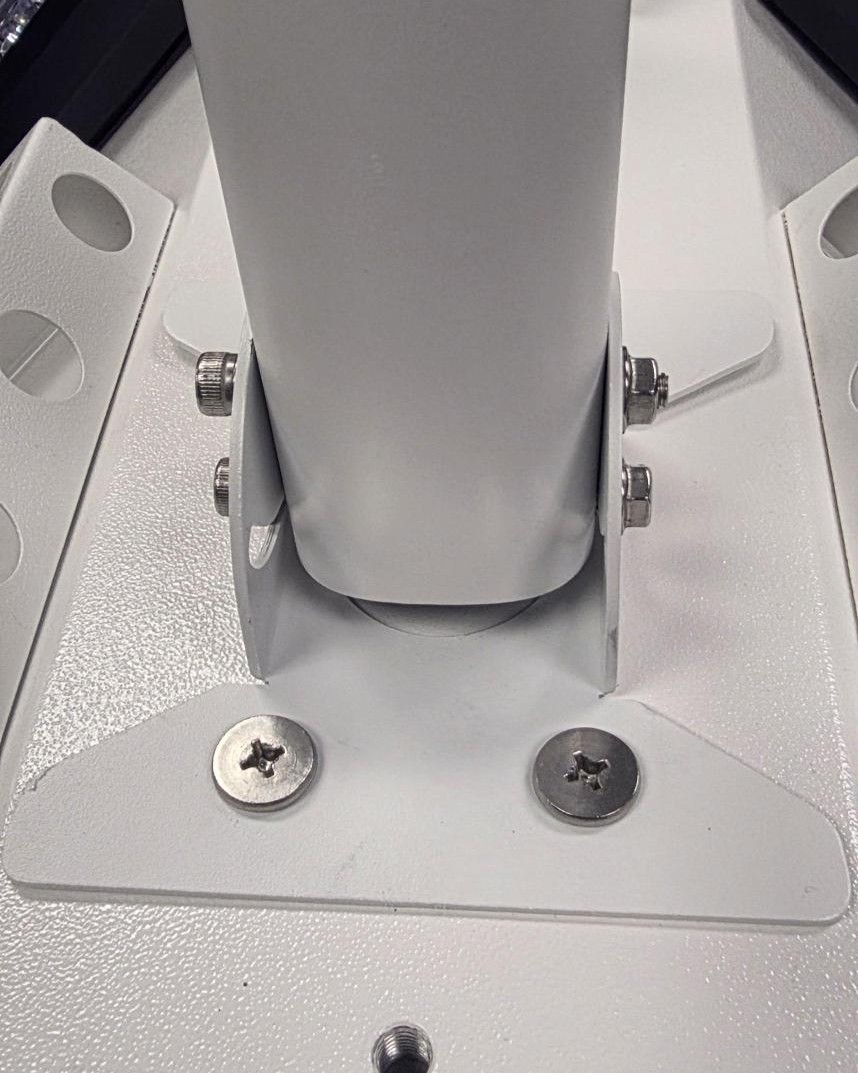
1. Remove the two screws securing the bracket to the control box, then remove the bracket.</br> | |||
[[File:LumiGuardian_Starlink_1a.jpeg|512px|link=https://wiki.luminyscorp.com/images/4/49/LumiGuardian_Starlink_1a.jpeg]] | |||
[[File:LumiGuardian_Starlink_1b.jpeg|512px|link=https://wiki.luminyscorp.com/images/e/e9/LumiGuardian_Starlink_1b.jpeg]] | |||
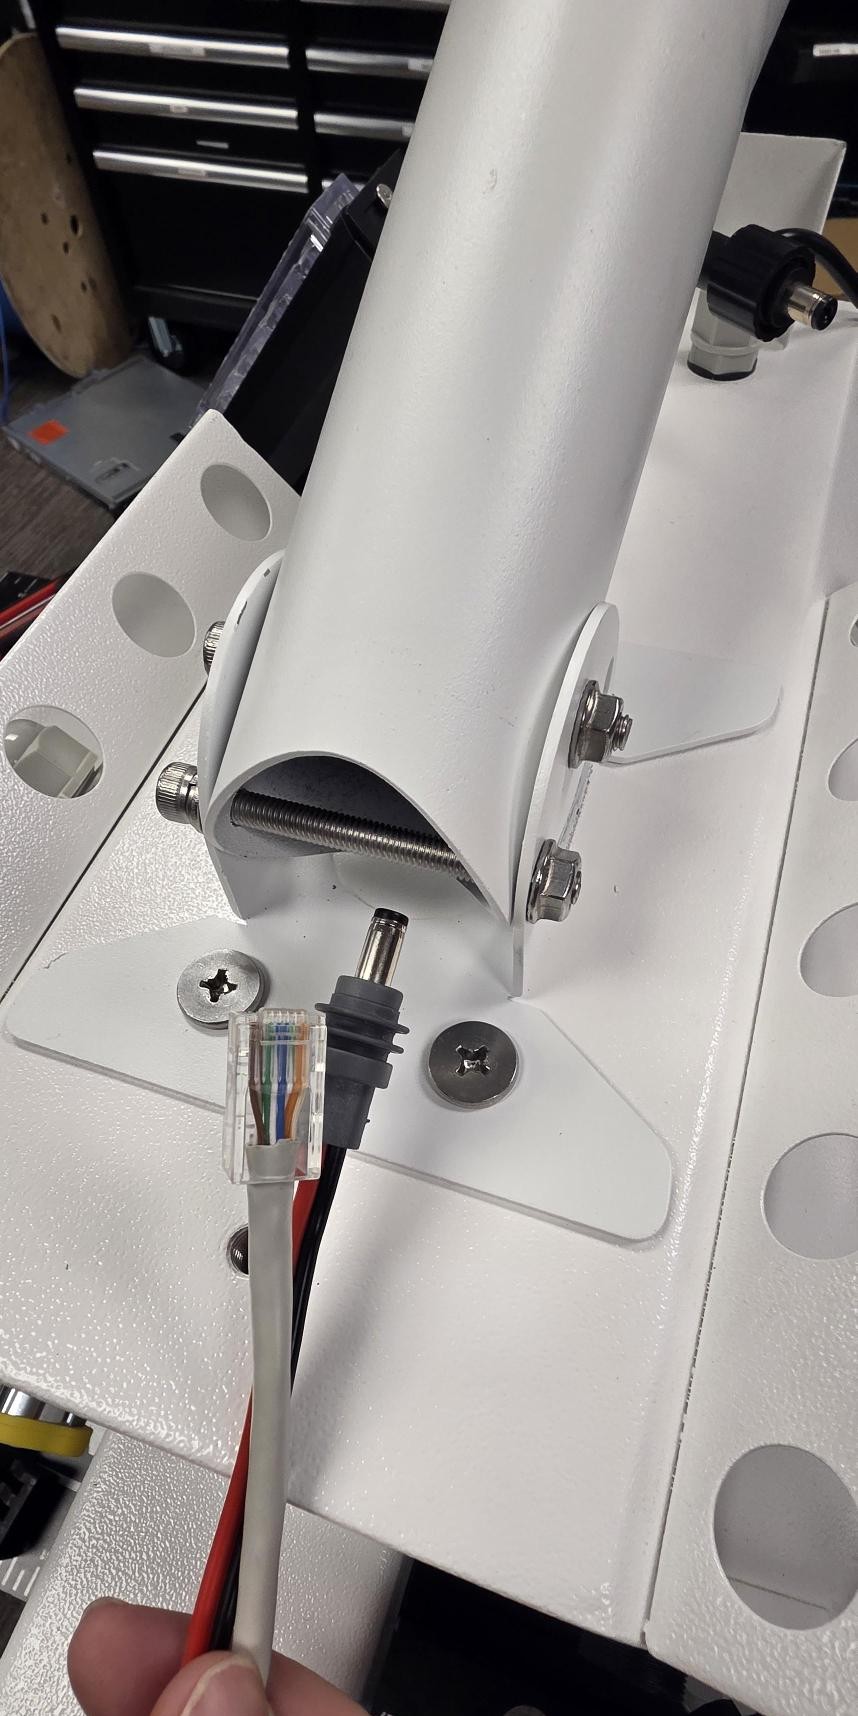
2. Align the four holes on the mounting arm with the four threaded holes exposed after removing the bracket, then secure the mounting arm using the four screws.</br> | |||
[[File:LumiGuardian_Starlink_2a.jpeg|512px|link=https://wiki.luminyscorp.com/images/d/de/LumiGuardian_Starlink_2a.jpeg]] | |||
[[File:LumiGuardian_Starlink_2b.jpeg|512px|link=https://wiki.luminyscorp.com/images/c/c3/LumiGuardian_Starlink_2b.jpeg]] | |||
3. From the bottom of the mounting arm, feed the power cable (plug end first) and the Ethernet cable through the arm. | |||
[[File:LumiGuardian_Starlink_3.jpeg|512px|link=https://wiki.luminyscorp.com/images/a/a2/LumiGuardian_Starlink_3.jpeg]] | |||
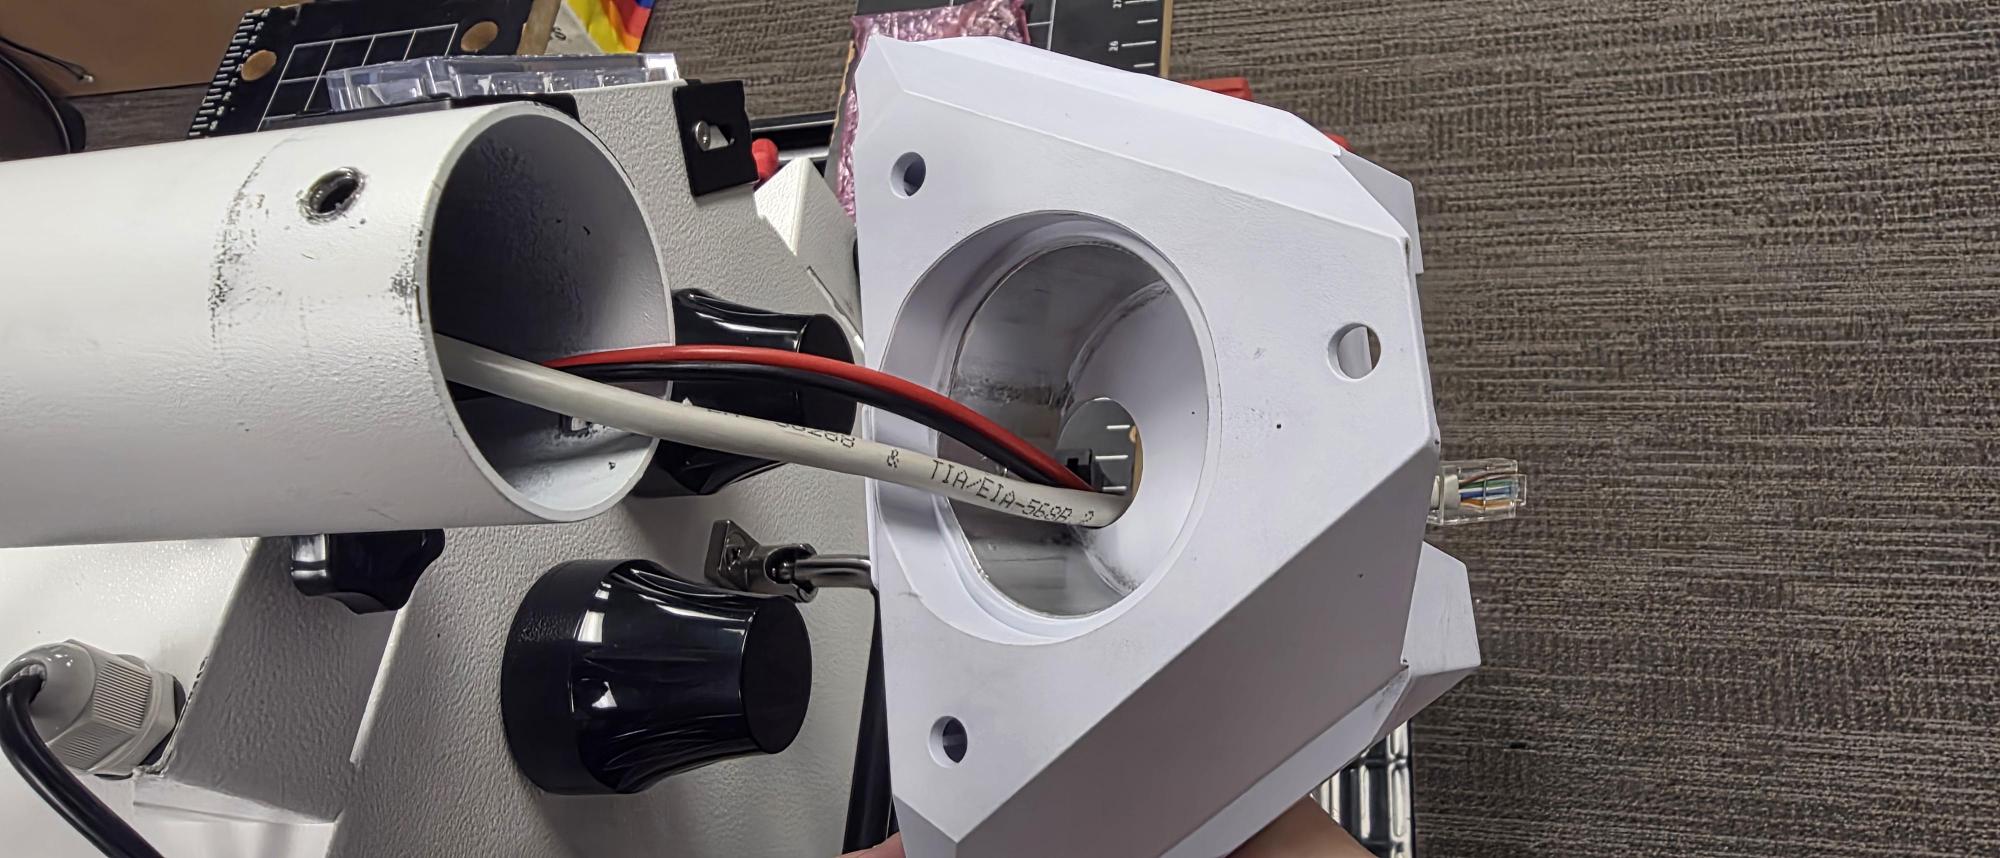
4. From the top of the mounting arm, where the cables exit, feed the cables through the opening in the Starlink mounting bracket. | |||
[[File:LumiGuardian_Starlink_4.jpeg|512px|link=https://wiki.luminyscorp.com/images/3/3e/LumiGuardian_Starlink_4.jpeg]] | |||
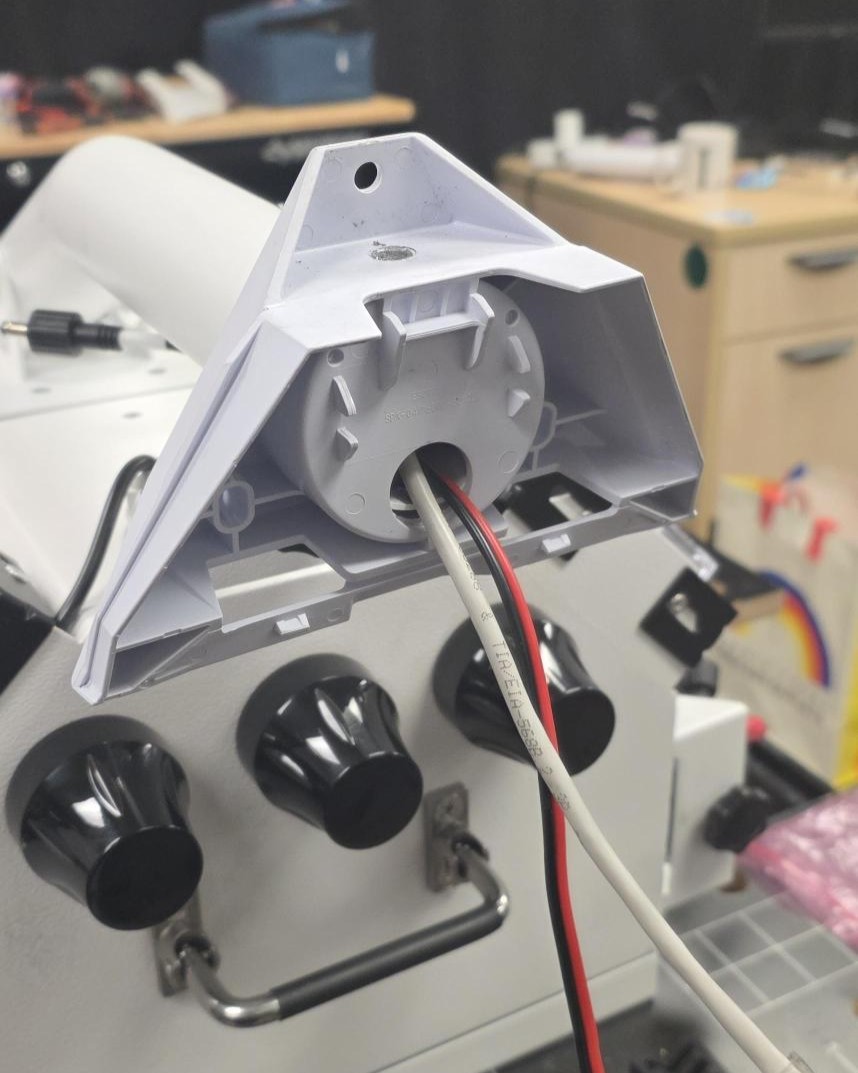
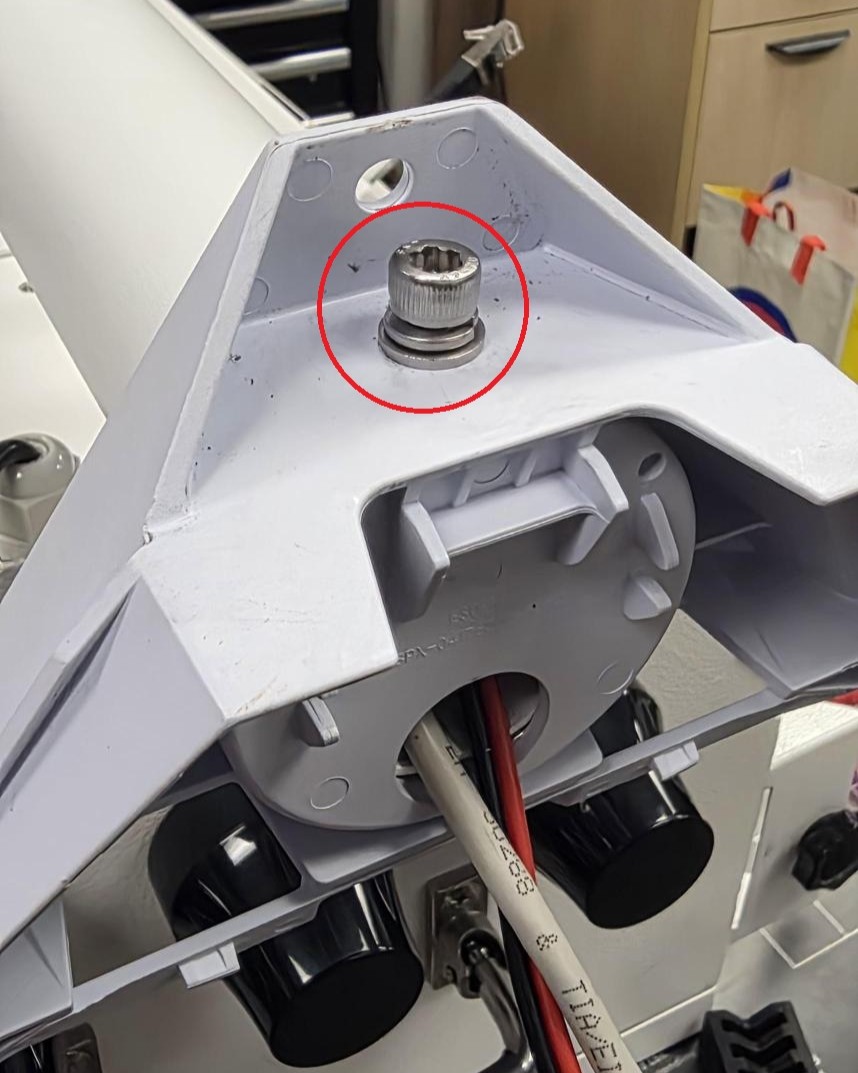
5. Secure the Starlink mounting bracket to the top of the mounting arm using the screw. Ensure the screw passes completely through both holes in the mounting arm and extends through to the opposite side of the mounting bracket. | |||
[[File:LumiGuardian_Starlink_5a.jpeg|512px|link=https://wiki.luminyscorp.com/images/0/09/LumiGuardian_Starlink_5a.jpeg]] | |||
[[File:LumiGuardian_Starlink_5b.jpeg|512px|link=https://wiki.luminyscorp.com/images/c/cc/LumiGuardian_Starlink_5b.jpeg]] | |||
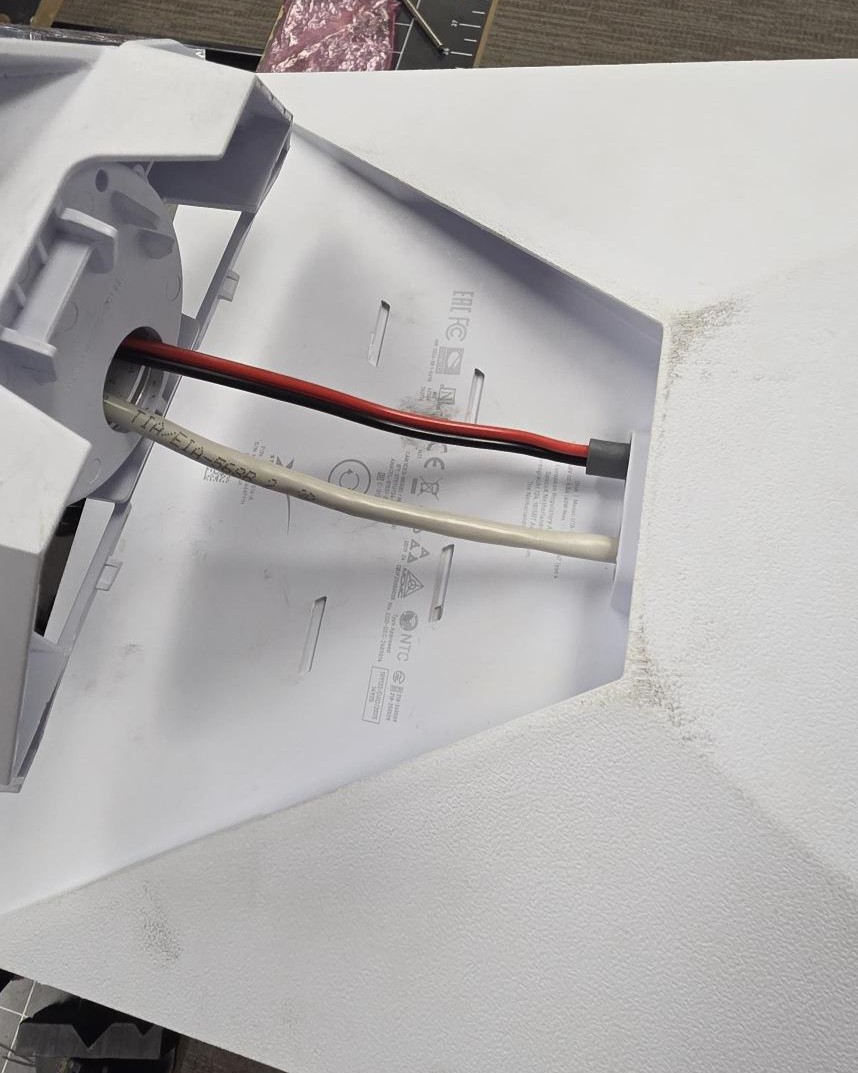
6. Connect the power cable and Ethernet cable to the Starlink unit. | |||
[[File:LumiGuardian_Starlink_6.jpeg|512px|link=https://wiki.luminyscorp.com/images/0/01/LumiGuardian_Starlink_6.jpeg]] | |||
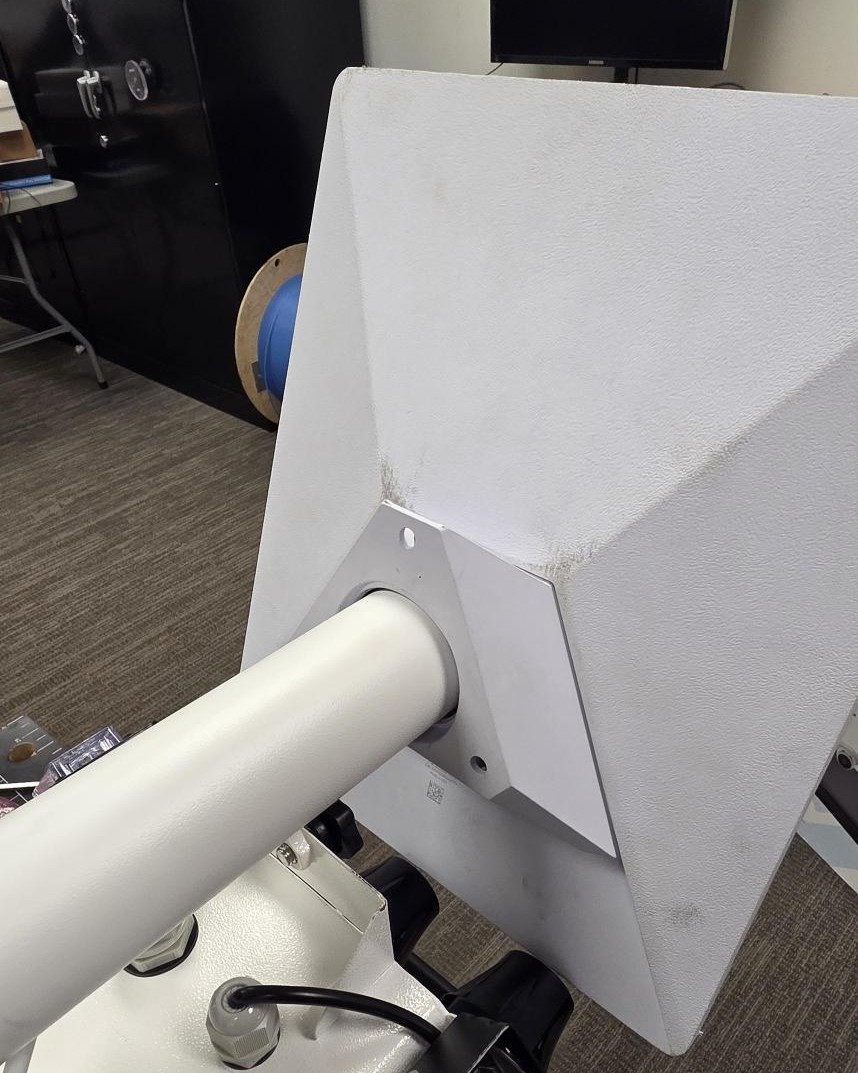
7. Place the Starlink unit onto the mounting bracket until it snaps securely into place. | |||
[[File:LumiGuardian_Starlink_7.jpeg|512px|link=https://wiki.luminyscorp.com/images/a/a9/LumiGuardian_Starlink_7.jpeg]] | |||
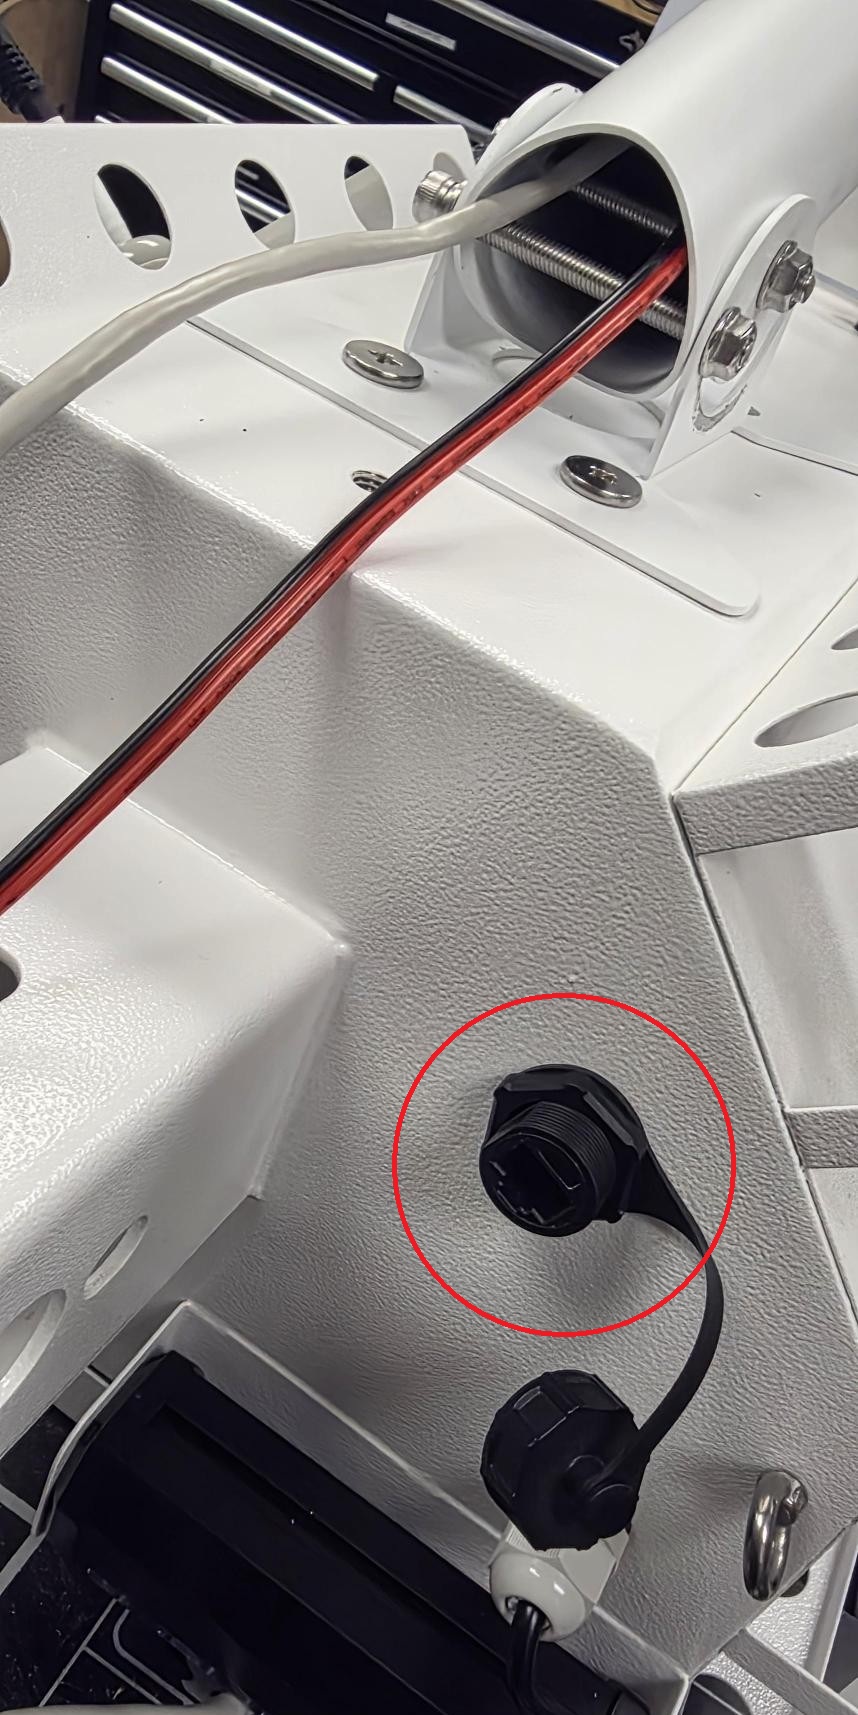
8. At this step, determine the best route for the Ethernet and power cables to enter the control box. For this tutorial, the bottom entry hole will be used as an example. Recommendation for Weatherproof: PG16 Cable Gland | |||
[[File:LumiGuardian_Starlink_8.jpeg|512px|link=https://wiki.luminyscorp.com/images/b/b5/LumiGuardian_Starlink_8.jpeg]] | |||
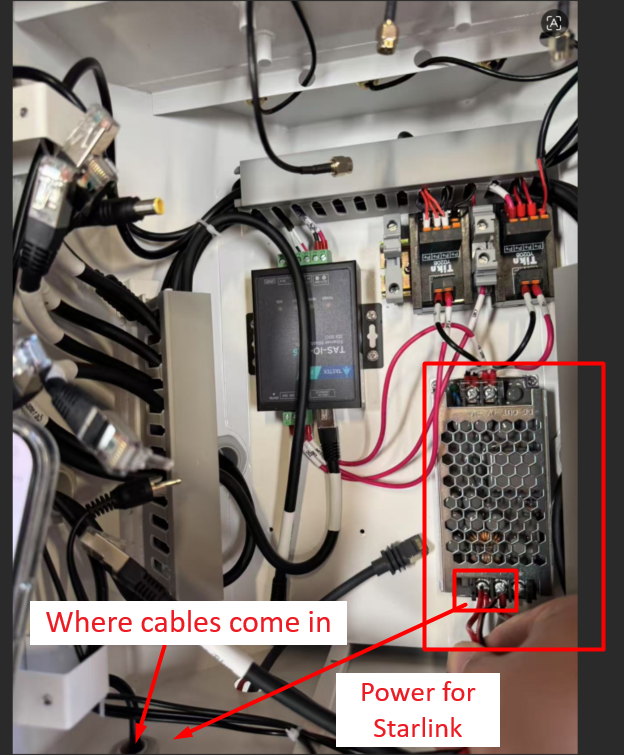
9. Use a voltmeter to identify the correct 48 VDC polarity for the Starlink power connection. | |||
[[File:LumiGuardian_Starlink_9.png|512px|link=https://wiki.luminyscorp.com/images/6/6d/LumiGuardian_Starlink_9.png]] | |||
'''NOTE: If you prefer to bypass the router, connect the Ethernet cable directly to the back of the NVR. Note that this will disable the GPS feature. If you want to retain and utilize the router functionality, proceed to the next step.''' | |||
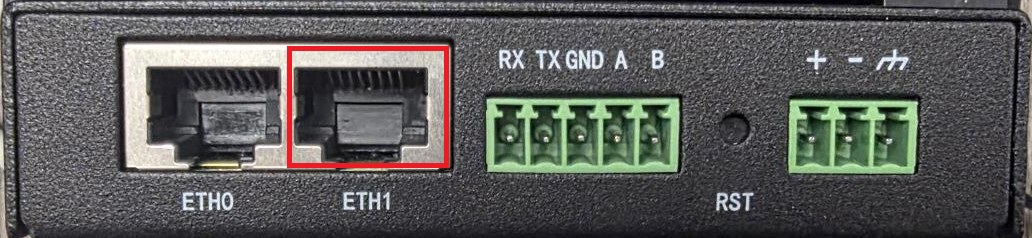
10. Locate the router inside the control box, then connect a computer to the ETH1 port. | |||
[[File:LumiGuardian_Starlink_10.jpeg|512px|link=https://wiki.luminyscorp.com/images/d/db/LumiGuardian_Starlink_10.jpeg]] | |||
11. Access the router using a web browser. The default IP address is '''192.168.1.1''', and the default credentials are admin for both the username and password. | |||
[[File:LumiGuardian_Starlink_11.jpg|512px|link=https://wiki.luminyscorp.com/images/7/79/LumiGuardian_Starlink_11.jpg]] | |||
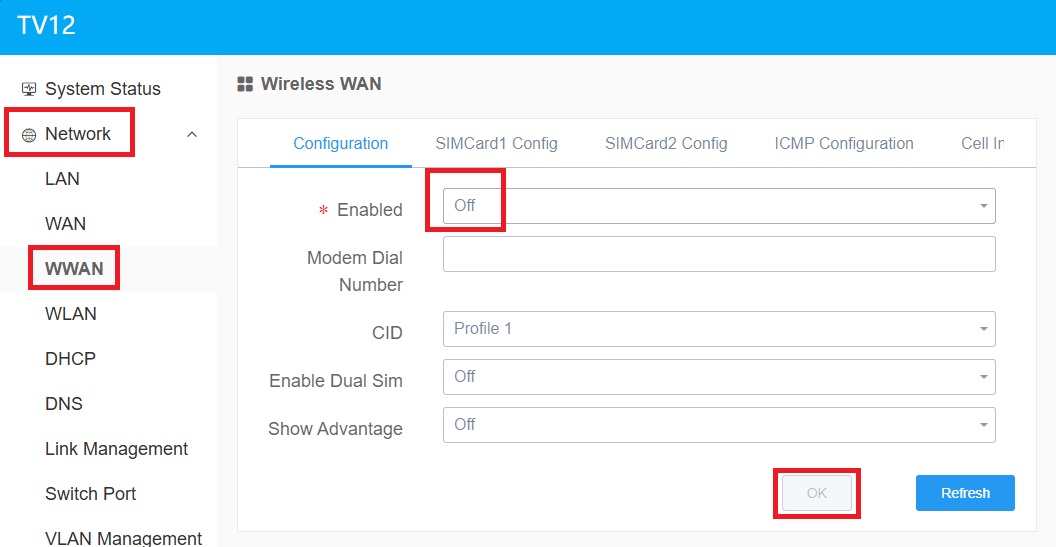
12. On the router web interface, navigate to Network > WWAN and set Enabled to Off. Click OK to save the changes. | |||
[[File:LumiGuardian_Starlink_12.jpg|512px|link=https://wiki.luminyscorp.com/images/3/35/LumiGuardian_Starlink_12.jpg]] | |||
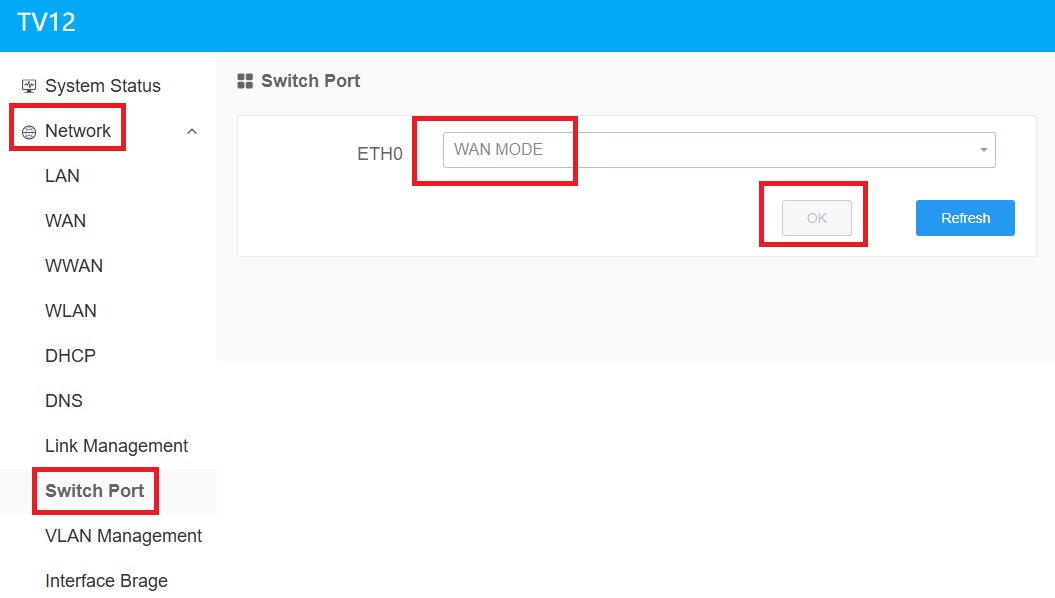
13. On the router web interface, navigate to Network > Switch Port and set ETH0 to WAN MODE. Click OK to save the changes. | |||
[[File:LumiGuardian_Starlink_13.jpg|512px|link=https://wiki.luminyscorp.com/images/3/39/LumiGuardian_Starlink_13.jpg]] | |||
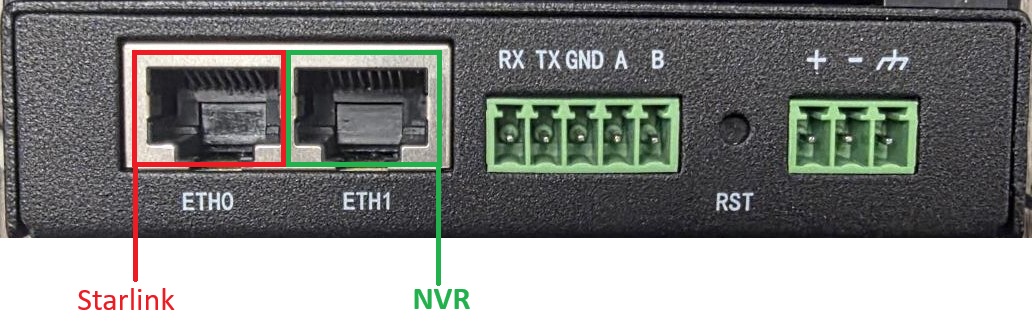
14. Disconnect the computer from the router. Connect the Starlink Ethernet cable to the ETH0 port, and connect the NVR to the ETH1 port. | |||
[[File:LumiGuardian_Starlink_14.jpeg|512px|link=https://wiki.luminyscorp.com/images/d/d3/LumiGuardian_Starlink_14.jpeg]] | |||
Latest revision as of 16:38, 30 October 2026
☰ Navigation Menu ▾

Starlink setup for LumiGuardian
Description
For Internal Use Only: A brief introduction to the idea of using Starlink for LumiWatch deployments.
Prerequisites
- Starlink device
- DC Power Cable with Fuse Holder for Starlink Mini (The cable length is not fixed; adjust the cable as needed.)
- Phillips screw driver
- Voltmeter
Step by step
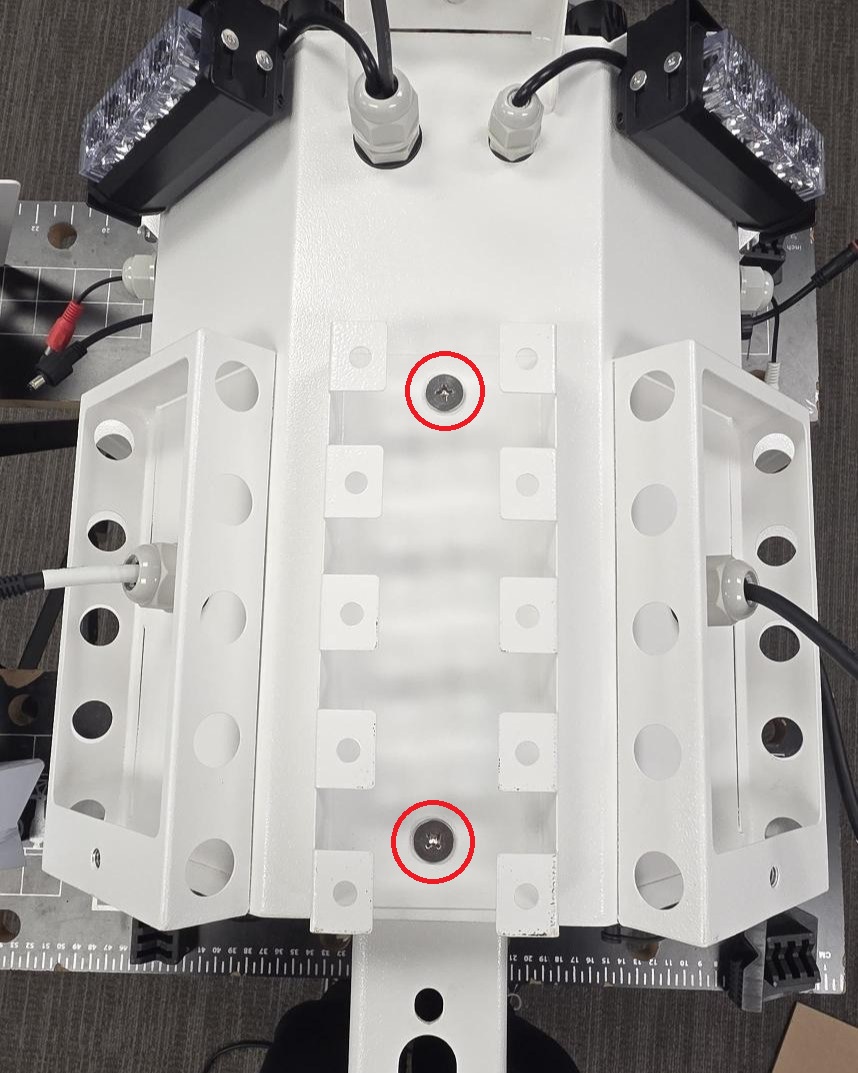
1. Remove the two screws securing the bracket to the control box, then remove the bracket.
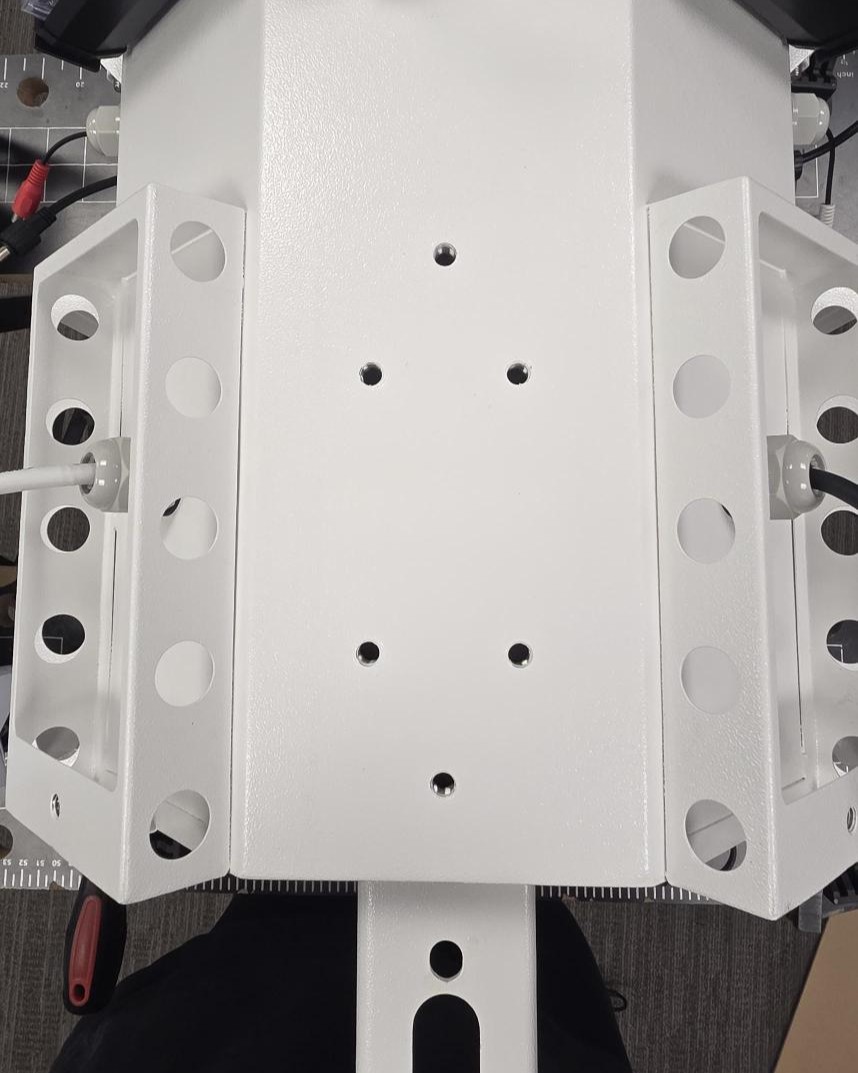
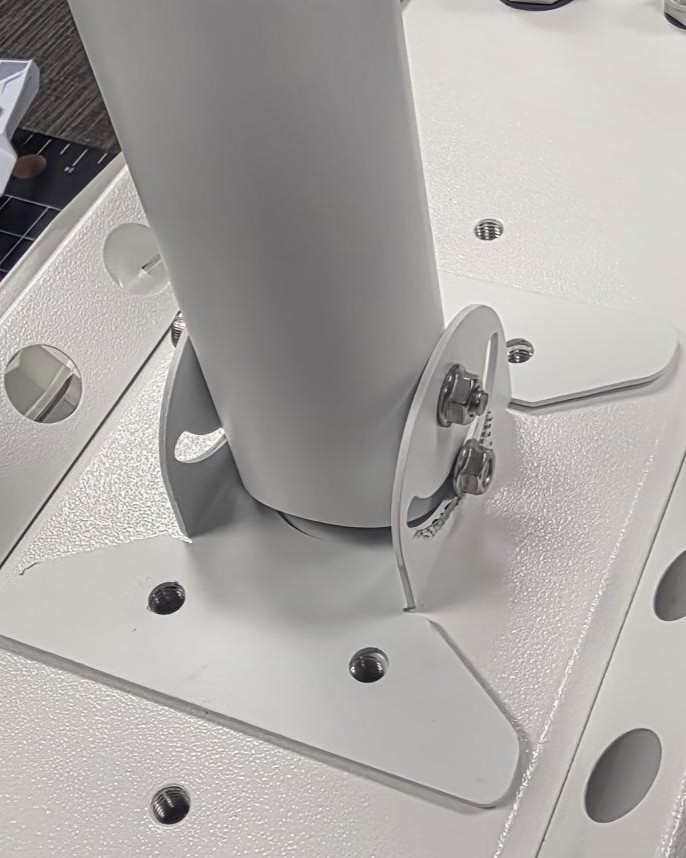
2. Align the four holes on the mounting arm with the four threaded holes exposed after removing the bracket, then secure the mounting arm using the four screws.
3. From the bottom of the mounting arm, feed the power cable (plug end first) and the Ethernet cable through the arm.
4. From the top of the mounting arm, where the cables exit, feed the cables through the opening in the Starlink mounting bracket.
5. Secure the Starlink mounting bracket to the top of the mounting arm using the screw. Ensure the screw passes completely through both holes in the mounting arm and extends through to the opposite side of the mounting bracket.
6. Connect the power cable and Ethernet cable to the Starlink unit.
7. Place the Starlink unit onto the mounting bracket until it snaps securely into place.
8. At this step, determine the best route for the Ethernet and power cables to enter the control box. For this tutorial, the bottom entry hole will be used as an example. Recommendation for Weatherproof: PG16 Cable Gland
9. Use a voltmeter to identify the correct 48 VDC polarity for the Starlink power connection.
NOTE: If you prefer to bypass the router, connect the Ethernet cable directly to the back of the NVR. Note that this will disable the GPS feature. If you want to retain and utilize the router functionality, proceed to the next step.
10. Locate the router inside the control box, then connect a computer to the ETH1 port.
11. Access the router using a web browser. The default IP address is 192.168.1.1, and the default credentials are admin for both the username and password.

12. On the router web interface, navigate to Network > WWAN and set Enabled to Off. Click OK to save the changes.
13. On the router web interface, navigate to Network > Switch Port and set ETH0 to WAN MODE. Click OK to save the changes.
14. Disconnect the computer from the router. Connect the Starlink Ethernet cable to the ETH0 port, and connect the NVR to the ETH1 port.